How to make homemade Sourdough English Muffins using sourdough starter (or sourdough discard) with no yeast. They rise overnight and are cooked on the stovetop in the morning. Tender, delicious, and easier to make than you might think! Vegan-adaptable. Video.
When we question our thoughts, we see that the craziness was never in the world, but in us. ~Byron Katie
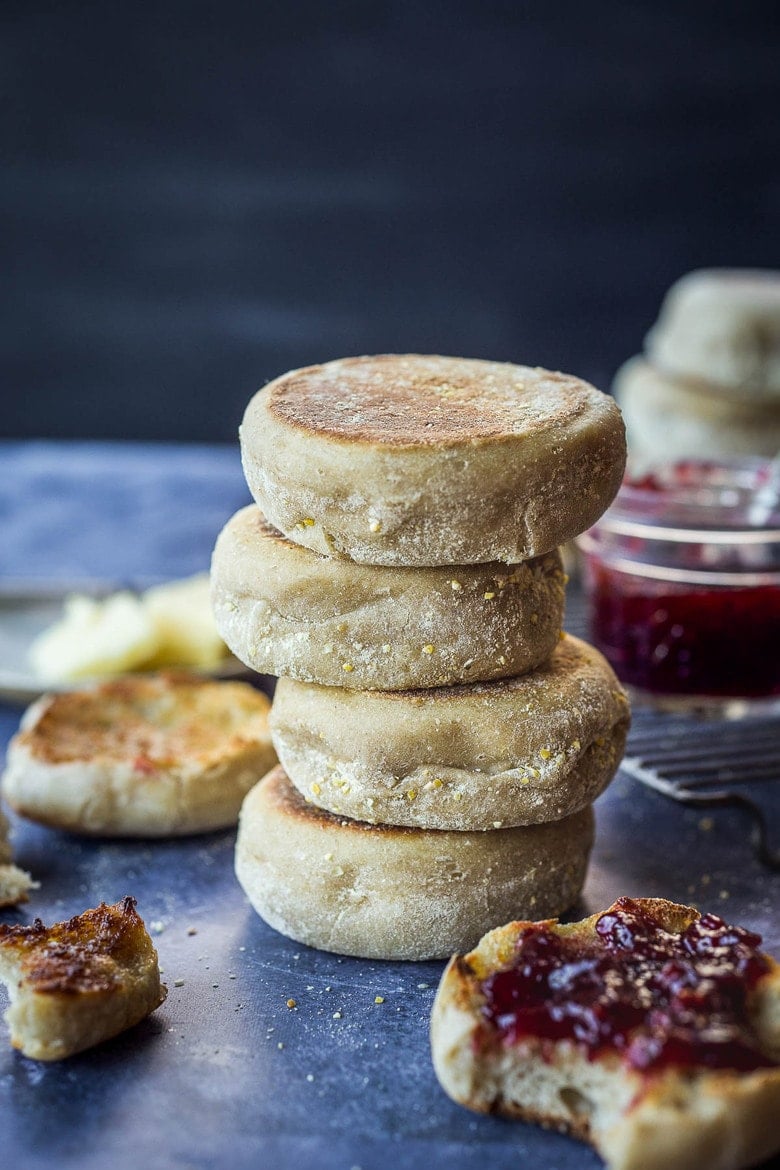
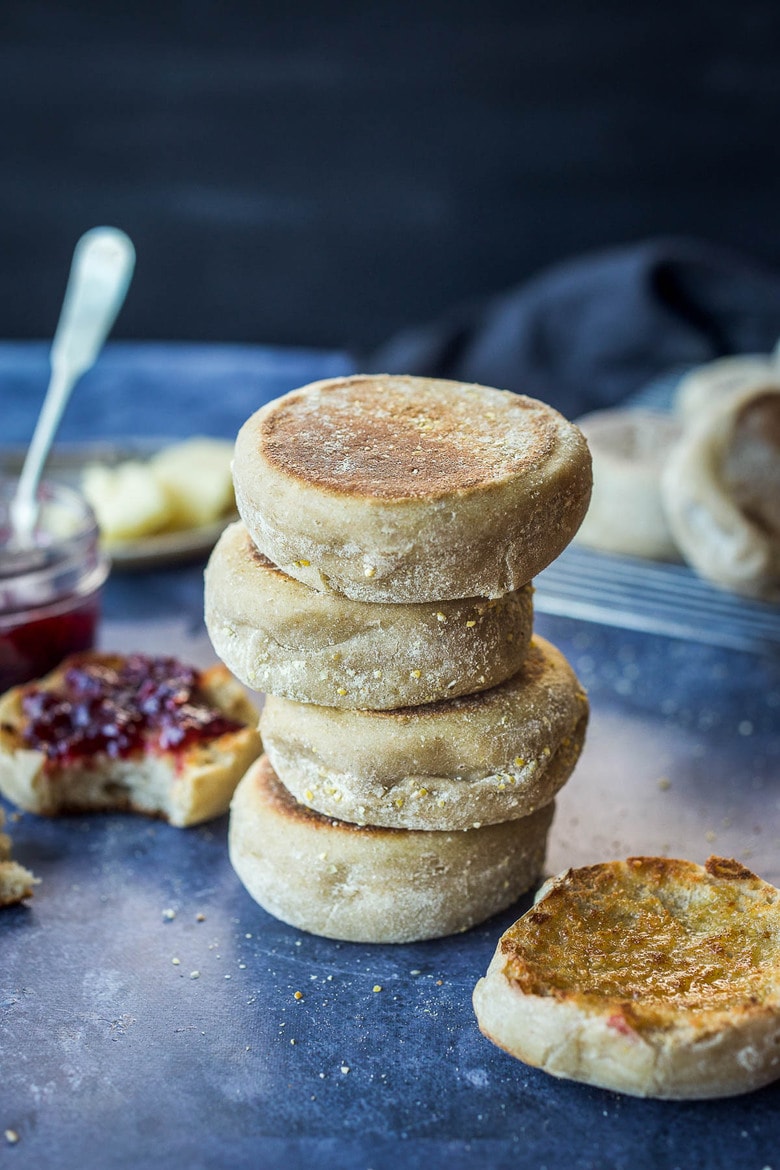
Oh my, these Sourdough English Muffins are so tasty! They are so tender, so flavorful, and so impressive with all the happy little nooks and crannies. Tuck a few batches away in the freezer for company and weekend breakfasts.
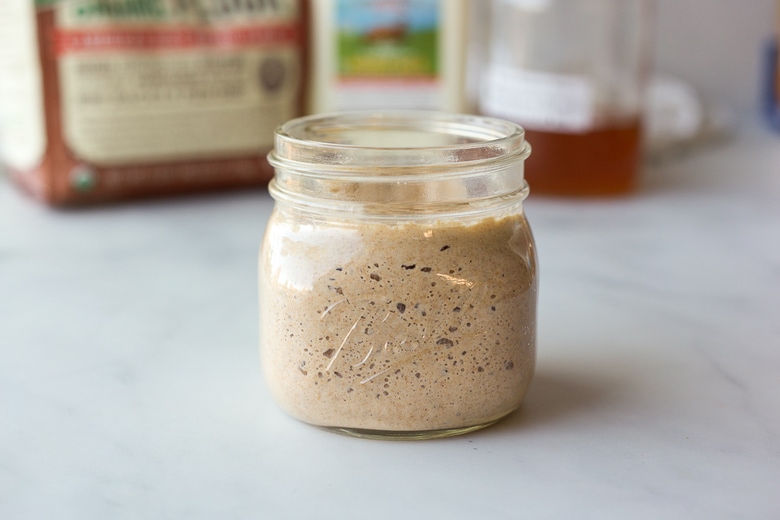
Some planning ahead is required, as the muffin dough requires 1 cup of proofed starter (fed 6-8 hours before use). If you are in the routine of making sourdough bread, this is not too hard a feat.
Simple to whip up in the evening, letting the dough do its lofty magic. In the morning, knead in baking soda, salt, and enough flour to make a soft but not sticky dough. Roll it out, shape, rest, and “bake” the English muffins on a cast-iron skillet or griddle on the stovetop.
With numerous sourdough recipes on the blog, including our sourdough starter (and 500 five-star reviews), I love showing home bakers how versatile sourdough baking can be. These Sourdough English Muffins are one of my favorite ways to use active starter for easy, flavorful breakfasts. As one reader, Stephanie says, "I have made this a couple of times now, and this recipe is perfect! Fluffy and crispy at the same time."
Sourdough English Muffins Video
What you’ll need for Sourdough English Muffins
- Active sourdough starter (fed 6-8 hours before)
- Honey– for that classic sweetness. Or sub other sweetener.
- Milk (whole, plant-based, or yogurt, many options will work)
- All-purpose flour– or use 1/2 whole wheat and 1/2 white
- baking soda
- Sea salt
- Cornmeal – for outer texure.
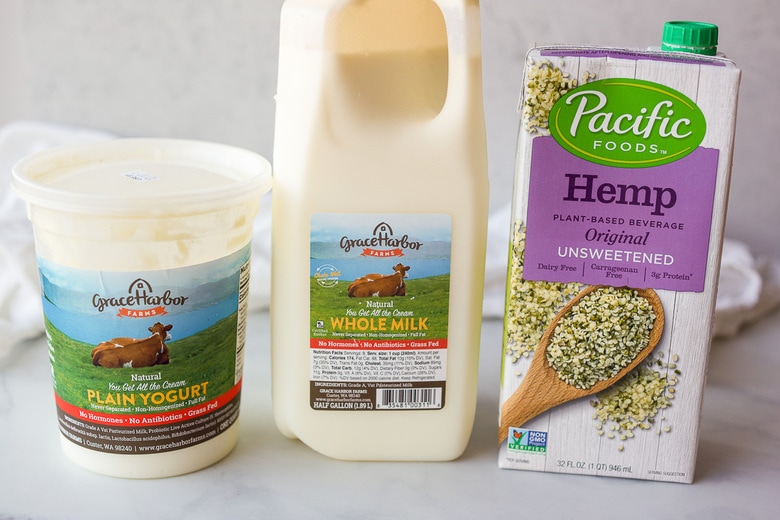
This recipe calls for milk, which will enrich and soften the muffin. I use whatever I have on hand. Sometimes raw milk, sometimes hemp milk, and sometimes yogurt mixed with water. They all turn out just fine!
How to make Sourdough English Muffins
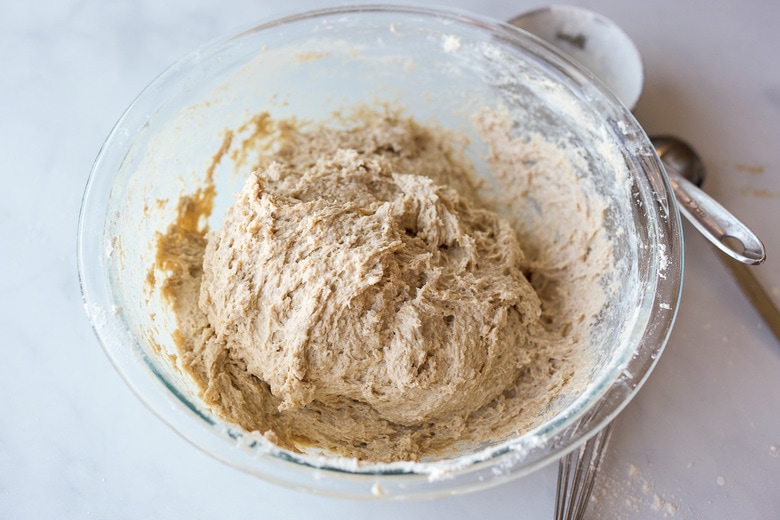
Step 1: In the evening: In a large mixing bowl combine sourdough starter, honey, milk, and flour mix thoroughly.
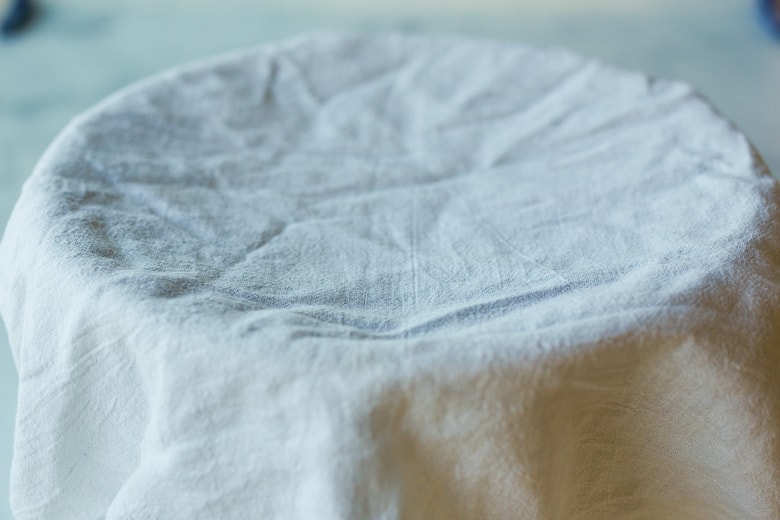
Step 2: Cover and leave at room temperature for 10-14 hours.
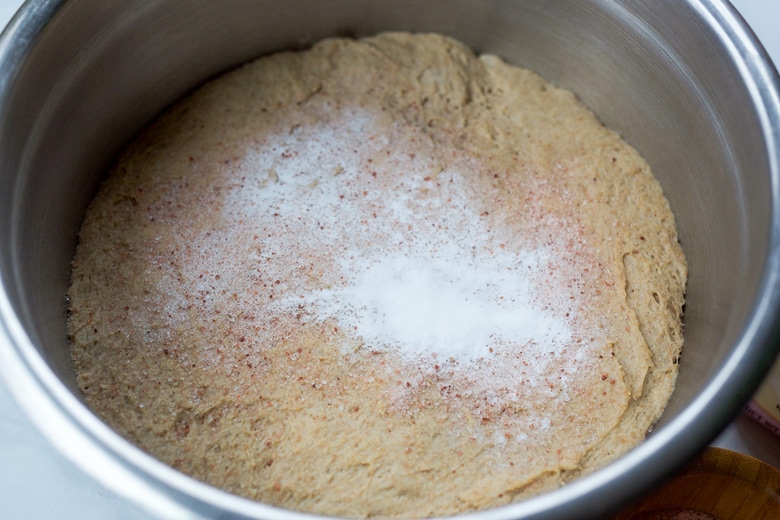
Step 3: In the morning, sprinkle baking soda and salt over the dough.
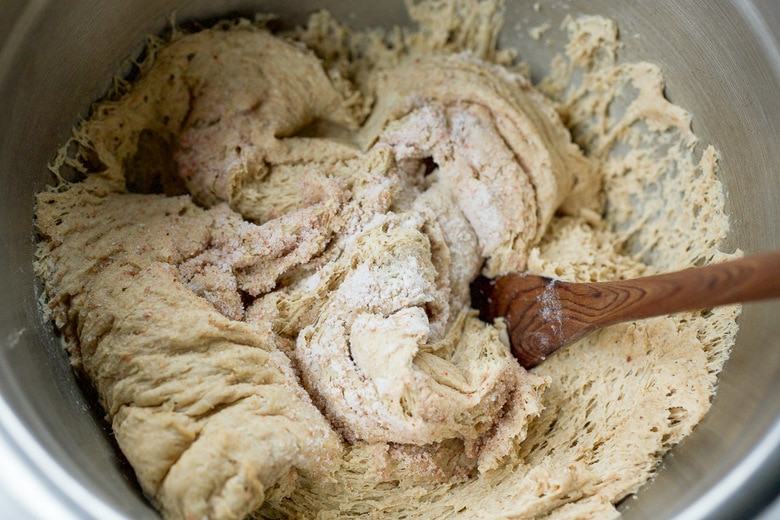
Step 4: Work these into the dough, adding more flour.
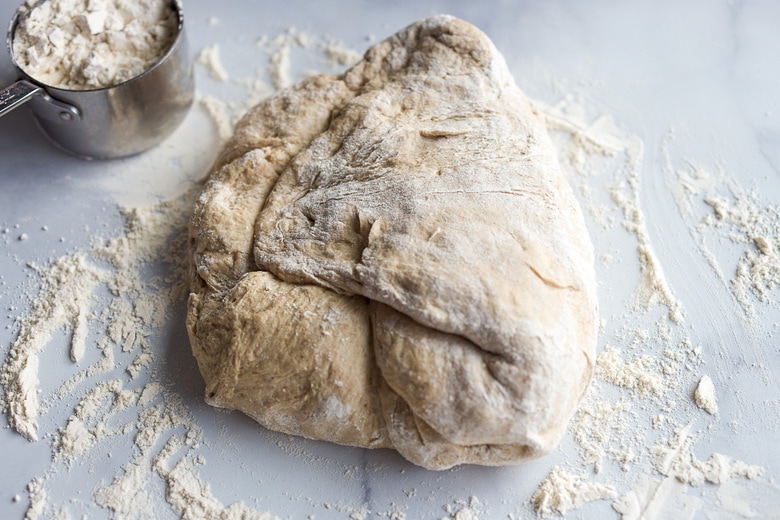
Step 5: Turn out onto a floured surface and knead just enough flour into the dough so that it is smooth and just beyond the sticky point. Form a ball.

Step 6: On a floured surface, roll the dough out to 1/2 inch thick and cut out with a large biscuit cutter (3- 3 1/2 inches).
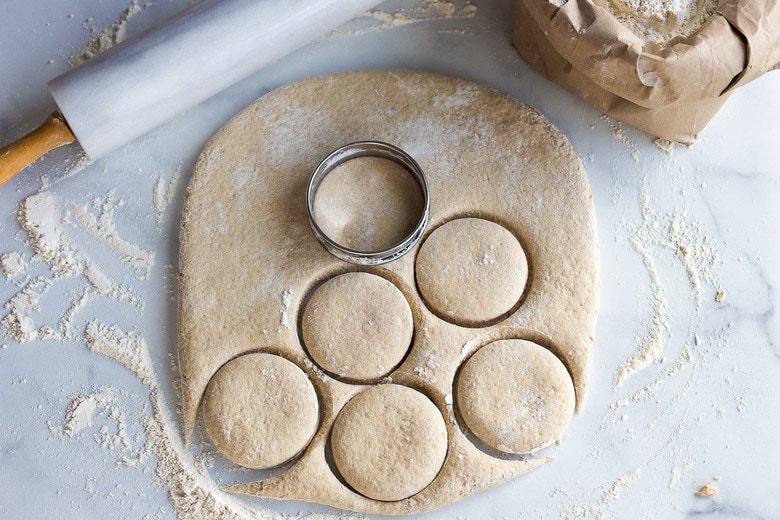
Step 7: Using a metal spatula, place on a baking sheet generously sprinkled with cornmeal to keep them from sticking to the pan. Sprinkle a little more over the top. Not totally necessary, but gives a nice texture and both sides will look more even when cooked.
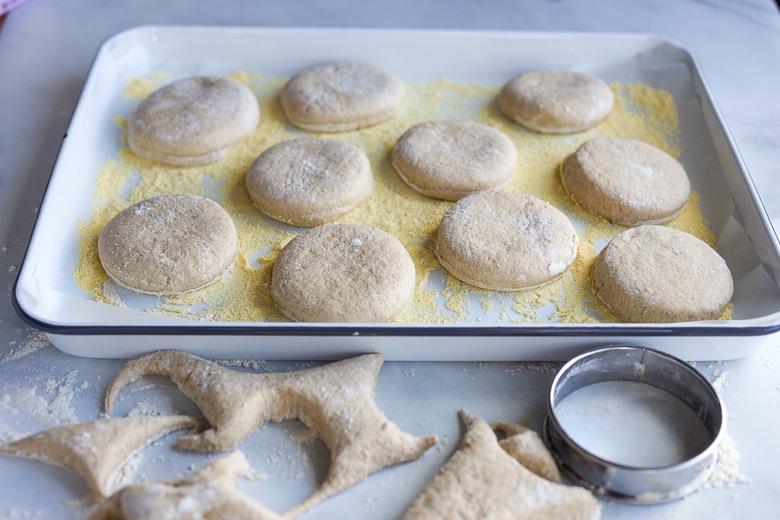
Step 8: Let rest about 1 hour on the counter. Less time if your kitchen is particularly warm, like above 75 degrees.
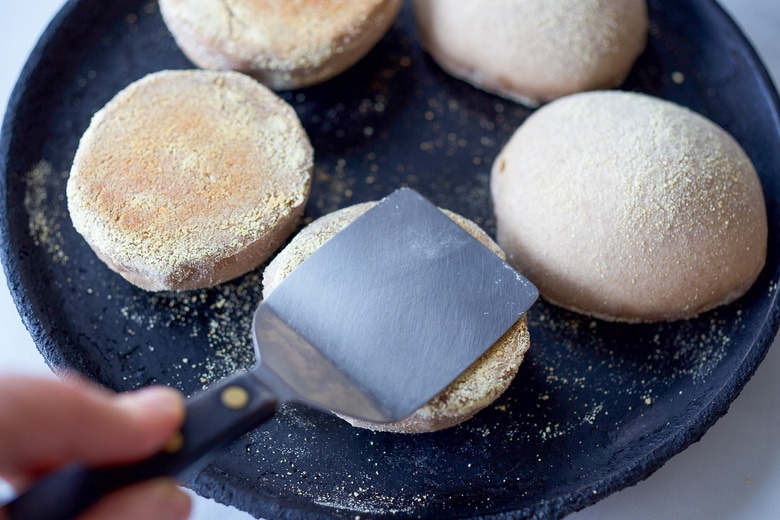
Step 9: Cook. Heat a dry skillet. With a metal spatula, carefully transfer the muffins to the pan, allowing an inch or so between them. Cook 10-15 minutes on each side. When flipping to the second side press down slightly with the metal spatula to get more of the muffin in contact with the heat. This helps keep the muffin flat rather than dome-shaped.
To ensure the muffins are cooked through, their internal temperature should be around 200 F.
Tip: If muffins are getting too brown but not cooked in the center, pop in an oven at 350F for 10 minutes or until done in the middle.

Serving Suggestions
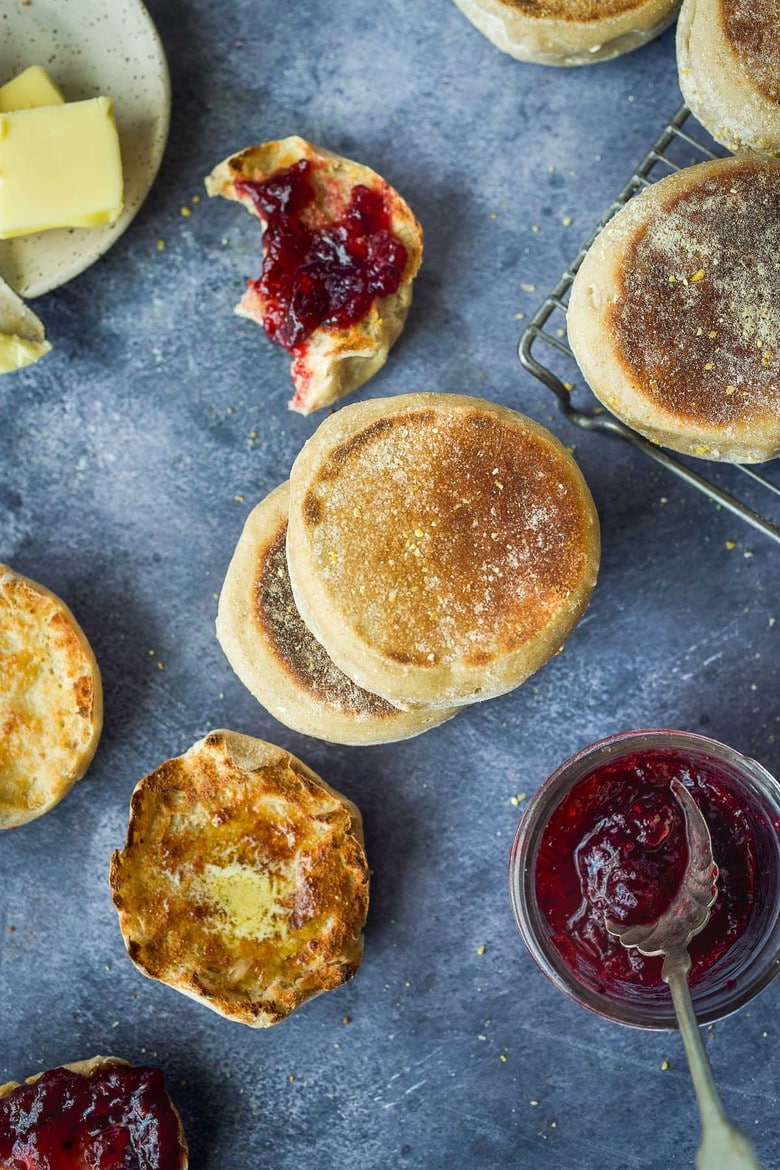
Keep it simple and serve the English Muffins for breakfast, toasted with a pat of butter and jam, honey, pumpkin butter, or maple syrup. Try our rhubarb jam or wild rose petal jam! You can also serve with peanut butter or any other nut butter with sliced banana and apples.
For a creamier topping, try ricotta, cream cheese, or avocado. Our whipped ricotta is especially nice!
Make a savory breakfast sandwich, like our Vegan "Eggs" Benedict! Or for lunch, use English muffins to make sandwiches like Chickpea Salad Sandwich, Caprese Grilled Cheese, or Tempeh Reuben.
Expert Tips
- Use sourdough starter that is fed 6-8 hours before using in the recipe.
- Split with a fork for all those amazing nooks and crannies. (rather than cutting with a knife.) Just stick a fork into the side of the muffin at about 4 points around it, and pull it apart with your fingers.
How to Store Sourdough English Muffins
- On the counter, sealed in an airtight container at room temperature for up to 4 days.
- Refrigerate sealed for up to a week.
- Freeze well sealed for up to 3 months.
Sourdough English Muffins Recipe FAQs
Can this be made Vegan?
Yes! Use non-dairy milk and maple syrup or another sweetener of choice.
Are English muffins traditionally sourdough?
Not necessarily. It depends on how the English muffins are made. They have to be made with sourdough starter to be considered sourdough English muffins.
What equipment is needed to make sourdough muffins?
You'll need a mixing bowl, rolling pin, biscuit cutter, metal spatula, and cast-iron skillet.
What is the history of the English muffin?
The English muffin came to the U.S. from British expat Samuel Bath Thomas in the late 1800s. He worked in a New York City bakery and developed his own version inspired by the crumpets in England. We may call them "English muffins," but they are called "muffins" in England. English muffin roots can be traced all the way back to the 10th century in Wales, where they were made from a yeast-leavened baked cake.
Are Sourdough English Muffins healthy?
Homemade Sourdough English Muffins are made with sourdough starter, which makes them more digestible. They're also healthier than store-bought English muffins because they are made with wholesome, simple ingredients ( organic if possible) and contain no preservatives or additives.
More sourdough recipes you may enjoy
- Simple Sourdough Starter
- Sourdough Crackers
- Quick Sourdough Buns
- Sourdough Scones with Lemony Glaze
- Sourdough Waffles!
- Sourdough Pancakes
- Soft Sourdough Rolls
My family gobbles these up, I hope you enjoy them as much as we do!
Print
Best Sourdough English Muffins Recipe
- Prep Time: 14 hours
- Cook Time: 30 minutes
- Total Time: 14 hours 30 minutes
- Yield: 12-14 muffins 1x
- Category: baked, sourdough recipes
- Method: stovetop
- Cuisine: American
- Diet: Vegetarian
Description
How to make homemade Sourdough English Muffins using sourdough starter (no yeast!). They raise overnight and are cooked on the stovetop in the morning. Tender, delicious and easier to make than you might think! Vegan adaptable. Allow
Ingredients
- 1 cup sourdough starter, (276 grams) fed 6-8 hours before
- 2 tablespoons honey (42 1/3 grams)
- 2 cups milk (1/2 liter) (or nut milk, reconstituted powdered milk, or a mix of yogurt and water)
- 4 cups bread flour (548 grams) (can use 1-2 cups whole wheat flour)
- 1 teaspoon (4 2/3 grams) baking soda
- 1-2 cups (137-250 grams) bread flour or all-purpose flour
- 2 teaspoons sea salt
- 1/4 cup (40 grams) cornmeal
Instructions
the night before
- In a large mixing bowl combine sourdough starter and honey. Mix until fully combined. Add milk, mix thoroughly.
- Add about half of the flour, mix in thoroughly and add the remaining flour. Incorporate until just mixed.
- Cover and leave at room temperature for 10-14 hours.
In the morning
- Sprinkle baking soda and salt (see notes) over the dough and work into the dough. Knead more flour into the dough until it is smooth and just beyond the sticky point. Form a ball.
- On a floured surface, roll the dough out to 1/2 inch thick and cut out with a large biscuit cutter. Combine scraps and roll out and cut more muffins out.
- Place on a baking sheet generously sprinkled with cornmeal to keep from sticking to the pan. Sprinkle a little more over the top. Not totally necessary but gives a nice texture and both sides will look more even when baked.
- Let rest 1 hour. Less time if your kitchen is above 80 degrees.
- Thoroughly heat up a cast iron skillet over med-low heat (or griddle set to 325 F), we are going for even heat so give about 5 minutes to get fully warm (you could also place skillet in a 325F oven).
- With a metal spatula, carefully transfer the muffins to the pan, allowing an inch of space between them. They will expand. Cook 10-15 minutes on each side.
- When flipping to the second side press down slightly with the metal spatula to get more of the muffin in contact with the heat keeping the muffin flat rather than dome-shaped.
- Test internal temperature. You want it around 200F. If not done in the center and muffins are getting too brown, pop in an oven at 350 for 10 minutes or until done in the middle.
- Split with a fork for all those amazing nooks and crannies. (Rather than cutting with a knife.)
Notes
Some have commented that it works to add the salt in the overnight mixture for a better distribution, allowing it to dissolve evenly and prevents salty pockets in the finished muffins, since incorporating salt into the thicker morning batter can be harder.
Wheat flour tastes amazing in these. The more wheat you add the denser the muffin gets. Still delicious just a different texture.
When using wheat flour, add 1-2 cups in the initial mix, the night before. Finish off with the AP flour in the morning.
Storage: On the counter sealed in an airtight container at room temperature up to 5 days. Freeze well sealed for up to 3 months.
Nutrition
- Serving Size: 1 muffin
- Calories: 192
- Sugar: 4.4 g
- Sodium: 438.6 mg
- Fat: 0.5 g
- Saturated Fat: 0.1 g
- Carbohydrates: 40 g
- Fiber: 1.4 g
- Protein: 6 g
- Cholesterol: 0.7 mg


do we cover with wet towel overnight or with a regular sealed lid ?
A lid is best, it doesn’t have to totally seal. I use a silicone lid or a lid from a soup pot on top of the bowl.
I made these three days ago and we’re enjoying them toasted for sandwiches, with almond butter/honey, and with scrambled eggs in the morning. I made them too big at first, not understanding how much they would rise and spread. Next time I’ll use a smaller cutter. Very delicious and easy to freeze extras for later.
Glad you are enjoying Lynne!
I am so excited to find this recipe. My first batch came out great. How would you suggest storing these? I’m looking forward to making them for family and friends.
Store them at room temp for a few days sealed. They freeze well too!
Yes this IS a great recipe, I love it. Used 1/2 bread flour1/2 wheat flour. Easy recipe, and easy to follow. I cover my muffins with lids to keep the heat and moisture in. Also by mistake, I left it out on counter all night. Added soda in morning and this batter loved it. Also 2 cu p s flour and 2t salt. Baking some right now…..so good.
So glad you are enjoying and finding your perfect rendition!
I have now baked this thrice. The second and third times were INSANE. The difference in the bake was I only used One cup of flour the second day.
Nice, glad you got your formula down!
Don’t you love this recipe! This is awesome in my belly!
🙂
This was so fun to make!! I’ve been craving English muffins for a really long time. I love that this yielded 16 muffins for me. I froze 12 lol. They turned out amazingly. I’m so excited to share this with friends and family who visit! Thank you for another great one!
Wonderful! Such a treat to have them in the freezer.
Once you bake them, how long do you think they would last for shelf life? Additionally, could the dough, once risen, be stored frozen until ready or could you freeze them after baking to dethaw later?
I have found the muffins to have the best texture when freezing after completely cooking. I take a few out and let thaw overnight and toast in the morning!
Worked well but they were quite tough I think due to excessive kneading, so how do you mix in salt and bk soda thoroughly in to the dough and lessen kneading time?
Hi Neil, The toughness could be from adding too much flour rather than over kneading or the muffins were possibly over proofed before cooking.
Thanks, will experiment to find right amount of flour. Did proof 1 hour at room temperature. Also maybe did an over-squish on the flip! Still ate them all!
Hi Neil, I would watch them on the rise, if your kitchen is warm they will proof faster.
I made these today for the second time, absolutely fabulous! It’s a learning curve, working with sourdough, and with all these processes and timings………… most of mine were 5 STAR perfect, and a few were a bit more on the dense side (not the ones I mention below, still a few I cooked properly). Not sure what would make this happen, I used a few different cutters for size trials, and some I wrestled with, not cleanly cut, that might be why.
I will say, for anyone thinking cooking in the oven will work………. IT DOES NOT! I ran a test few (because my past attempts lead me to burning most of my hard work), just to see, and I had dense little buns with cornmeal. Follow the directions, cast iron, stovetop! This time, they were just fluffy, pillowy, nook and cranny perfection!!
Your instructions are clear, perfectly explained, I followed it all to a T. I feel like the process all clicked for me. My past tries, my dough was sticky and messy to work with, today, I wasn’t afraid to add more flour till it was not sticky. Perfect! I 1 and 1/2’d the recipe, and it made 28 muffins. I’ll be making these constantly. Thank you for your time and sharing your talent with us!
Thanks for sharing your process Kate! It definitely makes a difference when the muffins are cut out with a sharp edge.
Can’t wait to try this recipe, but I’m wondering how forgiving it is – if I can’t get back to the next stage (morning) within 10-14 hours will it still work?
Yes no problem, it’ll work fine! The longer it sits the more sour the flavor.
Easy to follow recipe..would just warm milk and dissolve honey in that to more evenly distribute. Otherwise perfect airy flavoursome muffins.
Thanks, and great idea Pauline!
Easy to make and great flavor…a little too dense however. What would you recommend to increase the “nooks and crannies”??
Thanks!
What flour are you using Greg? It could be that they need to proof a little longer, after they are shaped, before cooking them. Cutting them with a sharp biscuit cutter helps them raise better (as apposed into shaping balls with your hands). Make sure your starter is well fed 6-8 hours before mixing.
This is the closest I’ve come to finding a proper Englush muffin recipe. The flavor is perfect. The addition of baking soda-essential..however next time I will increase the liquid ingredients because my nooks and crannies were lacking. I’m very hopeful. So many recipes out there are dinner rolls with cornmeal. Thank you!
So happy you enjoyed this Susie!
This is by far the BEST sourdough English muffin recipe! I’ve tried many other recipes and this by far exceeded my expectation! Thank you so much!
Wonderful Susan! Happy to hear these worked for you!
Hi Sylvia,
Help! I didn’t plan my baking day accordingly so I won’t be able bake the English muffins in the morning. Can I rest the dough more about 3-4 hrs in the fridge and then bake afterwards? Thank you!
Hi Dee, It’ll be fine to refrigerate the dough. Just allow for a little more resting time after shaping them, so they can rest at room temperature before cooking. Maybe an hour and a half or two hours?
Can you use regular white flour or is bread flour a must?
All purpose flour should work fine!
They are great! Thanks for the recipe
Thanks Iri, so glad you enjoyed!
Can you just bake these?
I haven’t tried it, but why not! Flip over half way through and make sure internal temperature comes up to 200F. Let us know if you give it a try!
Can you provide the recipe in grams rather than cups? Thanks.
Ok recipe is updated!
Such a great recipie and we make a batch about every other week. One question, I have trouble incorporating the honey as it tends to clump with the cold milk, etc. Any tips?
Glad you are enjoying the muffins! You could try mixing the honey in with the starter first and then add the milk. Or slightly warm milk and then whisk honey in.
I have crystallized honey so I melt it using a pot of boiling water and a little mason jar…the I measure it while it is still warm into my flour then add the milk…it doesn’t seem to clump this way…now to figure out how to keep it from being so dense
Really tasty and easy although time consuming.
Love! They’re easy and delicious.
Awesome Abbie!
In the middle of making a batch – taste testing as I go of course. Brilliant. Taste like the home bakery we bought ours from when I was wee. This is a keeper. Thank you.
Amazing Jay! I love that it takes you back. Thanks for sharing that.
Hey, Sylvia~ Big fan and love your recipes. 🙂 I hate to even ask, knowing it’s complicated, but what are your thoughts on making this GF-friendly? 🙂
Hi Virginia, We haven’t played around with making it gluten free. I’m thinking that would be a whole different process and recipe. 🙂
Have you tried these with whole wheat flour?
yes, I like using 1/2 wheat and 1/2 white.