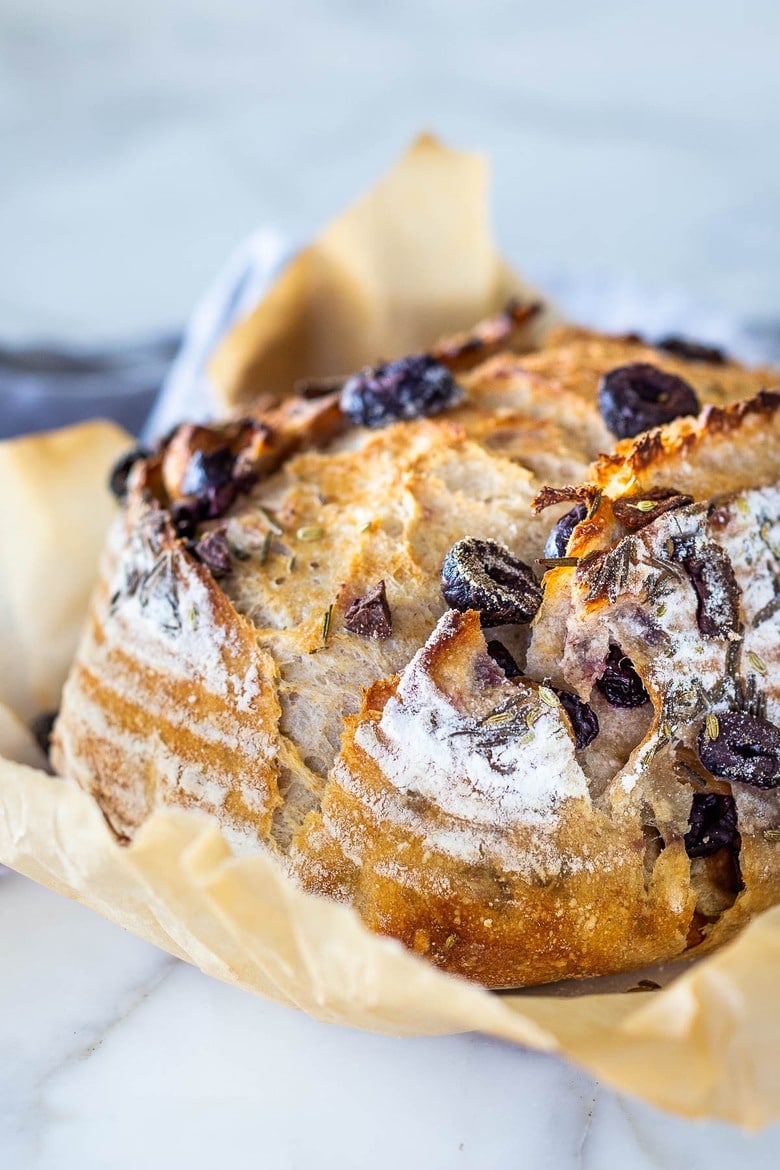
How to make Rosemary Olive Sourdough Bread with whole roasted garlic that requires no kneading and rises overnight. Video.

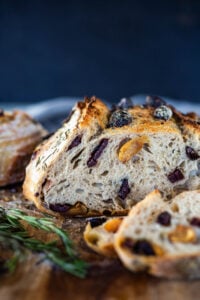
Many of you have been asking how to incorporate other ingredients into your sourdough bread recipe, so I just wanted to share one variation we’ve been making at home- Rosemary Olive Sourdough Bread with roasted garlic cloves.
This is my husband’s “dream loaf” and so it is one that is on repeat around here.
Before I start, I want to stress that this recipe is for those who have mastered our Easy Sourdough Bread Recipe. So start there first and then come back here. OK? 😉 It is very similar to that process, up until after the long overnight rise. Then we changed it up a bit.
What you’ll need:
- Sourdough Starter -make sure your starter is active and bubbly and doubles within 6 hours of feeding!
- Bread flour
- Salt
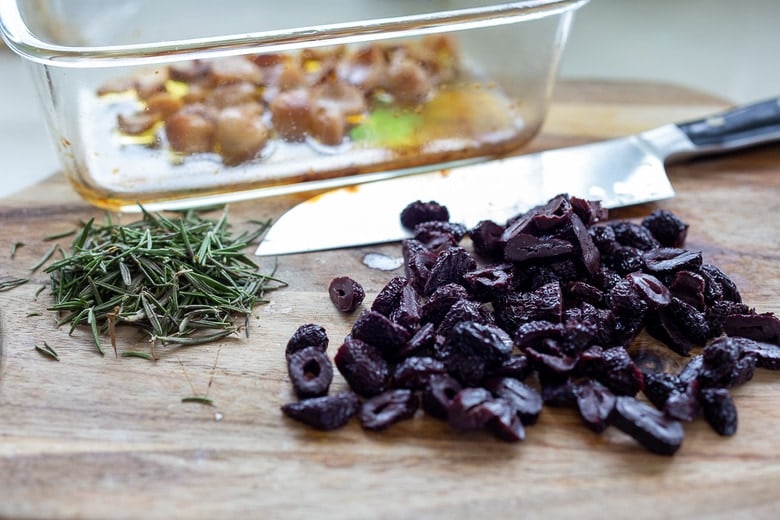
- Kalamata Olives
- Rosemary
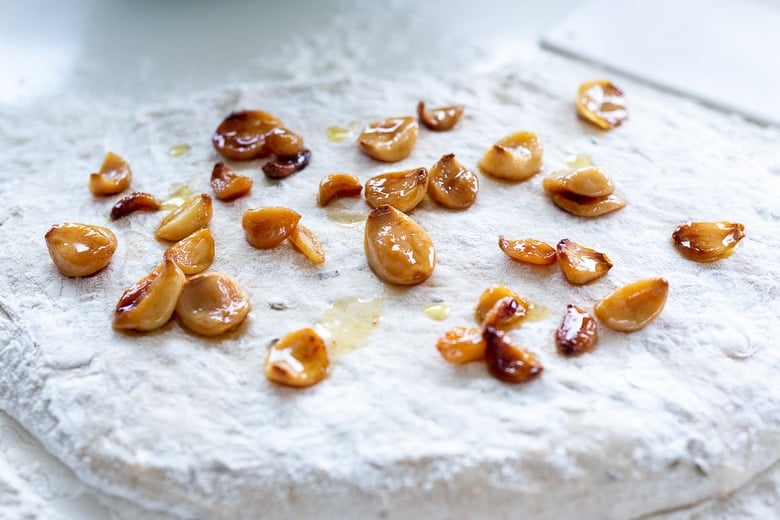
- Roasted Garlic
- A Dutch Oven- Here are the 3 Best Dutch Ovens for Bread Baking
How to make Rosemary Olive Sourdough Bread (instructions)
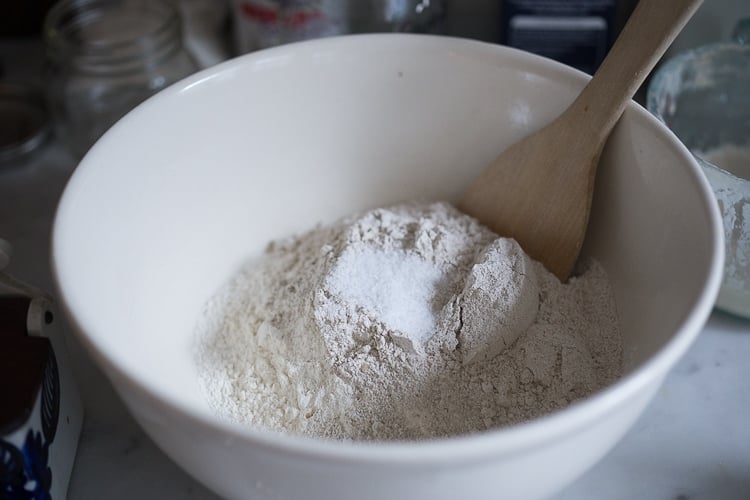
Step 1. Mix the flour and salt in a bowl. (See the recipe card for detailed measurements.)
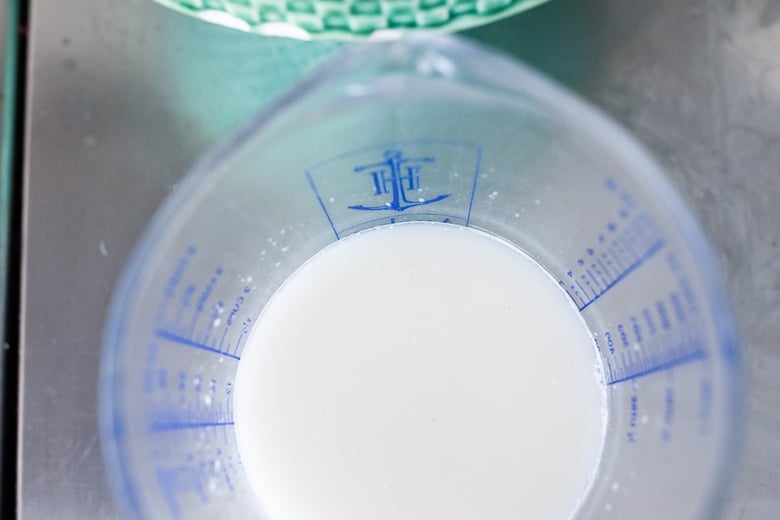
Step 2. Mix the water and starter in another container.
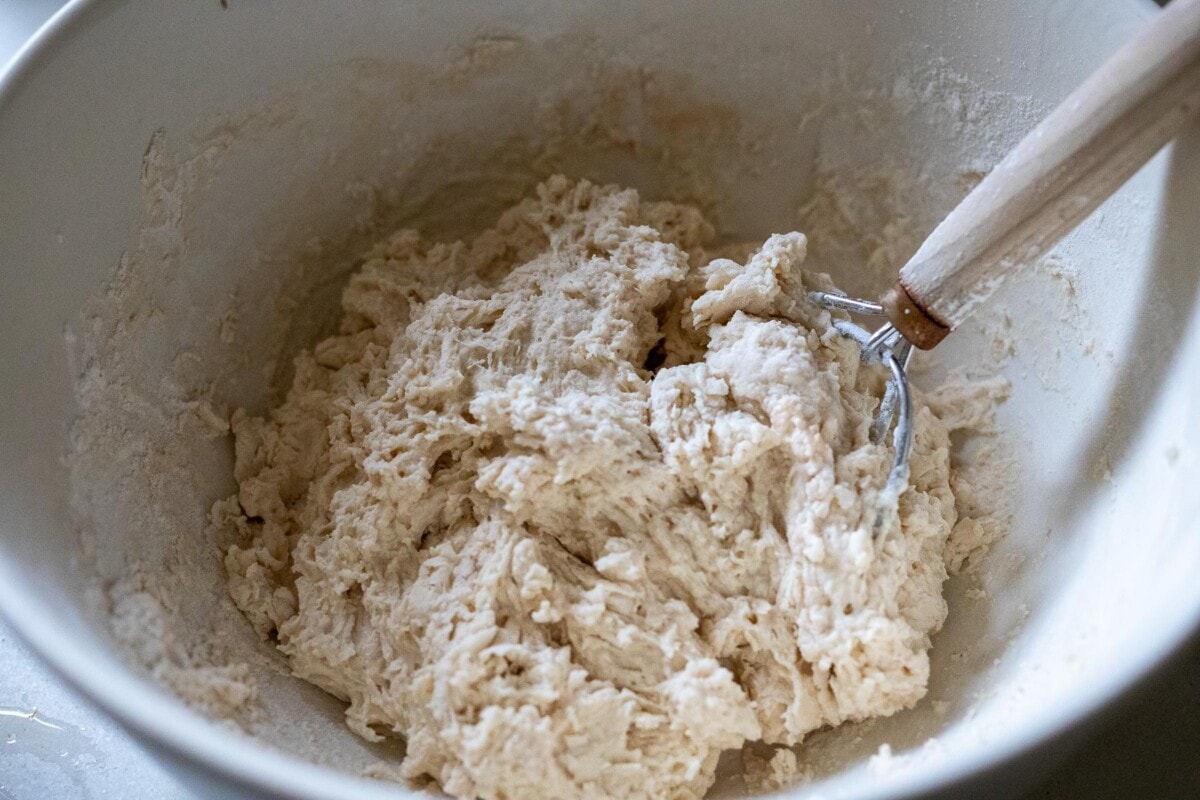
Step 3: Pour the water/starter mixture into the flour bowl and mix to incorporate, until all the flour is combined. If your mixture is very dry, it is OK to add a little bit of water so all th flour is incorporated. Cover the bowl with a damp kitchen towel.
Step 4. Wait 15 minutes and then do two sets of “stretch and folds”, 15 minutes apart. You already know how to do this, but here is a refresher.
Sourdough bread “Stretch and Fold” Technique: | 45-sec Video
Step 5. Cover with a damp towel and let the dough rise overnight on the counter.
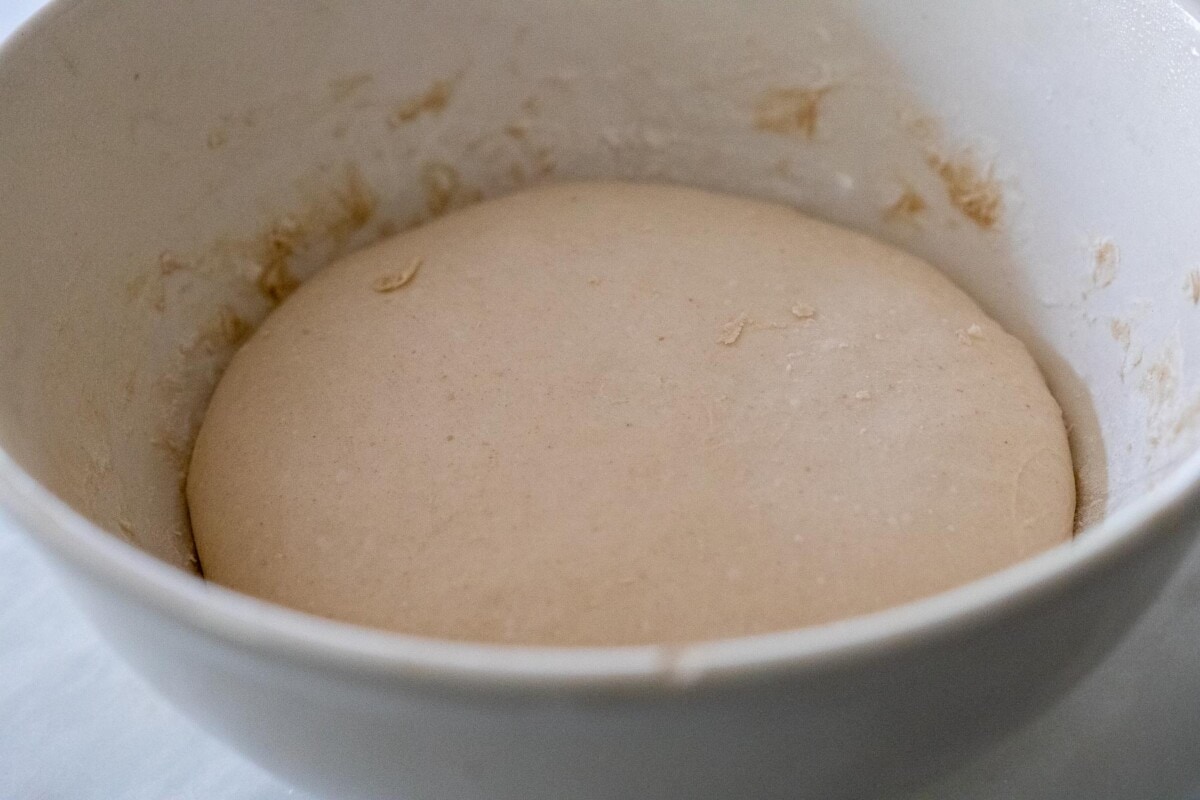
In the morning, the dough will have swollen, and jiggle like a full belly.
Step 6. When you think the dough has risen sufficiently, scrape the sides with a dough scraper (or wet fingers) and gently pour onto a well-floured surface. Gently pat into a rectangle, roungly 9 x 13.
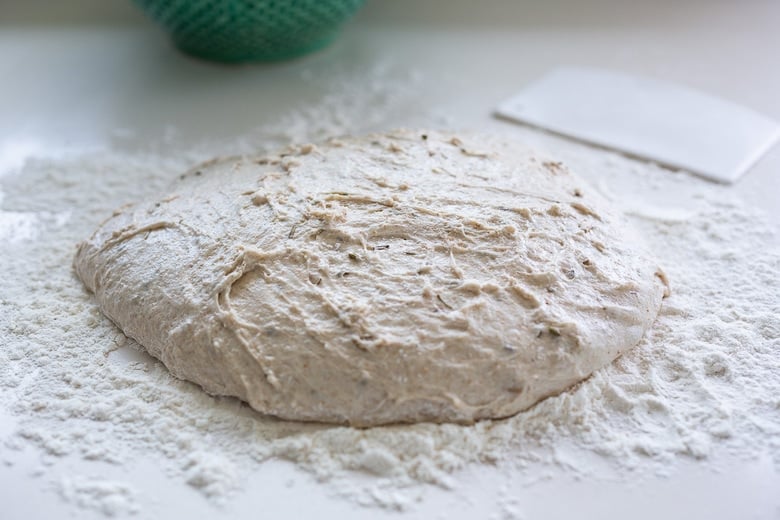
Step 7. Sprinkle in the ingredients you want to add. Here I’m using kalamata olives, roasted garlic and rosemary.
The roasted garlic adds so much flavor!
I really love this combo!
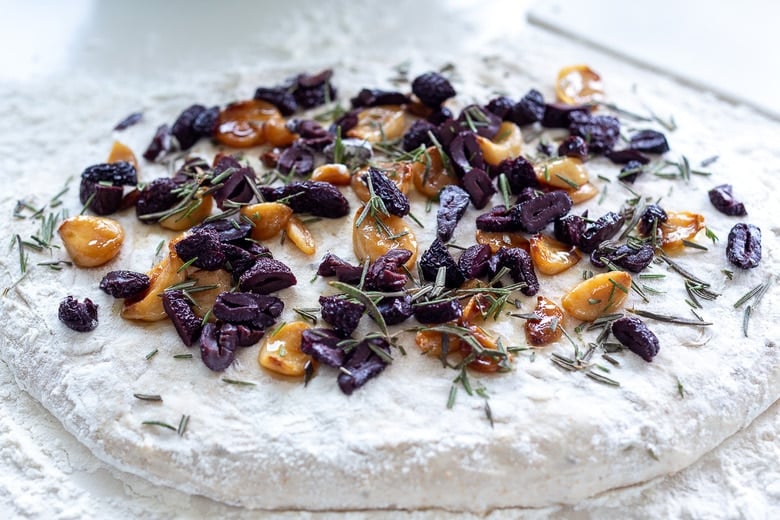
Step 8. Using a dough scraper lift one side up and over like a trifold letter. You can also simply roll up the loaf into a log if that feels easier.
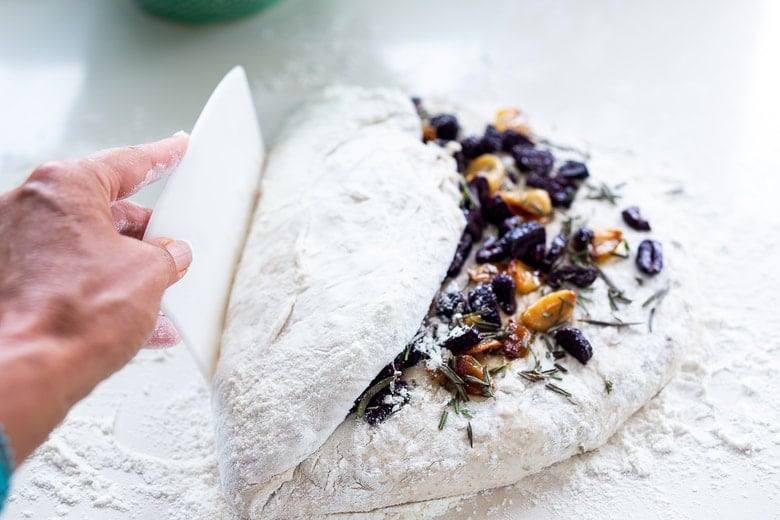
Tip: If doing the trifold, lift the other side, being mindful to overlap, so the dough is in between the filling, so the filling gets spread out in the final baked bread. Let this rest 15 minutes.
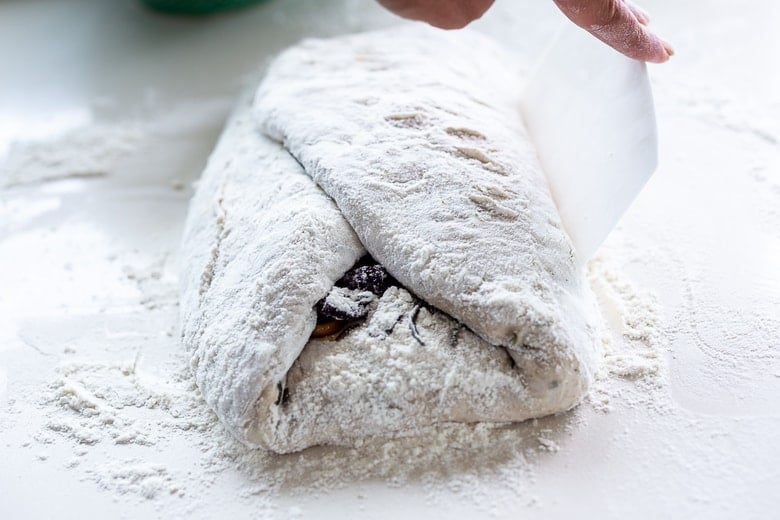
Step 9: Then repeat, turning the dough horizontally, gently flattening it out again, just a little, and tri-folding it once more, in the opposite direction. (Alternatively if you have rolled the dough into a log, turn it seam side down and fold under the ends to match the size of the banneton.)
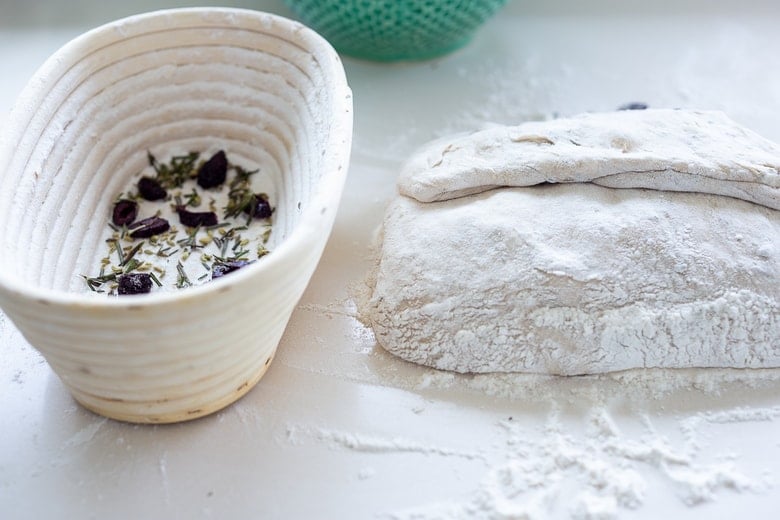
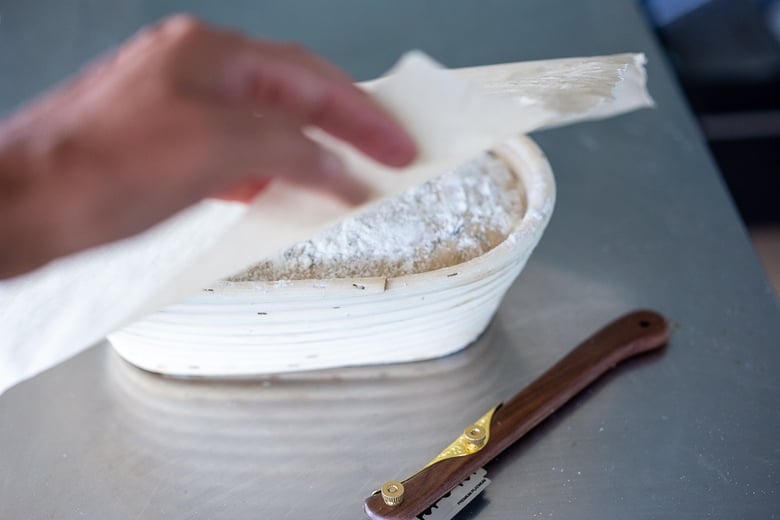
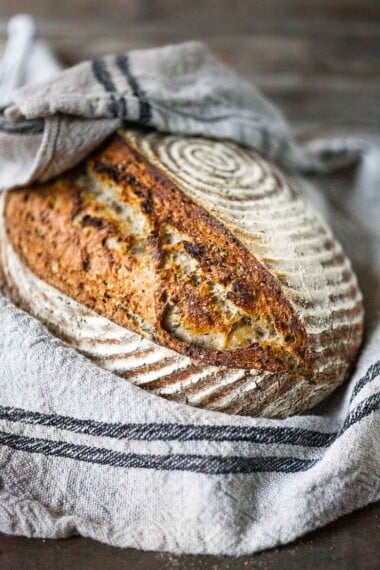
Step 10: Lift it into a well-floured banneton ( rice flour is best). You can sprinkle the banneton with more olives and herbs to decorate the top of the loaf. Be sure it is seam side up, pinching any seams closed. If you don’t have a banneton, use a parchment-lined bowl sprayed with a little olive oil.
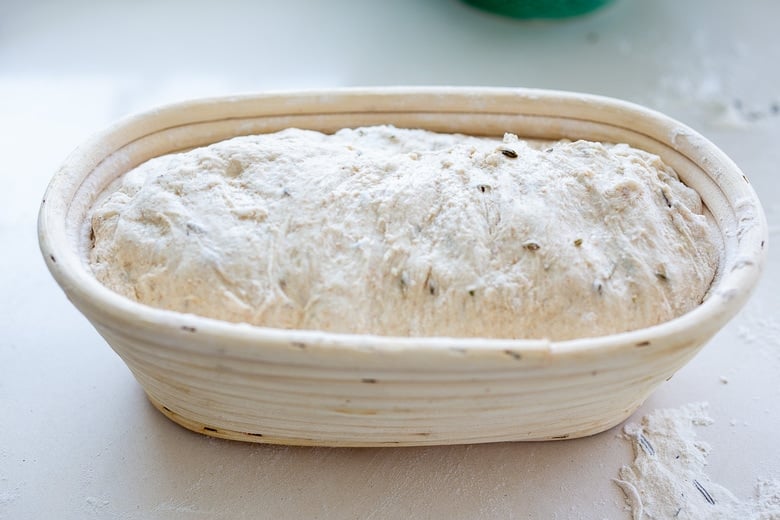
Step 11. Refrigerate for one hour while you preheat the oven with your lidded Dutch oven inside.
Step 12: When ready to bake, here is an easy way to get the dough into the dutch oven. Cover the dough with parchment and flip it onto the counter.
Alternatively, if you are an experienced baker, feel free to flip the sourdough directly into the dutch oven, you actually don’t “need” the parchment, we only use it here to make the dough easier to center.

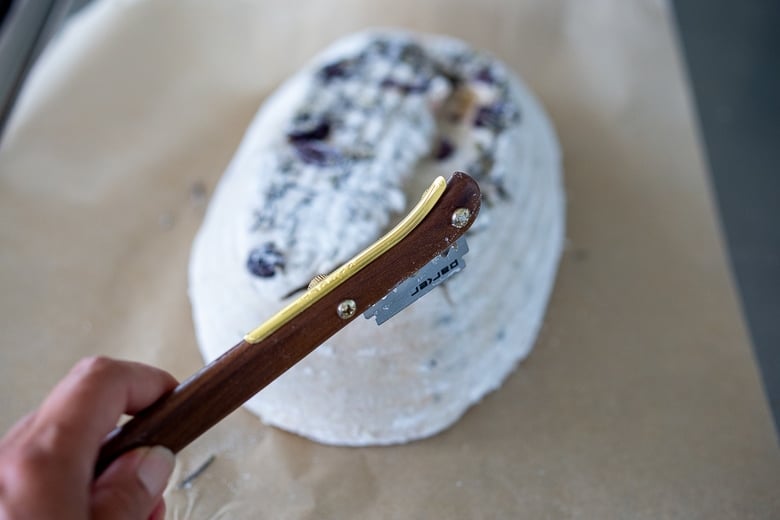
Step 13: Score using a razor or lame, then lift the dough and parchment into the dutch oven and bake!
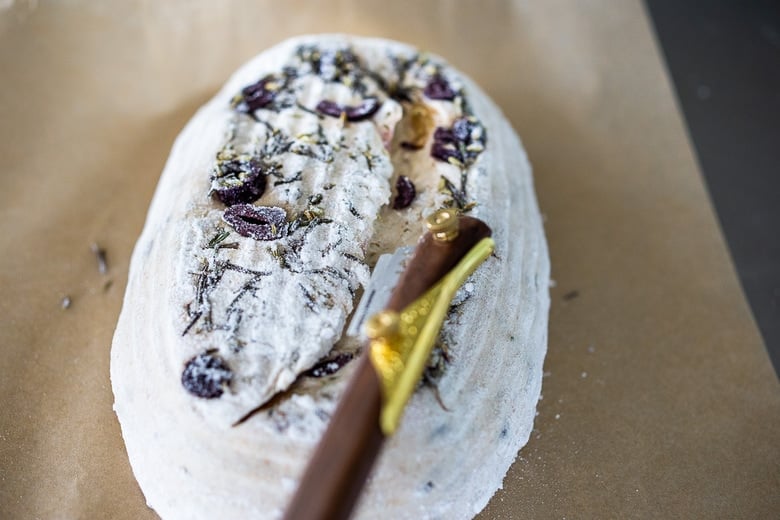
Here I’m using a lame to score the bread. It makes it very easy. If you’ve been baking a while, and plan on doing it more. Now is the time to treat yourself to a lame. It makes scoring fun! Also, consider getting a Banneton.
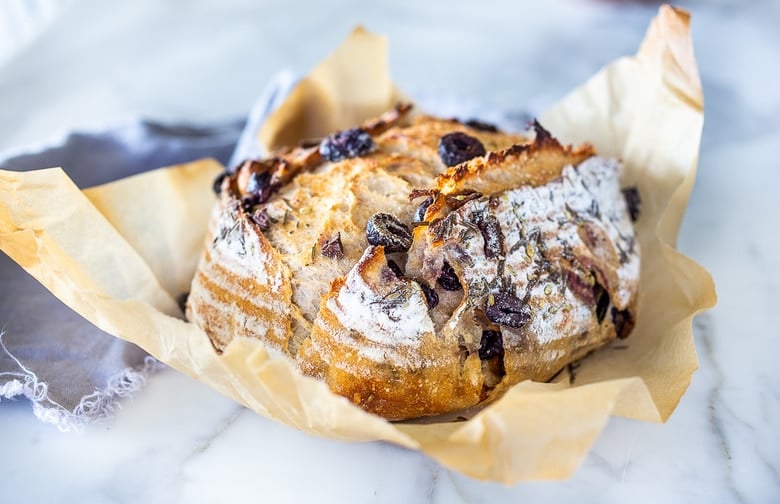
Step 14: Bake the bread in a 500F oven, covered, for 20 minutes, remove the lid and check the bread temp -internal bread temp should be around 200F.
Lower heat the heat to 450F and continue baking uncovered 5-10 more minutes until deeply golden and internal temp reaches 204-208F.
***If when you remove the lid, and the dough is has not yet reached 200F, replace the lid for a few more minutes, to let it get up to 200F before uncovering.
Serving suggestion
Let the bread rest 1 hour before cutting into it. Enjoy! I love this bread toasted, and served with good olive oil and balsamic for dipping.
Storage
Wrap in a kitchen towel or paper bag, or use a large zip lock. Store on the counter for 4-5 days, or in the fridge for 10 days. Or slice and freeze.
More Favorite Bread Recipes

- Vegan Banana Bread
- Overnight Sourdough Waffles
- Sourdough Pancakes
- Sourdough Scones
- Sourdough Biscuits
- Sourdough Buns
- Sourdough croutons
- The 3 Best Dutch Ovens for Bread Baking
- Homemade Pie Crust Recipe
Explore all of our Sourdough Recipes!
On the homefront: The leaves begin their gradual turning and the sun sinks down a little lower in the horizon, creating the beautiful light I’ve come to love about the Northwest in the fall.
This week has been all about cozy slippers, making soup and baking bread. Truthfully, I’ve had some failures in the bread department. I won’t go into the nitty-gritty, but I am reminded that even if you’ve made bread hundreds of times, you still must pay attention.
Like life, there are endless possibilities for learning and the moment we think we’ve mastered it, life comes along and shows us otherwise. Ha!
Perhaps being human means that each day I have the opportunity to learn. And forgiving myself when I fail.
Have a beautiful fall weekend and happy baking.
xoxo
Be sure to show me your sourdough bread creations! I’m sure you’ll come up with lots of variations and I can t wait to see them! Show me on Instagram tagging #feastingathome.
Watch How to make Rosemary Sourdough bread!
Rosemary Olive Sourdough Bread
- Prep Time: 25 mins
- Cook Time: 40 mins
- Total Time: 1 hour 5 minutes
- Yield: 1 loaf 1x
- Category: bread, sourdough recipes
- Method: Baked
- Cuisine: Northwest
- Diet: Vegan
Description
How to make Crusty Sourdough Bread, infused with rosemary, roasted garlic and olives that requires no kneading and rises overnight. Made with sourdough starter instead of yeast! Allow 10-14 hours rising time!
Ingredients
Basic Overnight Sourdough Bread
- 4 cups organic white bread flour (520 grams) see notes
- 2 teaspoons sea salt (12 grams)
- 1/3 cup sourdough starter (use after it has peaked) 90 grams
- 1 7/8 cup water (385 grams)
—–
- 3/4 cup chopped kalamata olives
- 2–3 tablespoons fresh rosemary, chopped
- 1/2 cup roasted whole garlic cloves (optional but good)
- rice flour for dusting (or sub regular flour)
Instructions
- Read through and perfect the No-Knead Sourdough Recipe (watch the video there) I recommend not attempting this until you have mastered that recipe. 🙂
- Mix the dough: At night, in a large bowl, mix flour and salt together. In a small bowl, mix starter and water together using a fork. Pour the starter-water into the flour mixture and stir with a fork until relatively combined. Using a wooden spoon, or dough mixer, scrape sides and mix dough for one minute, incorporating all the flour. The dough will feel thick and heavy and shaggy. Just do your best to incorporate all the flour. If for some reason the dough will not incorporate all the flour, add a tablespoon of water at a time to get it incorporated. Cover with a damp kitchen cloth, wait 15 minutes and do 2 sets of stretch and folds, 15 minutes apart. See video.
- RISE: Let rise overnight on the counter 10-14 hours. 65F-70F is ideal. In the morning, the dough should have swelled, but not quite doubled. Do the poke test.
- Prepare your banneton dusting the banneton with rice flour and perhaps some olives and rosemary in the bottom ( which will end up being the top.) See notes for using a regular bowl.
- SHAPE: Using a wet dough scraper, or wet fingers, loosen the dough around the edges and pour it onto a well-floured surface. Treat the dough gently, flattening lightly with your fingertips into a rough rectangle about 1 1/2 inches thick. It need not be perfect. Sprinkle the olives, rosemary and garlic over the surface. Using the dough scraper, lift up one side, stretching just a bit up and over to the middle, then fold up the other side, like a tri-fold envelope. You want the dough to be inbetween the filling so all the filling is not in one area. (See notes) Turn the dough horizontally. Let the dough rest for 10 minutes. Then repeat. Gently flatten with fingertips (it needn’t be as flat as the first time), then do another tri-fold. Pinch the seams closed and lift into the prepared banneton, seam side up.
- REST & PREHEAT Place dough in the fridge uncovered for 1 hour, while you preheat the oven to 500F (or 475F) with your lidded dutch oven inside.
- SCORE: Pull the dough from the fridge and have your lame (or sharp knife or razor blade) ready to score. Place a piece of parchment over the banneton and flip the dough, setting down on the counter over the parchment. Score 3/4 -1 inch deep at a 45-degree angle- basically wherever you want the dough to puff up. One slash is fine, or create a design.
- Pull the Dutch oven oven from the oven and close the oven door. Remove the lid, place the scored dough into the Dutch oven, lifting it by the corners of the parchment. (See notes) Quickly cover and place back in the oven.
- BAKE: Place in the middle of the oven for 20 mins with convection on, (or 25 minutes w/no convection ) or 28 minutes at 450F. Remove the lid, and the interior should reach 200F ( if not replace the lid until it does).
- Once the internal temp is 200°F, uncover the bread, lower the heat to 450°F, and continue baking 10-15 minutes until deeply golden and the internal temp reaches 204- 208°F.No pale loaves please, let them get golden!
- COOL: Remove from the dutch oven, let it cool 1 hour on a rack or tilted up on its side, before slicing so you don't let the steam out and don't smash it- be patient. This is the hardest part. 😉. Take a picture! Feel proud. You did it!
Notes
NO Banneton: Use a parchment-lined bowl, sprayed with spray oil. Place dough seam side down. Sprinkle with flour and some sliced olives or rosemary if you like. Or even something like Everything Spice would be good here.
FLOUR: Feel free to sub 1/2 cup of the white flour with rye, whole wheat or other whole grain. Using more may create a heavy loaf.
Shaping: Instead of doing a tri-fold, simply roll into a log. Place seam side down on the counter and tuck the ends under. Let rest 5 minutes, before lifting into the banneton, seam side UP.
Nutrition
- Serving Size:
- Calories: 199
- Sugar: 0.3 g
- Sodium: 541.5 mg
- Fat: 2.4 g
- Saturated Fat: 0.4 g
- Carbohydrates: 40.5 g
- Fiber: 6.1 g
- Protein: 7.4 g
- Cholesterol: 0 mg


Love this bread. I sprinkled 1 tablespoon Herbe de provence and 125g chopped black olives over laid out dough. Followed instructions on folding and my olives were nicely layered in loaf.
I’ve made this bread and it was excellent. My question is whether I can make the same dough but substitute dried cherries or cranberries and walnuts for the olives and rosemary. I don’t see why it wouldn’t work but thought I’d ask!
Also, I’m currently at a high altitude. Any changes I should make?
yes, totally. I’ve found that high altitude requires longer baking. Perhaps add 3-5 minutes to initial bake time. Make sure when you take the lid off, bread is at 200F.
I love the recipe and videos but your site won’t print or let me save a pdf it gets unresponsive or crashes my computer. Only recipe site that does this.
Hummmm that is strange and frustrating. Can you tell me what browser you are using and what devise? Also Try clicking “print recipe” button at the top and see if that works. Sorry about that, I know how annoying that can be.
I can’t wait to make this! May I ask why you call for a starter past it’s peak and not at it’s peak?
I find that if the starter is slightly “hungry” the bread rises better.
This bread is a winner and so gorgeous that I posted a photo on Instagram. Regarding adding the olives and rosemary during the tri-fold process: I think the recipe means that you fold it twice with HALF of the olive/rosemary mixture each time. Otherwise I think it would come out with the olives all in one place (as others have commented). This dough was so beautiful to work with – loved every step. I forgot to press “start” on my oven for an hour before baking and had already scored my bread when I realized that. Yikes! I put the scored bread back in the refrigerator (on the parchment bread) and preheated the oven for an hour. Whew, it still turned out great! This is an excellent recipe and I’ll make this again. Thank you Sylvia!
Glad it turned out!
What size of Dutch Oven do you recommend?
4.5-5.5 quart. 🙂
Hey, I’ve been doing your basic dough recipy for ages now and comes up perfect every time (well if I look after my starter properly that is!) Thank you will try the olive bread today 😬
Excellent recipe and incredibly explained, every single detail. Can not thank you enough. ♥️♥️
Best bread I have ever made
my first sourdough bread. Your recipe and style of explaining in so much detail is incredible gift to us. Thank you so much for this wonderful recipe.
I made your no knead sourdough twice before I attempted this one. Delicious! I only added olives and rosemary though, no garlic. My only problem was the olive distribution. They all ended up just under the surface of the bread at the top of the loaf. I would like them to be more evenly spread about. Any suggestions? Could I mix them in the evening before, when doing all the stretching/ folding?
Hi Grace, did you do the tri-fold method, 2 times? Yes, you could add them in the initial proof, I think that should be fine too. My only concern is that the additional salt from the olive could inhibit the starter a little, but I think it is worth at try. 😉
Hello Sylvia, I love your no-knead sourdough recipe and I would like to try this olive one next. What Kalamata olives should I use? In brine (glass jar) or in oil dressing? Not sure what to pick in my local supermarket. Thank you.
Either will work- I used a dry salty olive so if using brined, pat dry first.
Thank you Sylvia. I will try this tomorrow and let you know how it went.
This was spectacular. It was like ‘statement bread’. It made me look like a genius, like a pro.
Haha! Love it!!!!
I really like your recipe but don’t have a Dutch oven. I wonder if this recipe would be a success if I were to bake the loaf on a stone at 450 F with a cast iron skillet beneath filled with boiling water? That is how I’ve baked other sourdoughs, and get a very crunchy crust.
I have only baked this in an enclosed dutch oven- so not sure how this would work. Of course, you are welcome to try. My guess is it would yield a flatter loaf? But give it a shot and let us all know!
I cooked many a successful sourdough in a turkey roasting pan with a lid. I now have a dutch oven and I see minimal difference.
Good to know! Thanks for the tip.
What are the grams of the starter and salt? Thanks looks yummy!
90 grams
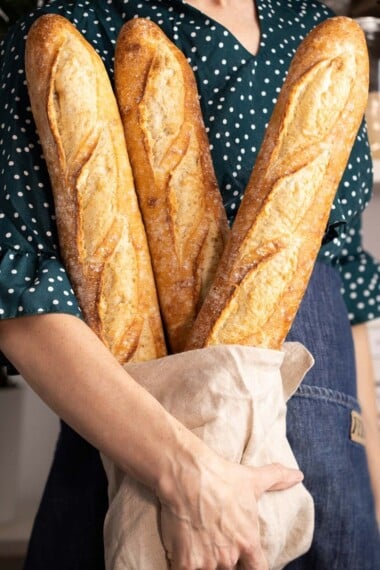
I’m hooked on my Ozeri kitchen scale now! How many grams of starter is the one-third cup you refer to please? Been loving your No-Knead Sourdough recipe and videos. Also, I want to make baguette shaped loaves, but not sure how without an elongated shaped dutch oven. Can I do without? Would love to know your technique for that.
90 grams. I have a baguette recipe coming out soon! Still learning!
This looks delicious! Why do you use Rice Flour instead of regular flour for dusting?
I used a banneton ( basket) in this recipe- and rice flour does not stick, where regular flour does. 🙂
Question in your basic recipe you do the 2nd stretch and fold before it goes in the batton. In this recipe there is no second stretch and fold just the tri fold part. Please clarify that I don’t have to do the 2nd stretch and fold. Thank you. So looking forward to this recipe By starter is just rising and I am getting ready to make my dough.
Right, that is correct the tri-fold is the stretch and fold. 🙂
I tried making this bread. Mostly everything came out exactly as planned. The bread was delicious. One thing I’ll do differently the next time is not put any garlic at the bottom of the banneton. Sylvia did actually do this, and I didn’t realize it, and just used my rosemary + garlic + olive mix. All the garlic on the surface got burnt. I had a question. My rosemary + garlic + olive mix didn’t mix well into the dough. It was visible in one layer in the bread. I followed the recipe exactly. Not sure what was wrong, but next time, during shaping, when I put olives in the middle of the rectangle shaped dough, I’ll cover more to the edge.
Hi Sam, yes, cover to the edge. Also, did you do the “envelope” tri-fold 2 times? If so, next time, try 3 times letting the dough rest for 10 minutes before the last tri-fold.
I made two loaves using the basic recipe last weekend. It turned out wonderfully and was delicious. I followed the directions, mostly, but used a 1/3 – 2/3 ratio of all purpose Einkorn flour and Einkorn wheat flour. Used a round banneton basket for the second rise. After three hours or so I scored the top and put it in a preheated dutch oven for 30 minutes at 500 degrees, then took the lid off and baked it another 12 minutes at 450. Each loaf was a beautiful burnished brown color. The crust was just hard and flakey enough leaving the crumb soft, chewy and nutty in flavor. The only thing I would change is that I would chop the roasted garlic in half next time rather than using whole cloves. Still wonderfully delicious.
Hey there! I’m planning on making this tomorrow (starting the process tonight). Do you roast the garlics whole and then mince them up to be distributed In the dough? Thank you!
I roasted them whole and actually put them in whole- but feel free to put them in cut up.
Best bread ever! Added some pecorino- so tasty!
I made this bread the other day and I think it was the best bread I’ve ever made! It was delicious and so beautiful. Thank you Sylvia for all of your amazing recipes. I love them all!
I’ve been making sourdough bread for a couple of years now but am always a bit shy when adding anything to it. I used two cups of all purpose flour and two cups of a 60/40 bread blend. It had a good rise and crumb with a little bit of whole wheat goodness. I was worried that the rosemary might be a bit overpowering but it wasn’t at all. The bread had a savory mediterranean flavor. I definitely will be making this one again.
Great to hear Trudy!
Love that you added the olives, garlic and rosemary while shaping the dough. The roasted garlic kept the structure – will have to try this soon. Thanks for sharing.
Wow! It has been years since I’ve baked bread, but I plan to start again, and will follow your advice about practice before tackling this recipe. But I have to say, I learned more in a few minutes just from looking at your photos and captions than I ever knew before, including about what a banneton was used for and how to more easily embed a few decorative and tasty ingredients in the top of a loaf. I so appreciate the time you take and your beautiful attention to detail in all of your posts. And that you make me want to bake and cook and learn more – thank you!
Awesome Terry! I hope you give it a go! It is so much fun baking bread- brings so much satisfaction.