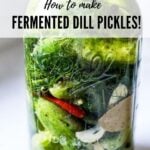
How to make Manhattan-style Fermented Pickles with Garlic and Dill! An easy step-by-step guide to making the most flavorful, crunchy, tangy pickles full of healthy probiotics with only 20 minutes of hands-on time! Video.
What happens when people open their hearts? They get better. ~Haruki Murakami
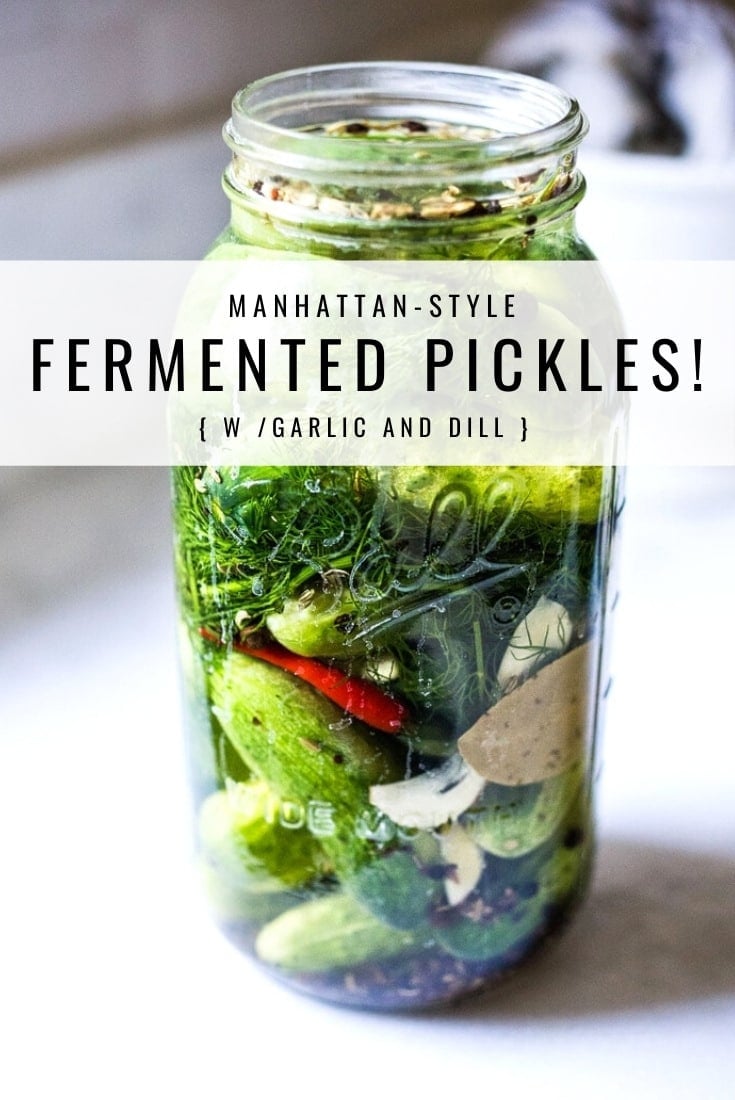
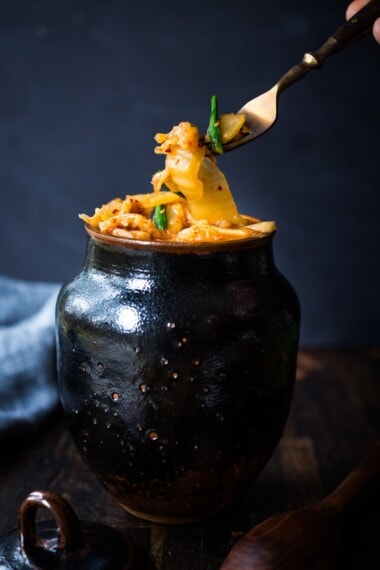
I’m excited to share this easy recipe for lacto fermented pickles with you! If you are a crunchy pickle lover like me, you will be in heaven. Seriously, these are the best! These Manhattan-style “half-sour” fermented dill pickles are crispy, crunchy, flavorful, and oh-so alive!
Fermented in a salt brine, rather than vinegar, they get their delicious tanginess from light fermentation rather than vinegar.
Full of healthy, gut-healing, immunity-boosting probiotics these little guys are perfect as a low-calorie snack, or sliced and added to sandwiches or served as a tasty side.
Not only are they delicious and incredibly EASY to make, they are also incredibly good for us!
And as crazy as this may sound to some, the fizzy brine itself is like a healing tonic to me – I love to drink a shot of it- especially when I feel like my immunity needs a boost! So flavorful and totally energizing. Or try a Gin and Brine!
What you’ll need
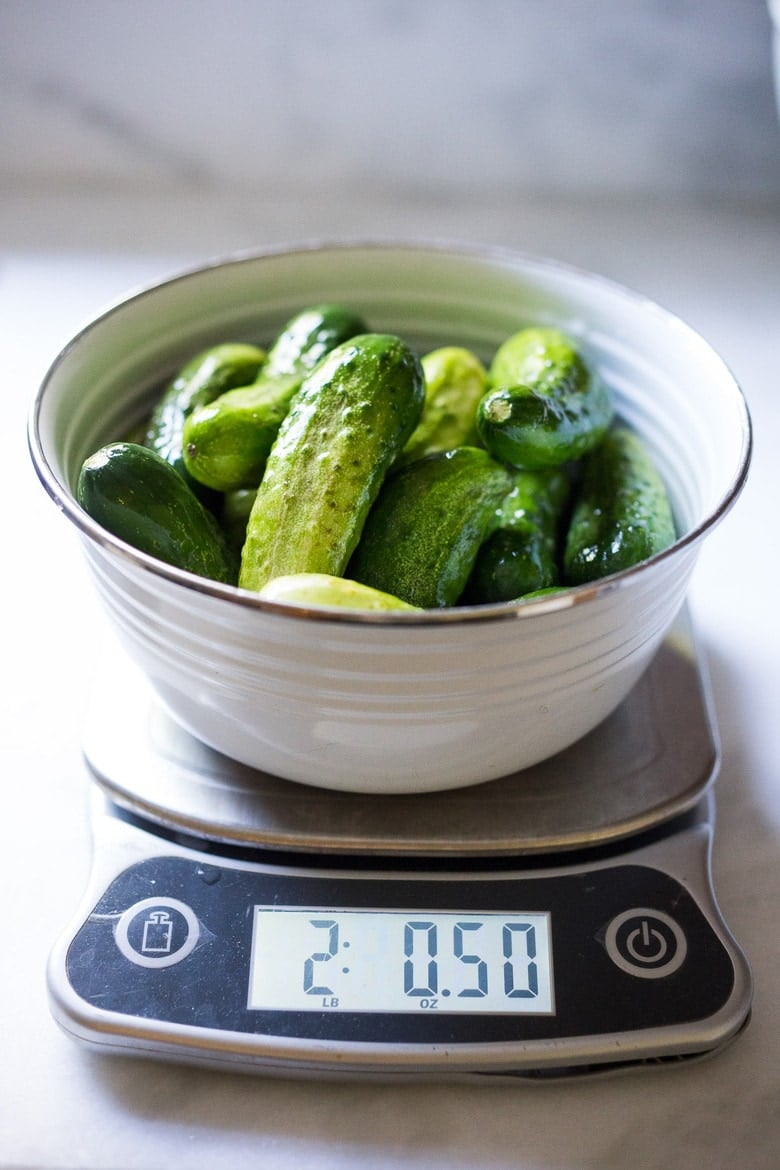
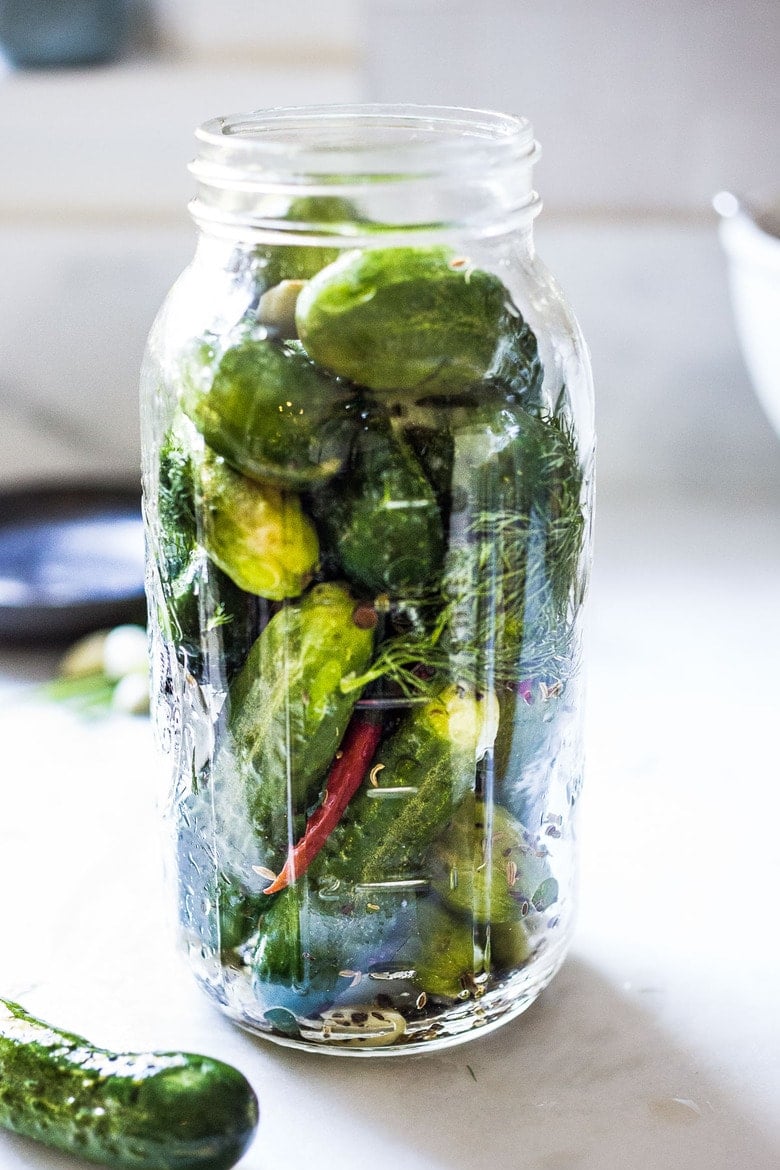
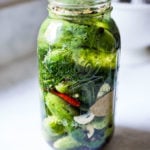
- Pickling Cucumbers- Small and short (4 inches long) with thin bumpy skin, crisp texture, small seeds, a blocky shape and color gradient from light to dark. Varieties include Kirby, Calypso, Royal, Pickalot, National Picking, Adam Gherkin, Sassy, Eurika, Jackson, Boston Pickling, Northern Pickling… to name a few. You’ll need 2 lbs of “pickling cucumbers.” This recipe makes one large 1/2 gallon jar (or use two quart-sized jars) – a relatively small batch. Pickling cucumbers are most easily found at your local farmers’ market. Ask the farmers if they have “pickling cucumbers” they can help direct you to the right ones. Your pickles will only be as good as your cucumbers, so choose wisely! Make sure they are roughly the same size -about 4 inches long with 1 1/2-inch to 2-inch diameters – so they fit in the jar nicely and ferment at the same rate. I handpicked each one. They should be fresh and crisp with no soft spots.
- Salt-use fine sea salt, or fine Himalayan Pink salt
- Garlic and Onion – we load this up with 10-20 garlic cloves for the best flavor!
- Fresh Dill – use a big handful!
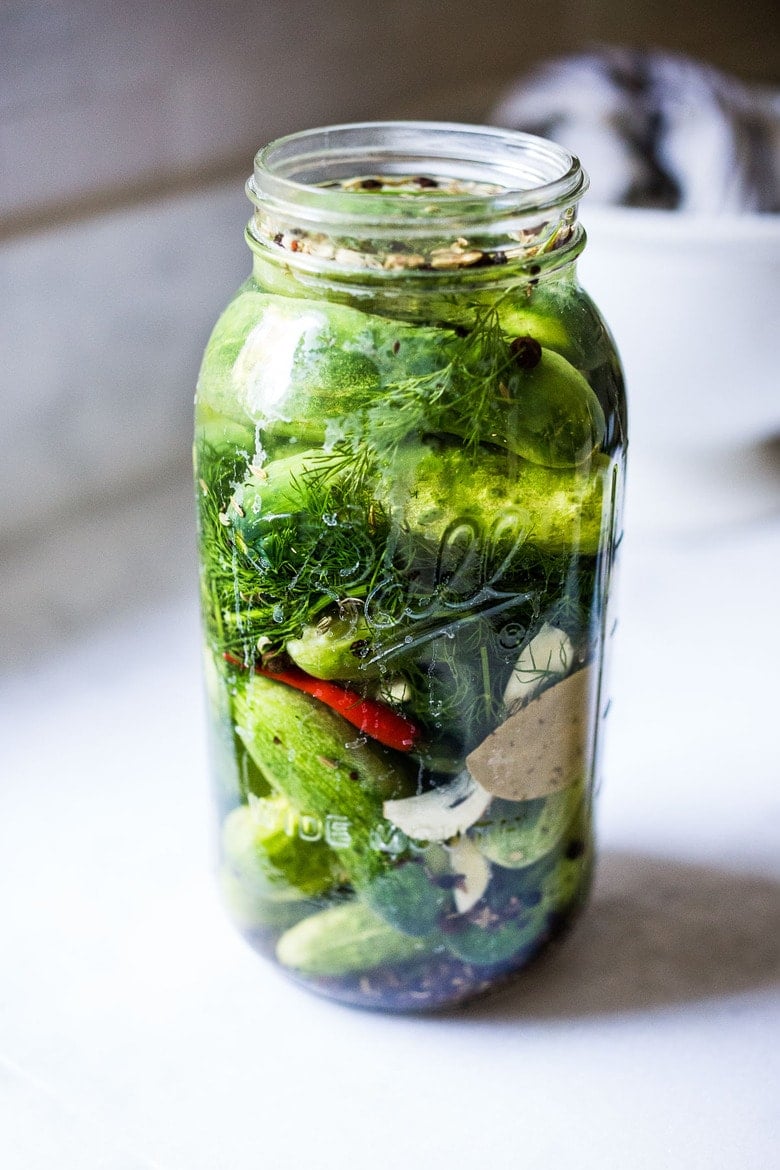
- Spices: Ground Turmeric ( adds fresh flavor) fennel seeds, mustard seeds, whole peppercorns, coriander seeds, whole allspice, dill seeds and celery seeds. Feel free to change or embellish! I added a couple of chilies for a little heat.
- Optional Tannic Acid: Bay leaves, grape leaves, oak leaves, or a couple of slices of fresh horseradish root. Cucumbers contain enzymes that soften them. To prevent this add a few bay leaves or a grape leaf to the jar.
- Two-Quart Mason Jar ( 8 cup mason jar)
- Fermentation weights
- Optional: Air lock, gasket, metal ring
How long does it take to ferment pickles?
These 3% Brined, half-sour crunchy pickles take 3-5 days of fermenting time.
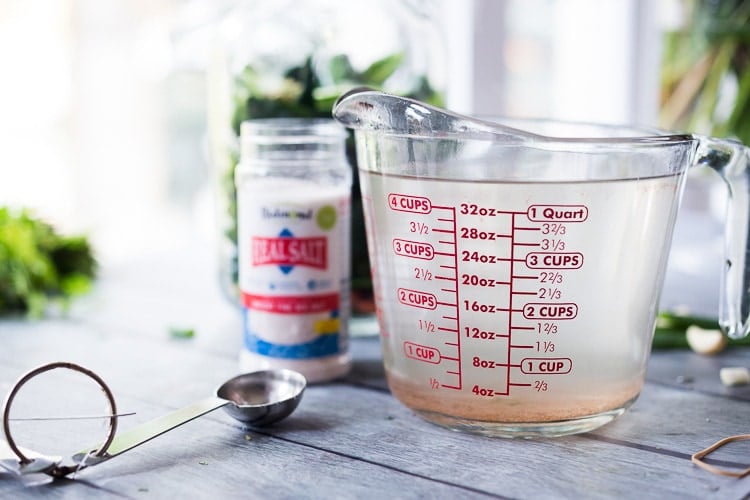
The Brine: SALT TO WATER RATIO
- This recipe is a 3% salt water brine, which is considered “safe”. It equals 7 grams of salt per 1 cup of water. Or, 1 heaping teaspoon salt (1 1/4 teaspoon salt ) per 1 cup of water. This ratio allows one to drink the brine (like a shot) because it is not too salty and is designed for a shorter fermentation period ( 3-5 days). Crunchy, lightly fermented pickles!
- If you want a stronger brine for a longer ferment, feel free to go up to 4.5%. So for example, 3.5% Ratio= 9 grams of salt per 1 cup of water, 4.5% brine =10.8 grams of salt per 1 cup of water. For a 4.5% brine, half-sour pickles take 5-7 days, full sour pickles 14-21 days.
Fermented Pickles (step-by-step Instructions)
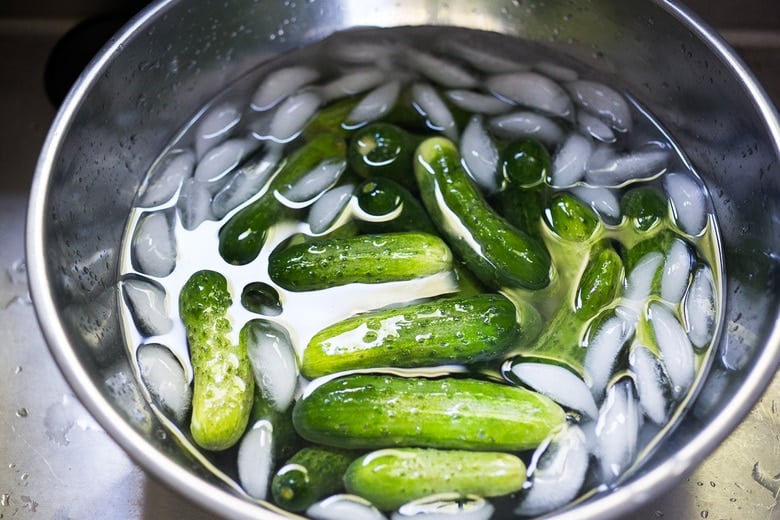
Step 1: Wash the cucumbers, slice off 1/16 inch of the blossom end, and soak them in an ice bath for 15-30 minutes to firm and crisp them up. There are enzymes in the blossom end that can make your pickles soft, so be sure to remove them.
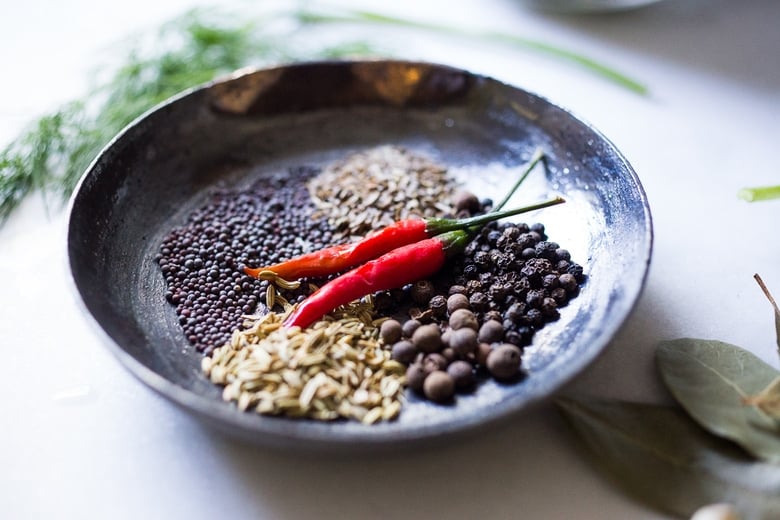
Step 2: Slice the garlic lengthwise and gather your spices.
Because these fermented pickles are left whole, you want the brine to be extra flavorful. I add a lot of garlic… 10-15 cloves, sometimes 20! Fermented Garlic is really good for the gut too!
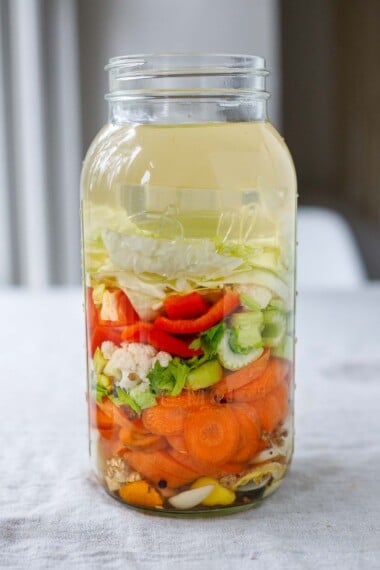
Step 3: Place the spices on the bottom of the jar, then sliced garlic, fresh dill and bay leaves, and then add 2 layers of cucumbers, end on end, in a large two-quart jar (half-gallon). Press everything down.
Step 4: Carefully measure and mix salt and water to create the 3% salt water brine- then pour this brine over the pickles leaving 1 1/2 inches of headroom.
How salt works in fermentation:
- In a nutshell, using the right ratio of salt in fermentation encourages the growth of healthy bacteria while at the same time killing off bad bacteria. You want to be precise when measuring the salt and water in these kinds of recipes.
- Too much salt may kill off ALL of the bacteria -preventing fermentation.
- Too little salt will allow bad bacteria to keep on living. It is a fine balance. 😉
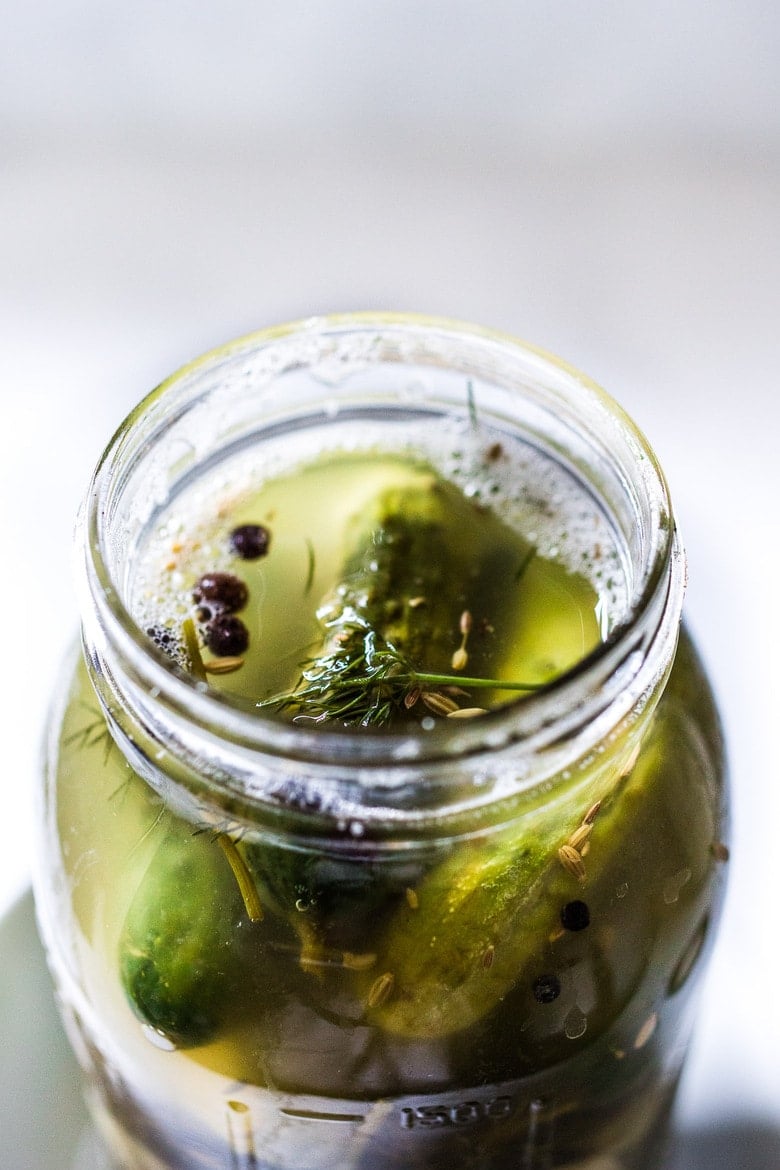
Step 5: Weigh down the cucumbers so they are completely submerged under the liquid, using a couple of fermentation weights, or a small zip lock bag filled with a little water (in a pinch).
MOLD: If the cucumbers or seeds are not submerged under the brine and become exposed to air- they can develop mold, so spoon any floaters out with a slotted spoon. Most seeds should stay submerged.
Step 6: Cover loosely with a lid or towel (to prevent bugs or flies from coming in, and to allow gases to escape) place in a bowl or pan to catch any overflow, and place in a cool dark place for 3-7 days, like the basement. You can also use and airlock lid- which allows air to escape, but nothing to fly in.
Step 7: Check after 2-3 days. Look for signs of life: bubbles/ or cloudy water. A cloudy brine is GOOD. Tap the jar and see if bubbles rise to the top. Check to see if any brine overflowed into the bowl ( both signs of life). This often takes about 3-5 days, I find 4 days is the “sweet spot”, depending on temperature. Cloudy brine is delicious and nutritious!
Step 8: Place the jar in the fridge to further slow the fermentation with a loose lid. They will continue to ferment very slowly and will keep indefinitely.
Expert Tips:
- Ferment at cooler temps (60-70F) to keep pickles crisp. If your home is hot, try placing in a cooler with ice. Take the temp of the brine.
- The longer you ferment them (unrefrigerated), the tangier they will get. But they will also get softer. I like them crisp, but you may want them tangier and softer. You can taste them at any point after you see bubbles.
- Smell: your ferment should smell tangy, garlic and fresh. If you notice anything foul or unpleasant, your ferment may have been contaminated: most commonly by dirty hands, dirty utensils, or a dirty jar.
- If you want to create a “fizzy” brine for drinking, tighten the lid, and burp daily if leaving out. You can tighten the lid in the fridge, but burp weekly. This will create a little pressure and give it some effervescence.
- Anything that touches air- may mold. Always fish out any floating spices with a slotted spoon to prevent this.
Once they are cold, give them a taste. They should be crunchy and flavorful! The brine is deliciously tangy, salty, and effervescent -so tasty and full of gut-supporting probiotics. The garlic is tasty too! Eat it!
I find myself often drinking shots of the brine! I also make this Gin & Brine Martini!
Let me know how you like this one in the comments below! Plus, explore more of our toppings and condiments, DIY gifts, and cooking basics!
xoxoxo
More Favorite Ferments!
- Curtido & Cultured Salvadoran Slaw
- How to make Sauerkraut (Simple Cultured Cabbage)
- Beet and Cabbage Sauerkraut
- Cucumber Kimchi Pickles
- Turmeric Sauerkraut
More from Feasting at Home
How to make Fermented Pickles| 45-sec video

Homemade Fermented Pickles with Garlic and Dill
- Prep Time: 4 days
- Total Time: 4 days
- Yield: ½ gallon 1x
- Category: fermented, preserved
- Method: fermented
- Cuisine: American
- Diet: Vegan
Description
Learn how to make lacto-fermented pickles! An easy method for flavorful, crunchy, tangy, garlic dill pickles with only 15 minutes of hands-on time. Full of healthy, gut-healing probiotics these little guys are perfect as a low-calorie snack, or sliced and added to sandwiches.
Ingredients
- 2– 2 1/2 lbs pickling cucumbers– all similar size ( 5 inches)
- 5 cups filtered water or tap water (that is not overly chlorinated)
- 2 tablespoons fine sea salt or Himalayan salt (or basically one heaping teaspoon fine sea salt (7 grams) per one cup of water, to make a 3% brine.) * see notes.
- 1/4 teaspoon turmeric (optional, adds a “fresh” flavor)
- 1 teaspoon each: fennel seeds, coriander seeds, allspice, peppercorns, dill seeds, mustard seeds, celery seeds- and feel free to add more peppercorns!
- 10–20 garlic cloves, sliced (or double for extra garlicky)
- 1/2 onion, thinly sliced (optional)
- big handful of fresh dill
- 1–3 fresh red chilies – or dried arbol chilies, or add chili flakes (all optional)
- 3–4 bay leaves (or a grape leaf or oakleaf) – these are sources of tannic acid to help them stay crisp.
You’ll need a 1/2 gallon mason jar, crock, or 2 quart-sized jars- clean and sterile.
Instructions
- Prep Cucumbers. Rinse the cucumbers, remove 1/16-inch of the flower end of each cucumber (keeps them from getting soft) and place them in an ice-water bath, to crisp them up (15-30 minutes). Leave them whole.
- Make the brine. Mix the salt (2 tablespoons) and 5 cups cold water until dissolved.
- Wash your hands, jars, and any utensils. No need to sterilize, just clean!
- Assemble. In a large, clean two-quart mason jar, place all the whole spices into the bottom. Add the dill, garlic and onions or turmeric if using. With clean hands, pack one layer of cucumbers tightly, standing on end, then add the bay leaves, then add the second layer of cucumbers standing on end. Press everything down, leaving 1 ½ inches of headroom. Pour the saltwater brine over the top and weigh down the cucumbers with fermentation weights so they are submerged under the brine. Remove any spices that may have floated to the surface (which can mold). Cover the jar loosely with a lid or with a cloth- basically, the pickles will bubble and you want air to be able to escape.
- Ferment. Place the jar in a pan or bowl to collect any overflow and leave it in a cool dark place (60-70F) for 2 -3 days (a basement, or lower kitchen cupboard) and check for bubbles or overflow, indicating fermentation. Half-sour pickles will take 3-5 days with crisp, white interiors. If is colder than 65F, it may take longer, if hotter, they will ferment faster. Full sour pickles will take 14-21 days (see notes for a stronger saltwater ratio).
- Check and Inspect. After 2 days, check for signs of life: bubbles, overflow, or clouding. Tap the jar, and see if tiny bubbles rise to the top. I usually ferment for 3-4 days- I like crunchy pickles! Longer ferments will yield tangier pickles but will get softer as they ferment, and lose their vibrant color. Up to you. You can taste them at any point after you see bubbles, and ferment longer if you like. The brine will get cloudy as it ferments- this is a good sign! Once you see active bubbles, you can at this point place the jar in the fridge, where it will continue to ferment, but much more slowly. Keep the pickles submerged.
- Refrigerate. Once chilled, give them taste. They should be crispy and flavorful with a little tang. (At this point, if you want a tangier or softer pickle, you can absolutely pull them back out again and ferment for a few more days longer if you want.)
- If you like fizzy brine, tighten the lid, burping every week or so or try using an airlock. If you don’t want to think about it, give the lid one loose twist, so it’s on there, but gases can escape.
Notes
If you need more brine, make sure you use the same ratio- 1 heaping teaspoon sea salt per one cup of water.
If using a grape leaf, place it on the side of the jar, then layer the remaining ingredients.
If pickles turn out too soft- it may be due to too warm of temperature during fermentation, or the flower end wasn’t removed (the flower end of the cucumber has enzymes that can soften pickles).
Feel free to use 2, quart-size jars, dividing cucumbers, spices and brine between the jars.
BRINE: This recipe is a 3% salt water brine, which is considered “safe”. It equals 7 grams of salt per one cup of water. I’ve had really good luck with this ratio – and this ratio allows me to drink the brine (like a shot) this is really healthy – full of good gut-supporting bacteria!
If you want a stronger, saltier brine, feel free to go up to 4.5%. For a full sour pickle (14-21 days) use a 4.5% brine.
- 3% ratio = 7 grams salt per 1 cup of water. (1 1/4 teaspoon fine sea salt, per 1 cup water)
- 3.5% Ratio= 9 grams of salt per 1 cup of water. (1 1/2 teaspoon fine sea salt, per 1 cup water)
- 4.5% ratio 10.8 grams of salt per 1 cup of water. (2 teaspoons per cup of water)
Cutting the Cucumbers: I recommend leaving them whole. The texture is much better. After your first successful batch, feel free to experiment.
Nutrition
- Serving Size:
- Calories: 16
- Sugar: 1.3 g
- Sodium: 297.4 mg
- Fat: 0.2 g
- Saturated Fat: 0 g
- Carbohydrates: 3.7 g
- Fiber: 0.5 g
- Protein: 0.7 g
- Cholesterol: 0 mg


HOW TO MAKE FERMENTED PICKLES| 45-SEC VIDEO where is the video?
Hey Gregg- Do you have your adblocker turned on? This blocks the videos.
I love these pickles
Thank you for including 3 salt levels
I just have one issue.
How do I make these last longer?
It seems whenever someone sneaks into the kitchen my pickles disappear?
Have you ever heard of pickle elves perhaps?
🫣🫣🤭🤭
Hahaha! So funny. Maybe I need to come up with elf-proof jars.
I made these last fall and have kept them in the fridge. They are delicious! The brine is clear but there is white, somewhat chunky stuff in the brine and/or on the pickles. Any idea what it is and if it’s ok? We’ve been eating them.
It sounds like Kahm yeast, which is harmless. As long as they taste ok, and you don’t see anything fuzzy ( mold) they should be fine. Feel free to remove it.
Oak leaves from your yard have far more tannins than Grape leaves or bay leaves. Half of one will do ya or you can throw a tannin bomb in with an oak acorn, but it is most important to cut off the blossom end of the cucumbers.
Interesting- which type of oak tree do you use leaves from?
I have so many cucumbers coming on and love this recipe.. have done for years. Great to make them myself … more jars needed
Great Wendy!
Wendy save your store bought pickle jars, jam jars – any jars with a twist cap and use those for making homemade pickles. These all seal just fine multiple times. You do not need to buy canning jars for making pickles or any kind of canning.
I can’t eat raw garlic because I have pretty bad acid reflux. Would it be okay to add sautéed garlic? Or powdered garlic?
Hi Katie, since the garlic is infusing the pickles and just in the brine, you don’t have to actually consume them- do you think this flavor will cause reflux? Just curious… I thought you had to eat it to create the reflux?
I believe you are eating to much food that is acidic , try drinking ALKALINE 88 water with Himalayan minerals and electrocytes.
Katie, once the garlic has fermented, I believe you will be able to eat it with no problem. The fermentation process changes the garlic, making it easier to digest. I would suggest trying a clove and see how it affects you. I think you will be pleasantly surprised. It won’t taste anything at all like raw garlic. You could also use roasted garlic.
I once started making red cabbage sauerkraut with apple, inspired by Central European cooked dishes that also use spices such as juniper berries and cinnamon. It was supposed to be fermented and thus without vinegar. I included two cloves for each quart jar. Then I had to toss it because I was told that cloves, having antibacterial properties, are likely to kill the lactobacillus and thus prevent fermentation. Is this true? Have you fermented successfully with cloves in your spice mix?
Hi Ron, I have used garlic a LOT in fermenting, without a problem. I wonder if it was the salt ratio of that particular recipe? So many variables.
Never use cloves in fermenting. Clove oil has anti-bacterial properties and will inhibit fermentation.
Hey Ron. I think you were given some misinformation. I ferment whole jars of nothing but garlic cloves, and they turn out fine. Just make sure your brine and temp. is correct and you should have no problems.
Hi Silvia,
I am living in the South of Spain and there is no room in the house below 80 + Fahrenheit all summer. I have read your idea in one of the comments to store the glass in a cooler for the first days and that seems to work perfectly! Very smart, in deed! With just one or two cooling elements, the temperature keeps within the 60 to 65 Fahrenheit range for almost 12 hours. The brine already smells amazing! My first time in fermenting cucumbers… and I am so curious, how they will turn out!
One more question: why do you remove the flower end? Any science behind that? And do you mean just the tiny little spot at one end?
Love the cooler idea- thanks! Removing the flower end helps keep them crunchy! The flower end contains enzymes that may cause pickles to get soft.
Hi Sylvia. Help please. I have tried twice to make fermented dill pickles. I use Kirby cucumbers purchased at the market. I use a “Fido” jar and burp it daily. By day 3 I have bubbling and cloudiness in the brine as expected. The issue is that by day 5 the pickle skin is like shoe leather and the insides are mush. Is this a cucumber issue, a process issue, or a fermentation issue?
I’m not sure Raul. It sounds like they are perfect on day three- so maybe just put them in the fridge at that point next time? Are you using a bay leaf? Did you cut of the flower end?
Yes, two of them. Thanks. I will continue to try.
Is it very warm where you live? Could you try finding a slightly cooler spot- so it ferments a little slower?
In my experience your brine is likley too dilute (go for 4.5%) and you either did not cut off the blossom end of the cucumbers or did not add tannins (oak, grape or bay leaves). Up the salt and add oak leaves or a couple of accorns. Cloves are a HUGE NO NO for fermentation.
The cukes you use are thick skinned. You want small cukes., not the mini british cukes with the dark green skin. You want the small ones that have little spikes on them where they are nearly white on one side and light green on the other. If they grow too long on the plant and sort of yellow, the skin gets thick and bitter. The darker green they are the bigger and thicker the skin gets. They are no good to eat as pickles then and you should use them for cuke slices in salads, peeled of course.
I’m curious what will happen if you leave them sitting out to long. I made mine and let them sit in a 1/2 gallon jar for 7 days since my cucumbers were a little larger. They smelled amazing and I placed them in the fridge. The first week they tasted great and now at week 3 they have this off flavor and smell that I do not enjoy.
They weren’t bubbly any longer when I placed them in the fridge and my brine isn’t fizzy, even though I used an airlock.
Is it possible I left them to long?
I’m going to try them again and this time put them in the fridge at 5 days.
Thanks for the help!
Hi Rebekah- leaving them out longer would only ferment them a little more ( make them tangier)- but it shouldn’t cause them to taste “off”. Is it possible the container got contaminated by something after being in the fridge, like a dirty utensil? I’ve done that…
Does the garlic play a role in the fermentation? Wondering if I can get away with making them without as I am on the low-FODMAP diet at the moment.
Yes, you can leave them out, they are there for flavor. 😉
Are we supposed to seal the lid when we put it in the fridge?
I just loosely twist it on. Not a tight seal.
Sylvia suggested in her recipe that if you like them fizzy, you can tighten the lid, but make sure to release the building CO2 at least once a week in the fridge. If you’re good at remembering (I’m not) that could also work for a different type of ferment.
These pickles taste amazing and are so much fun to make! I’ve had such an abundance of cucumbers and now tomatoes in my garden, that I’ve adapted the recipe multiple times to make the following versions of cucumber and grape tomato pickles: Indian, Thai, middle eastern (our household favorite), Spanish and Mexican.
Love this Karen!!!
First try with these and absolutely delicious.
Can’t believe this is so easy!
Wonderful, so glad these worked for you Jan! It is quite a magically easy process.
I made these a couple of weeks ago and now have my jar in the fridge. Since I still have a little room in it, can I add a couple cukes to it without doing the 1st step of fermenting 3-7 days in salt brine?
Hi Joy, You need to start at step one to keep the bacteria in balance. The salt saturation and temperature in the beginning are key to fermenting properly.
When you list turmeric and allspice, are these ground?
I use sliced fresh turmeric and whole allspice.
I was excited to try your recipe & especially love your amounts of garlic & dill. I also like your suggestion to taste after 3 days to judge if it needs more fermenting.
Unfortunately like the other salt fermentation recipes I’ve made, there is a slight bitter aftertaste. I followed the recipe & used wonderfully fresh & crisp cucumbers from my farmer’s market. I did substitute bay leaves instead of grape leaves. And I keep the jars in a dark room but given that it’s summer it probably was about 68-70 degrees.
I’d love to hear your thoughts.
Hi David- I believe this caused by cucurbitacin, a compound found in cucumbers and perhaps this may be because the cucumbers themselves were very bitter to begin with. The cucurbitacin levels are heavily affected by growing conditions and an be intensified by heat waves (if I remember correctly). I’ve also had some batches of bitter ones- now I just ask the farmer if they are bitter before buying or ask to taste first.
Should the water be hot or boiled when dissolving the salt?
Just warm is fine 🙂
How long do these last in the frig?
Indefinitely! As long as you get them active and fermenting, they should keep for a long time. They do lose their crisp over time though.
Please stress “leave them whole” I made a batch and cut most into spears and they were kind of mushy. Pulled the only whole one I put in the jar and nice and crispy. Almost gave up on the recipe until I had the whole one.
Great job!
OK thanks Dan- I updated the recipe card, and I really appreciate your feedback. 🙂
I cut mine in half and in quarters and they are just as crisp as the whole ones. Are you adding a grape leaf or an oak leaf to your jar? I add one of each and also a currant leaf from my currant bushes. This gives the pickles the crunch. I also soak my cucumbers in cold water(some people do it in ice water) for crunch. I soak for about 2 or 3 hours.
hi sylvia, i have made a few batches using basically this recipe. my question is; why do my pickles turn olive green. a true half sour is still bright green. the last batch i made i only fermented on the counter for 1 day and then refrigerated. they still turned dark. my other question is regarding the salt. i only had flaked sea salt which i put in a small food processor but still weighed everything. do you think that could have contributed to my drab pickle color?
What temperature do you think your kitchen is?
i would say in the 70-72 range. do your pickles retain that bright green color? they look perfect in your photos.
They seem to stay green in the first few days, then they start to turn. I feel like if you can ferment at a cooler temp, like 60-65F they tend to do better. I usually take them down to the basement. Also adding a tanin, like bay leaves, grape leaf, etc may help.
I’ve made around 10 batches already this season. (My cucumber vines are going crazy!) I’ve been fermenting at 78 deg in a dark pantry (it’s hot here all summer) and having no problems! Every batch has been better than Bubbies. Excellent recipe!
Great to hear Matt! Love it!
Oh my sweet Matt! So glad I read this. Bubbies are my favorite, addicted to them…Bless your comment. This is my new recipe. Yippee..😛😛
I am completely new to fermenting & recently was gifted a 1 gallon fermentation jar. Can I make this recipe in the larger jar as long as everything is weighted down below the brine or should I double it to attain the 1″ head space? Thanks for your advice, can’t wait to get started !
Yes, absolutely!
Can the jars be stored on the shelf in the pantry after completing the process?
No, Michelle- these need to be refrigerated. Fermented, not canned. 😉
They can be if you pack the cucumbers into sterilized jars(boil jars in water on the stovetop) and then boil water, add the salt. Pour the salted water over cucumbers in the jar. Sterilize the lid and close. Check to make sure the lid is closed – you will hear popping noises as they are closing. These can be stored in a cool place for a year.
If you boil them like this, they will not ferment. This will become a “canning” recipe, not fermented pickles.
I always pour boiling salted water over my cucumbers – even the ones that stand at room temperature in a large jar and are not closed securely. And they ferment everytime. I am using a centuries old recipe from Europe.
Ok great. Whatever works. I may not be understanding this correctly.
Could you share your European recipe?
Hi Chuck, I did respond the same day you asked. Scroll down…