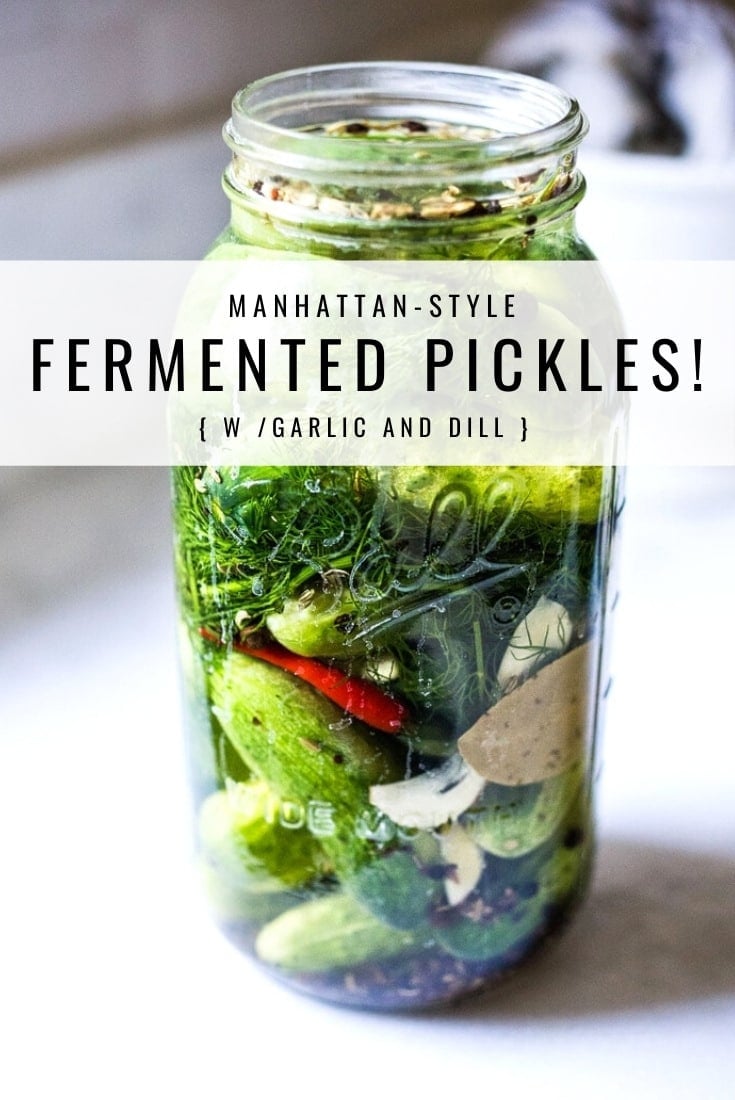
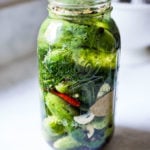
How to make Manhattan-style Fermented Pickles with Garlic and Dill! An easy step-by-step guide to making the most flavorful, crunchy, tangy pickles full of healthy probiotics with only 20 minutes of hands-on time! Video.
What happens when people open their hearts? They get better. ~Haruki Murakami
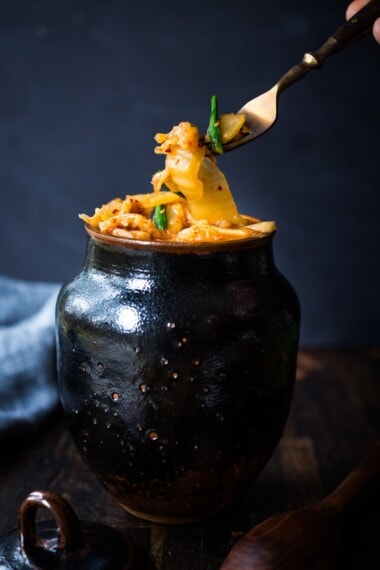
I’m excited to share this easy recipe for lacto fermented pickles with you! If you are a crunchy pickle lover like me, you will be in heaven. Seriously, these are the best! These Manhattan-style “half-sour” fermented dill pickles are crispy, crunchy, flavorful, and oh-so alive!
Fermented in a salt brine, rather than vinegar, they get their delicious tanginess from light fermentation rather than vinegar.
Full of healthy, gut-healing, immunity-boosting probiotics these little guys are perfect as a low-calorie snack, or sliced and added to sandwiches or served as a tasty side.
Not only are they delicious and incredibly EASY to make, they are also incredibly good for us!
And as crazy as this may sound to some, the fizzy brine itself is like a healing tonic to me – I love to drink a shot of it- especially when I feel like my immunity needs a boost! So flavorful and totally energizing. Or try a Gin and Brine!
What you’ll need
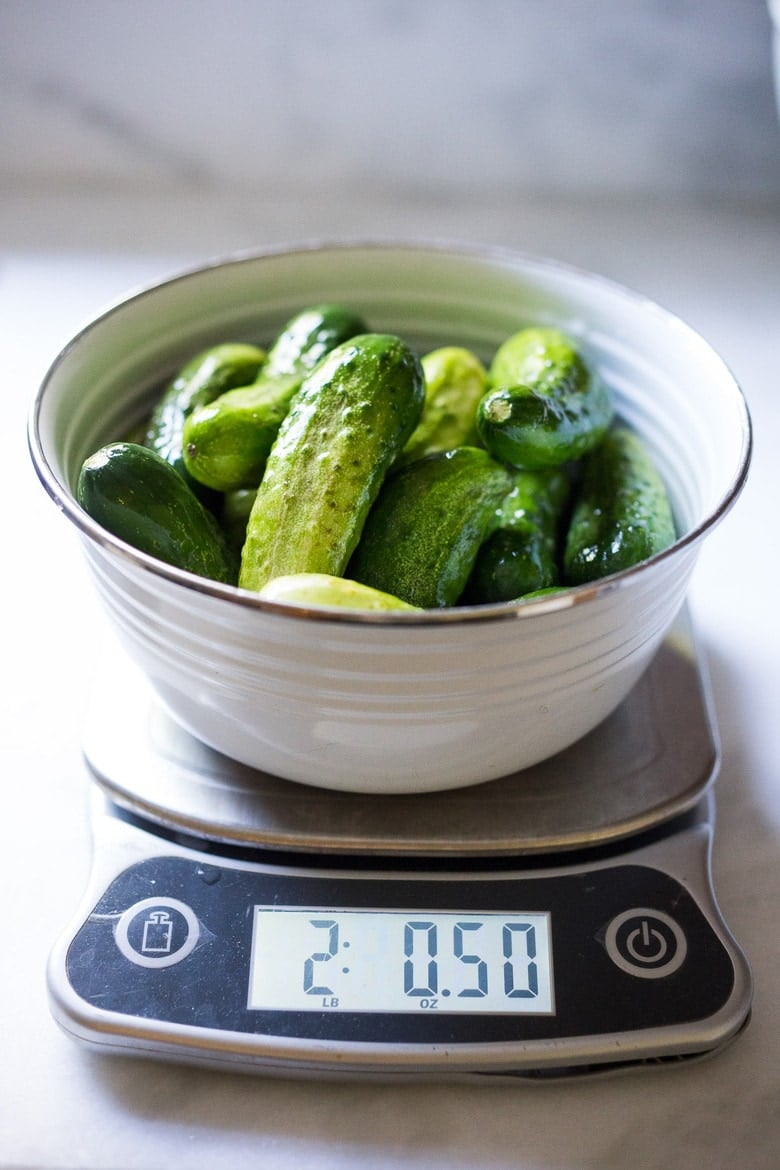
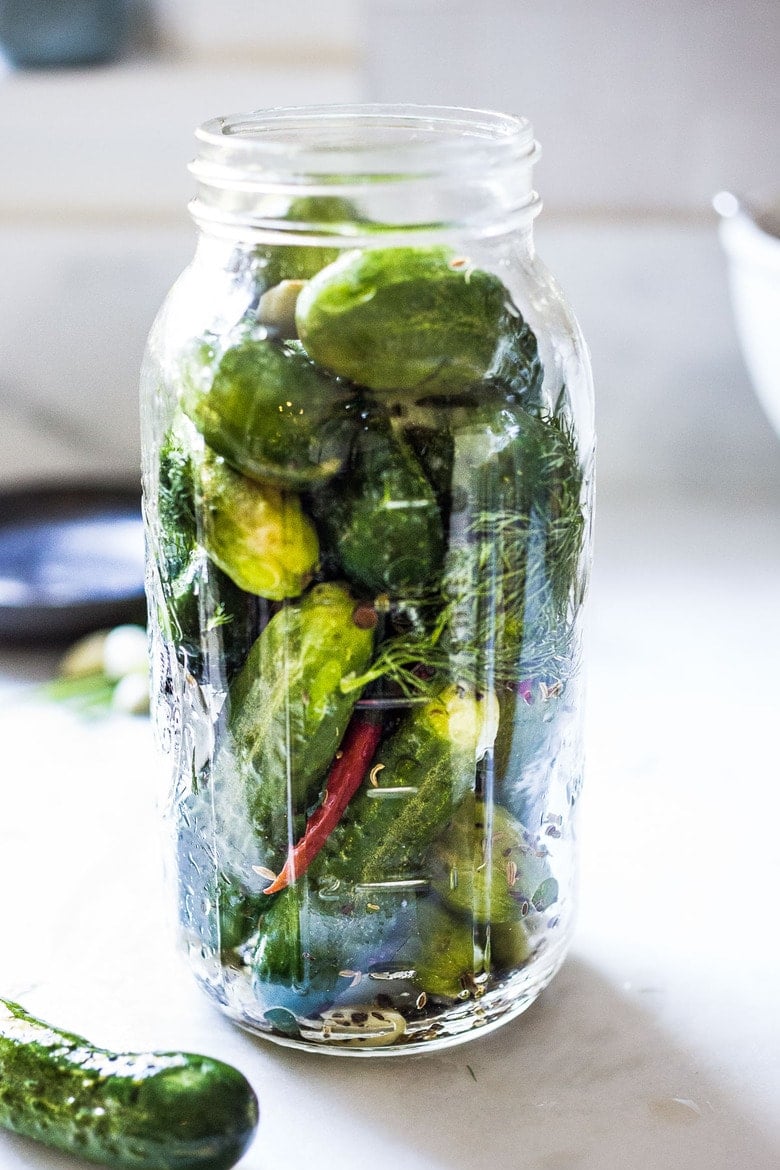
- Pickling Cucumbers- Small and short (4 inches long) with thin bumpy skin, crisp texture, small seeds, a blocky shape and color gradient from light to dark. Varieties include Kirby, Calypso, Royal, Pickalot, National Picking, Adam Gherkin, Sassy, Eurika, Jackson, Boston Pickling, Northern Pickling… to name a few. You’ll need 2 lbs of “pickling cucumbers.” This recipe makes one large 1/2 gallon jar (or use two quart-sized jars) – a relatively small batch. Pickling cucumbers are most easily found at your local farmers’ market. Ask the farmers if they have “pickling cucumbers” they can help direct you to the right ones. Your pickles will only be as good as your cucumbers, so choose wisely! Make sure they are roughly the same size -about 4 inches long with 1 1/2-inch to 2-inch diameters – so they fit in the jar nicely and ferment at the same rate. I handpicked each one. They should be fresh and crisp with no soft spots.
- Salt-use fine sea salt, or fine Himalayan Pink salt
- Garlic and Onion – we load this up with 10-20 garlic cloves for the best flavor!
- Fresh Dill – use a big handful!
- Spices: Ground Turmeric ( adds fresh flavor) fennel seeds, mustard seeds, whole peppercorns, coriander seeds, whole allspice, dill seeds and celery seeds. Feel free to change or embellish! I added a couple of chilies for a little heat.
- Optional Tannic Acid: Bay leaves, grape leaves, oak leaves, or a couple of slices of fresh horseradish root. Cucumbers contain enzymes that soften them. To prevent this add a few bay leaves or a grape leaf to the jar.
- Two-Quart Mason Jar ( 8 cup mason jar)
- Fermentation weights
- Optional: Air lock, gasket, metal ring
How long does it take to ferment pickles?
These 3% Brined, half-sour crunchy pickles take 3-5 days of fermenting time.
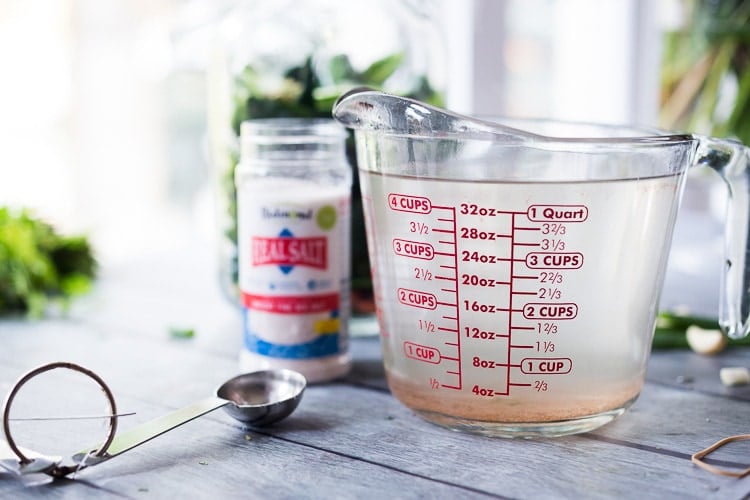
The Brine: SALT TO WATER RATIO
- This recipe is a 3% salt water brine, which is considered “safe”. It equals 7 grams of salt per 1 cup of water. Or, 1 heaping teaspoon salt (1 1/4 teaspoon salt ) per 1 cup of water. This ratio allows one to drink the brine (like a shot) because it is not too salty and is designed for a shorter fermentation period ( 3-5 days). Crunchy, lightly fermented pickles!
- If you want a stronger brine for a longer ferment, feel free to go up to 4.5%. So for example, 3.5% Ratio= 9 grams of salt per 1 cup of water, 4.5% brine =10.8 grams of salt per 1 cup of water. For a 4.5% brine, half-sour pickles take 5-7 days, full sour pickles 14-21 days.
Fermented Pickles (step-by-step Instructions)
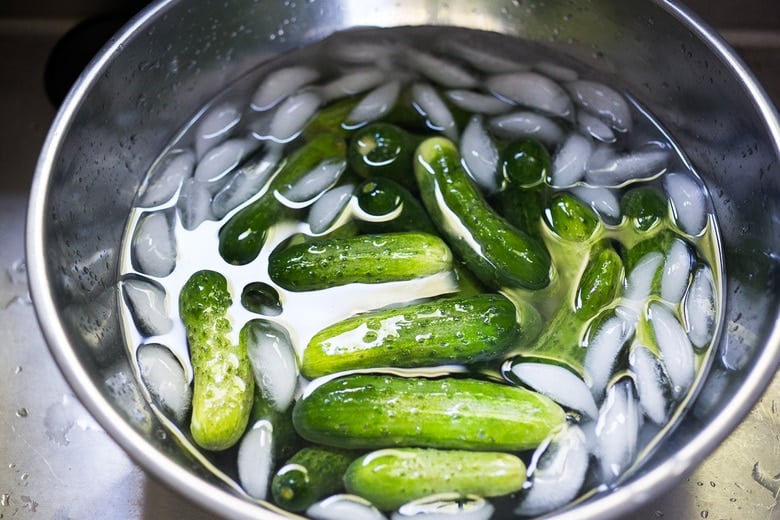
Step 1: Wash the cucumbers, slice off 1/16 inch of the blossom end, and soak them in an ice bath for 15-30 minutes to firm and crisp them up. There are enzymes in the blossom end that can make your pickles soft, so be sure to remove them.
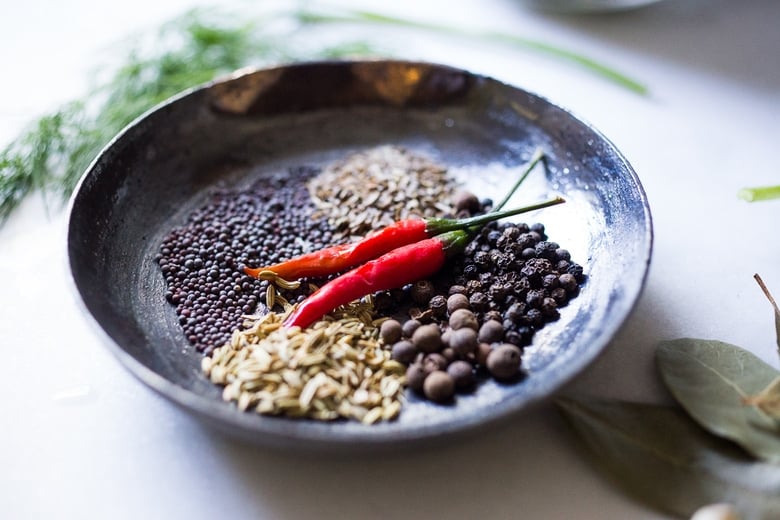
Step 2: Slice the garlic lengthwise and gather your spices.
Because these fermented pickles are left whole, you want the brine to be extra flavorful. I add a lot of garlic… 10-15 cloves, sometimes 20! Fermented Garlic is really good for the gut too!
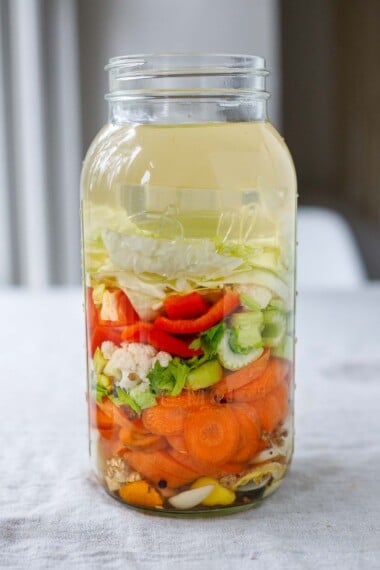
Step 3: Place the spices on the bottom of the jar, then sliced garlic, fresh dill and bay leaves, and then add 2 layers of cucumbers, end on end, in a large two-quart jar (half-gallon). Press everything down.
Step 4: Carefully measure and mix salt and water to create the 3% salt water brine- then pour this brine over the pickles leaving 1 1/2 inches of headroom.
How salt works in fermentation:
- In a nutshell, using the right ratio of salt in fermentation encourages the growth of healthy bacteria while at the same time killing off bad bacteria. You want to be precise when measuring the salt and water in these kinds of recipes.
- Too much salt may kill off ALL of the bacteria -preventing fermentation.
- Too little salt will allow bad bacteria to keep on living. It is a fine balance. 😉
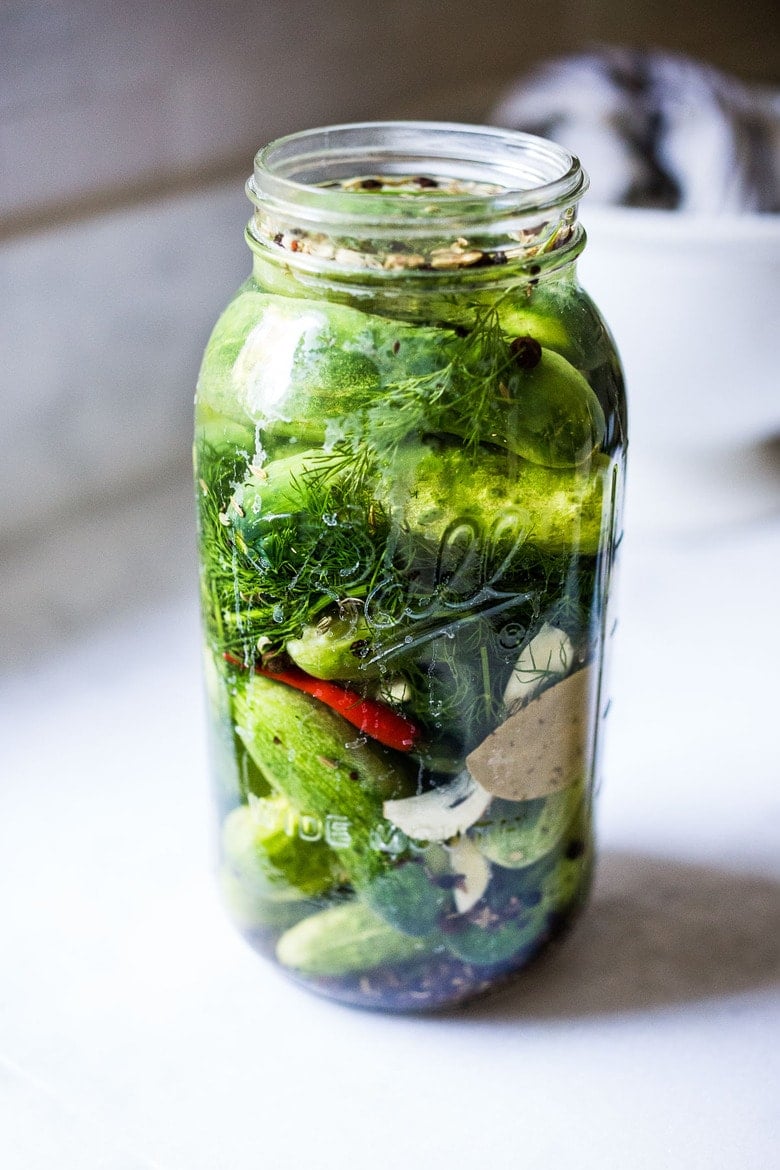
Step 5: Weigh down the cucumbers so they are completely submerged under the liquid, using a couple of fermentation weights, or a small zip lock bag filled with a little water (in a pinch).
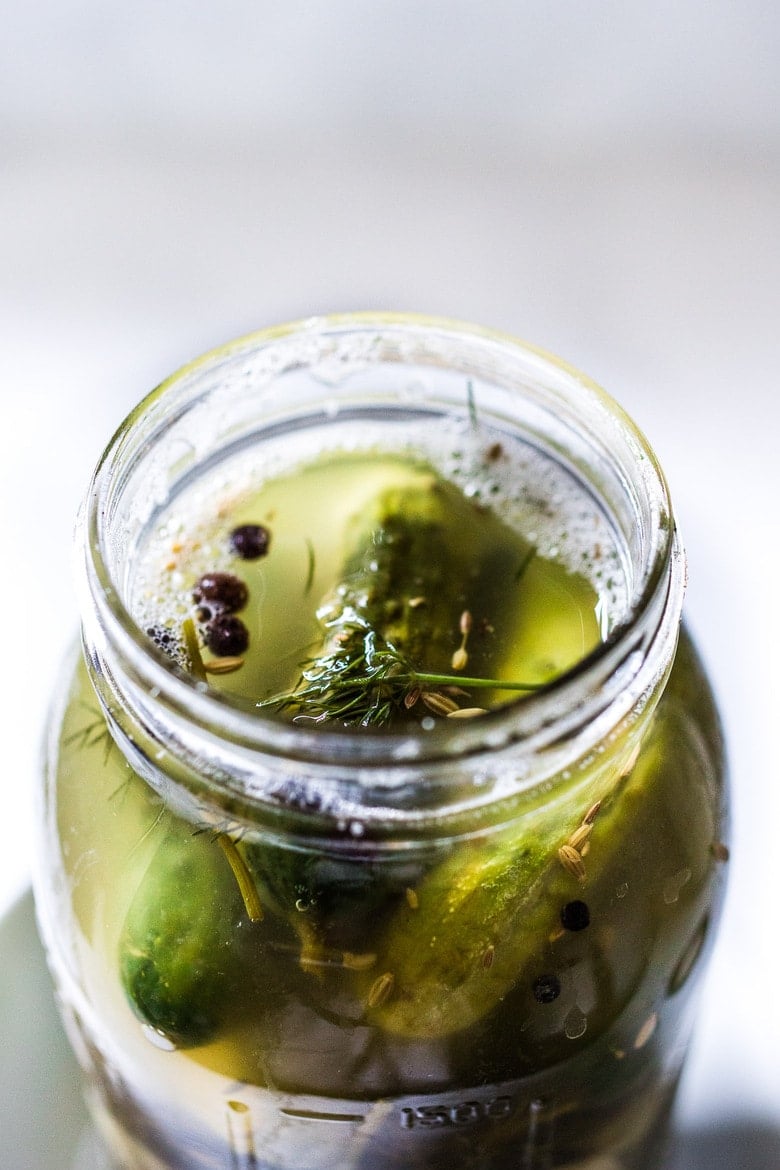
MOLD: If the cucumbers or seeds are not submerged under the brine and become exposed to air- they can develop mold, so spoon any floaters out with a slotted spoon. Most seeds should stay submerged.
Step 6: Cover loosely with a lid or towel (to prevent bugs or flies from coming in, and to allow gases to escape) place in a bowl or pan to catch any overflow, and place in a cool dark place for 3-7 days, like the basement. You can also use and airlock lid- which allows air to escape, but nothing to fly in.
Step 7: Check after 2-3 days. Look for signs of life: bubbles/ or cloudy water. A cloudy brine is GOOD. Tap the jar and see if bubbles rise to the top. Check to see if any brine overflowed into the bowl ( both signs of life). This often takes about 3-5 days, I find 4 days is the “sweet spot”, depending on temperature. Cloudy brine is delicious and nutritious!
Step 8: Place the jar in the fridge to further slow the fermentation with a loose lid. They will continue to ferment very slowly and will keep indefinitely.
Expert Tips:
- Ferment at cooler temps (60-70F) to keep pickles crisp. If your home is hot, try placing in a cooler with ice. Take the temp of the brine.
- The longer you ferment them (unrefrigerated), the tangier they will get. But they will also get softer. I like them crisp, but you may want them tangier and softer. You can taste them at any point after you see bubbles.
- Smell: your ferment should smell tangy, garlic and fresh. If you notice anything foul or unpleasant, your ferment may have been contaminated: most commonly by dirty hands, dirty utensils, or a dirty jar.
- If you want to create a “fizzy” brine for drinking, tighten the lid, and burp daily if leaving out. You can tighten the lid in the fridge, but burp weekly. This will create a little pressure and give it some effervescence.
- Anything that touches air- may mold. Always fish out any floating spices with a slotted spoon to prevent this.
Once they are cold, give them a taste. They should be crunchy and flavorful! The brine is deliciously tangy, salty, and effervescent -so tasty and full of gut-supporting probiotics. The garlic is tasty too! Eat it!
I find myself often drinking shots of the brine! I also make this Gin & Brine Martini!
Let me know how you like this one in the comments below! Plus, explore more of our toppings and condiments, DIY gifts, and cooking basics!
xoxoxo
More Favorite Ferments!
- Curtido & Cultured Salvadoran Slaw
- How to make Sauerkraut (Simple Cultured Cabbage)
- Beet and Cabbage Sauerkraut
- Cucumber Kimchi Pickles
- Turmeric Sauerkraut
More from Feasting at Home
How to make Fermented Pickles| 45-sec video

Homemade Fermented Pickles with Garlic and Dill
- Prep Time: 4 days
- Total Time: 4 days
- Yield: ½ gallon 1x
- Category: fermented, preserved
- Method: fermented
- Cuisine: American
- Diet: Vegan
Description
Learn how to make lacto-fermented pickles! An easy method for flavorful, crunchy, tangy, garlic dill pickles with only 15 minutes of hands-on time. Full of healthy, gut-healing probiotics these little guys are perfect as a low-calorie snack, or sliced and added to sandwiches.
Ingredients
- 2– 2 1/2 lbs pickling cucumbers– all similar size ( 5 inches)
- 5 cups filtered water or tap water (that is not overly chlorinated)
- 2 tablespoons fine sea salt or Himalayan salt (or basically one heaping teaspoon fine sea salt (7 grams) per one cup of water, to make a 3% brine.) * see notes.
- 1/4 teaspoon turmeric (optional, adds a “fresh” flavor)
- 1 teaspoon each: fennel seeds, coriander seeds, allspice, peppercorns, dill seeds, mustard seeds, celery seeds- and feel free to add more peppercorns!
- 10–20 garlic cloves, sliced (or double for extra garlicky)
- 1/2 onion, thinly sliced (optional)
- big handful of fresh dill
- 1–3 fresh red chilies – or dried arbol chilies, or add chili flakes (all optional)
- 3–4 bay leaves (or a grape leaf or oakleaf) – these are sources of tannic acid to help them stay crisp.
You’ll need a 1/2 gallon mason jar, crock, or 2 quart-sized jars- clean and sterile.
Instructions
- Prep Cucumbers. Rinse the cucumbers, remove 1/16-inch of the flower end of each cucumber (keeps them from getting soft) and place them in an ice-water bath, to crisp them up (15-30 minutes). Leave them whole.
- Make the brine. Mix the salt (2 tablespoons) and 5 cups cold water until dissolved.
- Wash your hands, jars, and any utensils. No need to sterilize, just clean!
- Assemble. In a large, clean two-quart mason jar, place all the whole spices into the bottom. Add the dill, garlic and onions or turmeric if using. With clean hands, pack one layer of cucumbers tightly, standing on end, then add the bay leaves, then add the second layer of cucumbers standing on end. Press everything down, leaving 1 ½ inches of headroom. Pour the saltwater brine over the top and weigh down the cucumbers with fermentation weights so they are submerged under the brine. Remove any spices that may have floated to the surface (which can mold). Cover the jar loosely with a lid or with a cloth- basically, the pickles will bubble and you want air to be able to escape.
- Ferment. Place the jar in a pan or bowl to collect any overflow and leave it in a cool dark place (60-70F) for 2 -3 days (a basement, or lower kitchen cupboard) and check for bubbles or overflow, indicating fermentation. Half-sour pickles will take 3-5 days with crisp, white interiors. If is colder than 65F, it may take longer, if hotter, they will ferment faster. Full sour pickles will take 14-21 days (see notes for a stronger saltwater ratio).
- Check and Inspect. After 2 days, check for signs of life: bubbles, overflow, or clouding. Tap the jar, and see if tiny bubbles rise to the top. I usually ferment for 3-4 days- I like crunchy pickles! Longer ferments will yield tangier pickles but will get softer as they ferment, and lose their vibrant color. Up to you. You can taste them at any point after you see bubbles, and ferment longer if you like. The brine will get cloudy as it ferments- this is a good sign! Once you see active bubbles, you can at this point place the jar in the fridge, where it will continue to ferment, but much more slowly. Keep the pickles submerged.
- Refrigerate. Once chilled, give them taste. They should be crispy and flavorful with a little tang. (At this point, if you want a tangier or softer pickle, you can absolutely pull them back out again and ferment for a few more days longer if you want.)
- If you like fizzy brine, tighten the lid, burping every week or so or try using an airlock. If you don’t want to think about it, give the lid one loose twist, so it’s on there, but gases can escape.
Notes
If you need more brine, make sure you use the same ratio- 1 heaping teaspoon sea salt per one cup of water.
If using a grape leaf, place it on the side of the jar, then layer the remaining ingredients.
If pickles turn out too soft- it may be due to too warm of temperature during fermentation, or the flower end wasn’t removed (the flower end of the cucumber has enzymes that can soften pickles).
Feel free to use 2, quart-size jars, dividing cucumbers, spices and brine between the jars.
BRINE: This recipe is a 3% salt water brine, which is considered “safe”. It equals 7 grams of salt per one cup of water. I’ve had really good luck with this ratio – and this ratio allows me to drink the brine (like a shot) this is really healthy – full of good gut-supporting bacteria!
If you want a stronger, saltier brine, feel free to go up to 4.5%. For a full sour pickle (14-21 days) use a 4.5% brine.
- 3% ratio = 7 grams salt per 1 cup of water. (1 1/4 teaspoon fine sea salt, per 1 cup water)
- 3.5% Ratio= 9 grams of salt per 1 cup of water. (1 1/2 teaspoon fine sea salt, per 1 cup water)
- 4.5% ratio 10.8 grams of salt per 1 cup of water. (2 teaspoons per cup of water)
Cutting the Cucumbers: I recommend leaving them whole. The texture is much better. After your first successful batch, feel free to experiment.
Nutrition
- Serving Size:
- Calories: 16
- Sugar: 1.3 g
- Sodium: 297.4 mg
- Fat: 0.2 g
- Saturated Fat: 0 g
- Carbohydrates: 3.7 g
- Fiber: 0.5 g
- Protein: 0.7 g
- Cholesterol: 0 mg


Hello I would love to try your recipe! My question is this: I just harvested about 8 cucumbers that I caught too late and are quite large (half Persian salad variety and half Boston Pickling variety) am I able to use both in the ferment and could I possibly cut them into chunks, big slices or spears? I’ve had luck with big slices using a vinegar brine but would love to try fermentation this time. Thank you !!!
Hi Lindsay, you can try- but I have not had the best luck with cutting the cucumbers or with Persian cucumbers (the skin is too thin). Of course you can try- but they seem to get overly soft.
If I double the recipe, would it be alright to use a one-gallon jar instead of two half-gallon jars?
Yes Darlene!
I’ve got two questions for you on this process.
If utilizing a ceramic crock, what are you checking and inspecting after 2 days, especially if it’s not supposed to be introduced to outside air/oxygen? If it were glass jars, you can obviously see without cracking it open.
Also, what to do with the “floaters”? Some of the peppercorns, seeds, and dill are floating above the weights in the crock. Do I open it up, which I’m not supposed to in order to remove it, or just forget about it, and trust the process?
Hi Bud, YES, you can expose it to air, this is not an issue at all! Open it up, collect the floaters with a slotted spoon. I would check for bubbling when you tap the side of crock. Smell it, does it smell tangy?
I mixed the 5 cups filtered water with 2 tablespoons of pink Himalayan salt.
But I guess I packed the jar so tightly only 3 cups of the brine fit in. Is this ok? All is submerged.
I put a glass weight and pickle pipe on.
Should be fine Donna!
I’m brand new to fermentation. I just tightly filled the 2 quart jar with cucumbers, dill, garlic, jalapenos, and 2-4 fresh bay leaves.
I filled the 5 cups filtered water to 2 Tablespoons of salt. I was only able to fit 3 cups in. Everything is submerged. Is this ok?
Should be fine Donna!
Nice and clear, great job! I’m making these in the next couple of days, my last batch smelled like boiled eggs. I tossed them.
It souns like your jar was contaminated. Let us know how this batch goes.
I’m not interested in printing your recipes with ads -please- remove them from your recipe
Hi Lillian, if you use the print button on the recipe card at the bottom of the post, no ads will print.
I don’t have a weight and I don’t like the idea of using a plastic bag and having the plastic in my pickles
The glass weights are really my favorite but I have also used a small glass cup or jar that will fit inside the pickling jar- fill with water or something heavier. Then just push it in every time you walk by to keep the veggie submerged. Placing a cabbage leaf over the vegetables before adding the weight also helps hold everything beneath the surface and distributes the pressure more evenly.
Can you do these in pints and quart jars?
Hey Vicky! Yes, you could, but whole pickles are harder to fit in the smaller jars. 🙂
This is exactly what I was looking for! I have been trying to make crunchy pickles without vinegar for years. The tip about cutting off the blossom end and using grape leaves for tannins is genius. Can not wait to try this recipe with my garden cucumbers this summer!
Great to hear Matt! Let us know how it goes.
You say 2 TABLESPOONS of salt per cup in your recipe, or one heaping teaspoon, or 7 grams of salt. I think it should be TEASPOONS.
Hey Jennie- if you are use the large half gallon jar you see in the photos, you’ll need 5 cups of water plus 2 tablespoons salt. Yes tablespoons. If you are using smaller jars and want to measure by cup- you add 1 heaping teaspoon per cup of water you use. Hope that helps. 🙂
I just made these for the 1st time today. My friend has been making then (and devouring them) all summer. When we opened a 5 day old jar, the brine is a little thick and slimy. They smell & taste great but the slick brine is weird to me. Is this normal?
Shoot Kim, a thick and slimy brine does not sound good. Were there signs of fermentation before you put it in the fridge? I wonder if it got contaminated somehow. I would not risk it. Sorry, I know how hard that is.
Love this recipe but I ran into a math challenge here. When halving the recipe from 2 L (2quart jars down to 1quart) down to 1L, the recipe calls only for 1 T salt. That isn’t 3-3.5%. It should be between 5teaspoons and 2Tablespoons of salt for 1 L jar to result in 3-3.5% salty brine. Your recipe shows 2T for 1/2gal. Can you clarify? Thanks!
Cassie
Hi I don’t think the multiplier is working Cassie. I’d just stick with the 2 ½ cups water with 1 tablespoon of salt for the brine and make as much as you need.
Can I used ground turmeric
You could I suppose but this would color the brine, and perhaps the pickles too.
I hope so 😅 because I’m about to!
Does anyone know how long a jar would last before it would go bad? I am going to make these but would rather make as many as possible if they can store well.
Hi Jill, if you refrigerate them, they won’t go bad. They just keep fermenting. 🙂 this is not a tradiitonal canning recipe.
Ah . . I’ve made them for several years and find them perfect, perfect, perfect at first. Like Jill, I prefer to make them in quantity (our small cuke season is so short), but find the second/third jar tend to get too soft, even if kept in the refrigerator. Am I doing something wrong? Should they be “burped” if kept in the fridge? It’s so disappointing when they get mushy. Suggestions, please?
HI Leslie, they do continue to ferment in the fridge, but slower. You could try shortening the initial fermentation time?
Last year I made 8 one-litre jars. They DO take up a lot of space in the fridge! I went through the first four in two months and they kept well. By 8-10 weeks, they really lost their crispness. By 3 months, they were mush. (How did our ancestors do it in the old days of the big ceramic tubs? Or did they just eat mushy pickles?)
Love this recipe! I have an overabundance of cucumbers and want to can them after fermenting is there anything I need to do to brine to water-bath the pickles
Hi Joseph, We haven’t tried pickling these because when heated most of the good probiotics will be destroyed. The good news is that these will last for many months in the fridge!
Are there any tell tale signs that the pickles are bad? This is the first time that I have used peppercorns, and the brine has a slight dirty look to it. But they smell good. Could it be dust from the peppercorns? Or should I just toss them?
Hi Jessica, Dirty or cloudy looking brine is totally normal and means that fermentation is happening!
Unfortunately this recipe was a fail for us. I think it doesn’t have enough salt. The previous recipe we tried was 4 c water to 3Tb salt and was successful. this is less salt with more water. Pickles didn’t ferment and created mold on top.
Sorry this didn’t for for you. It consistently works for me and as you see others too- with many successful comments. Is it possible you mismeasured the salt? I have done this before- it is easy to do.
You might want to include some measurements for the normal world. cups has an american size and a normal size. Gallons, etc.
Hey Ken, If you scroll all the way down (or use the jump to recipe button) it is all in the recipe card. Happy pickling! 🙂
Once the pickles fermented, Can you cut them up and them a different jar? if yes? Can I use the original brine and new spices to the jars?
Yes that should work fine!
Im excited to try making these tonight. I will stop by the farmers market today after work. One quick question. What type of onion would you recommend using? White onion? Also, does the turmeric need to be freshly grated? Thanks!
I like red onion but any type will do. You can just add a couple thin slices of turmeric. Happy fermenting!
Okay, so which is the blossom end?
Opposite the stem end. 🙂 Usually has a small raised area on the blossom end, the stem end tends to be indented.
I generally do the vinegar/water bath type but thought I’d give the ferment a try 🙂 Easier process so far. The proof will be at the end of my long ferment, can’t wait!
Exciting Cindy! Let us know how it goes.
I made these last summer and they were perfectly crisp and delicious. An abundance of fresh dill takes it to the next level. Today at the farmers market I stocked up on fresh dill and pickles and am fermenting as I write this. As for any leftover brine I soak hard-boiled eggs in it in the refrigerator in a mason jar for a few days. Simply amazing!
Oh! I am going to try that Paul. Sounds delicious! Appreciate your review.
I made these and accidentally left them for 4 weeks and they were divine. They did start to go a little soft as I used baby cucumbers from the supermarket in Australia with a higher water content but they were so yummy and the brine almost tasted a bit buttery. It was incredible. Obviously for the longer ferment I used the 4.5% brine and just used the weight of the salt for the cups as I know some measurements differ for U.S/AUS
But thank you for all the tips and optionals. I’m just about to make my second batch (I do have a huge fermenting crock with the water seal top, which is filled about half way with 1kg of cucumbers. Easy to keep the mouldies away also!!)
Wonderful Jacinta! So glad they turned out for you. So fun.