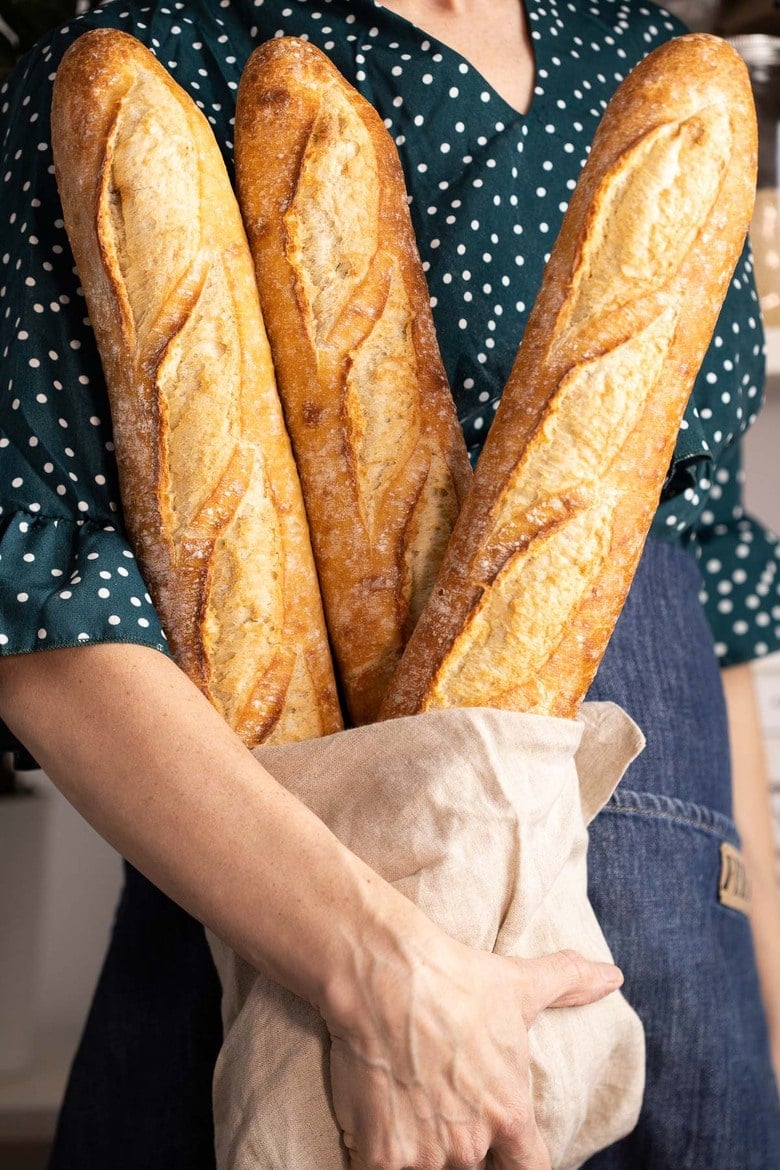
This sourdough baguette is everything you want in the French classic–a crunchy crust, an open, airy crumb, and lots and lots of flavor. And it’s easier to make than you think! Eat it plain, slathered in butter, or serve it with your favorite soup. For best results, this recipe requires sourdough starter, kitchen scale, a baguette pan and 3 days. See all our sourdough recipes here!

How to make Sourdough Baguettes! By now, many of you have perfected your Easy Sourdough Bread, and I thought I’d share a recipe for Sourdough Baguettes that will introduce a couple of new terms and techniques to add to your growing repertoire. This recipe was created by my friend, Kris Osborne, over at Baked- the blog.
She’ll introduce you to the terms “levain” and “autolyse”, two things I intentionally omitted from the Sourdough Bread recipe to keep it as simple as possible. But I know you are ready now! You’ll recognize the stretch and fold technique and will have, by now, be able to do this with your eyes closed. I’m so excited for you to try this. Keep in mind this recipe takes 3 days.
How to make Sourdough Baguettes| step-by-step Video
Sourdough Baguette ingredients
- Active, bubbly starter (make sure it doubles within 6 hours of feeding)
- Bread flour -try for organic, locally milled, if possible. 🙂
- Salt
- A scale
- Baguette Pan
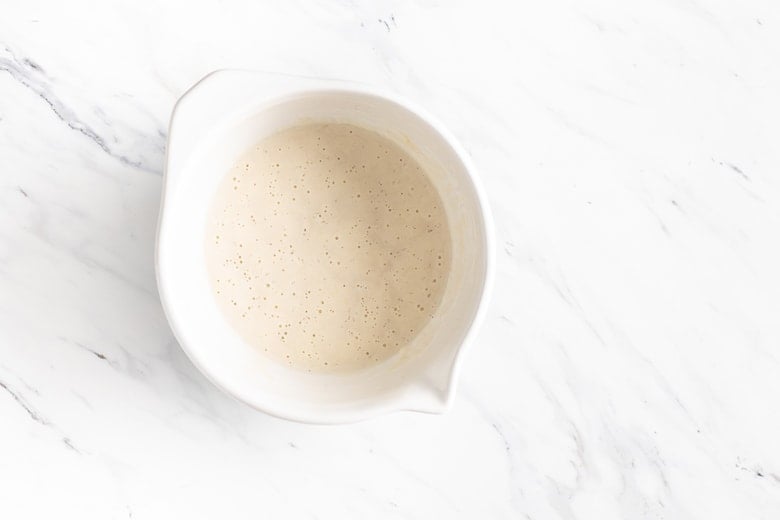
STEP ONE: The night before you plan to make the baguette dough, make the levain: In a medium bowl, mix together the starter, water, and bread flour until well-combined. Cover with a plate and rest overnight (8-12 hours) until very bubbly and active.

The levain should have many small bubbles across the top and throughout.
STEP TWO: Day two, morning. Transfer all of the levain to a large bowl. Add the water and bread flour, and mix until all of the flour is incorporated and a shaggy dough is formed. Cover with a lid or damp towel and set aside 45 minutes to rest. This is called the autolyse.
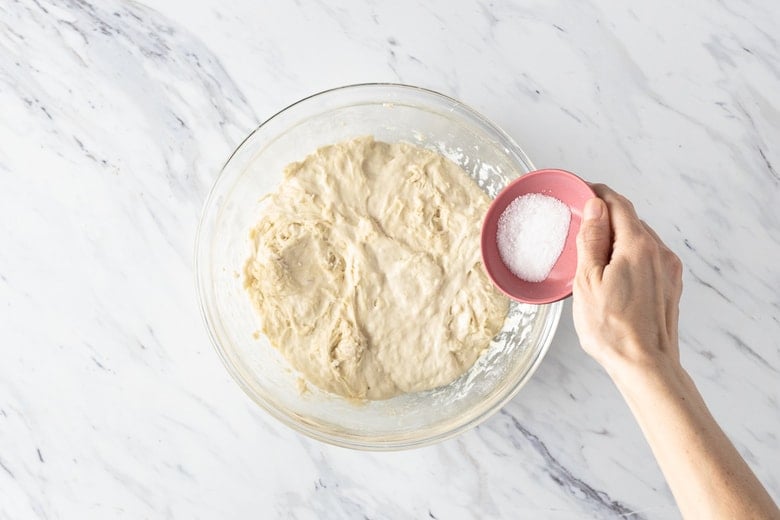
STEP THREE After the 45-minute rest period, add the salt to the dough and squeeze and pinch the salt into the dough until evenly distributed. Perform a set of stretch and folds (see notes), then cover and set aside for 30 minutes to rest.
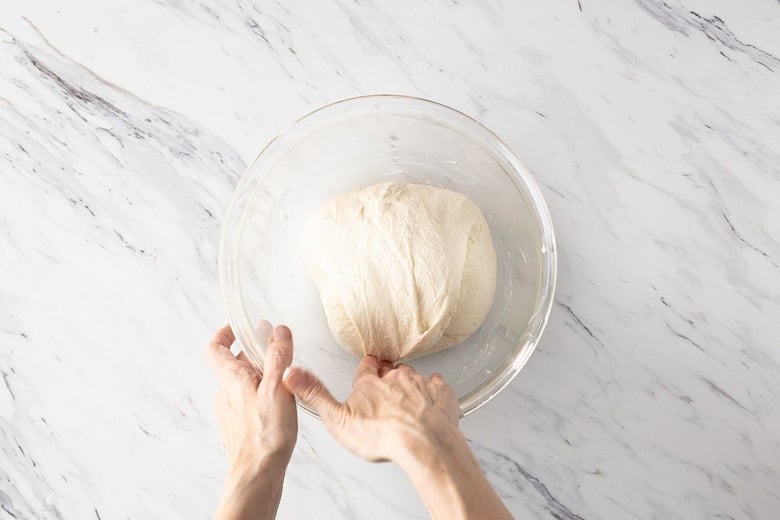
STEP FOUR: Continue to perform a set of “stretch and folds” every 30 minutes for 3 hours, covering and resting in between each round.
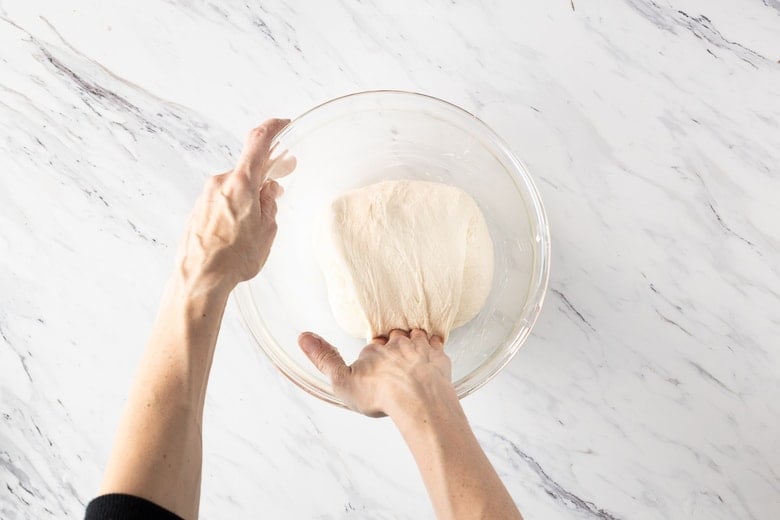
How to do the Stretch and folds
To perform a series of stretch and folds, imagine the dough in 4 quadrants. Grab the dough in the 12 o’clock position and pull it up and over toward yourself (toward the 6 o’clock position). Watch the video above.
Then, rotate the bowl a quarter turn to the right and grab the dough in the 12 o’clock position again (formerly 9 o’clock), bringing it up and down toward 6 o’clock once more. Repeat this step 2 more times until each quadrant of the dough has made it to the 12 o’clock position and has been stretched and folded onto itself.
The dough will look like a little parcel.
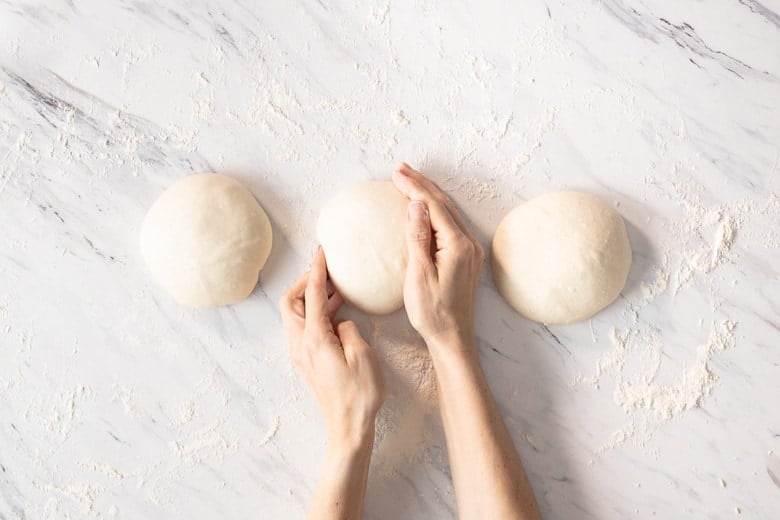
STEP FIVE Shape! Gently tip the dough onto a lightly floured surface and cut it into 3 equal portions. Using a circular cupping motion with the palm of your hand, gently roll each ball of dough on the countertop to create a taut ball.
Gently dust with flour and cover with a towel. Bench rest 30 minutes.
Sprinkle your countertop with flour and gently pat the first ball of dough into a rectangle, approximately 9-inches long. Fold the top third of the dough down (like folding a business letter) and press it into the dough, using the heel of your hand, to stick the edges together.
Rotate the dough 180 degrees and repeat so that both the bottom and top thirds have been folded in. Fold the dough in half once more to create a slim silhouette, and, again, use the heel of your hand to connect the edges. Roll the dough so it’s seam-side down and press and roll the dough out so that a baguette shape forms, pinching the edges to taper them, if necessary.
Place seam side down on a greased baguette pan or on floured parchment-lined sheet pan. Please refer to video above!
STEP SIX. Cover with plastic wrap and refrigerate overnight.
STEP SEVEN: Day 3: The next morning, preheat the oven to 500°F (260°C) with the oven racks positioned in the middle and one level below.
Bake the baguettes directly on baking sheet or the baguette pan. Keep in mind, the baguette pan will leave slight perforations on the bottom of the bread.
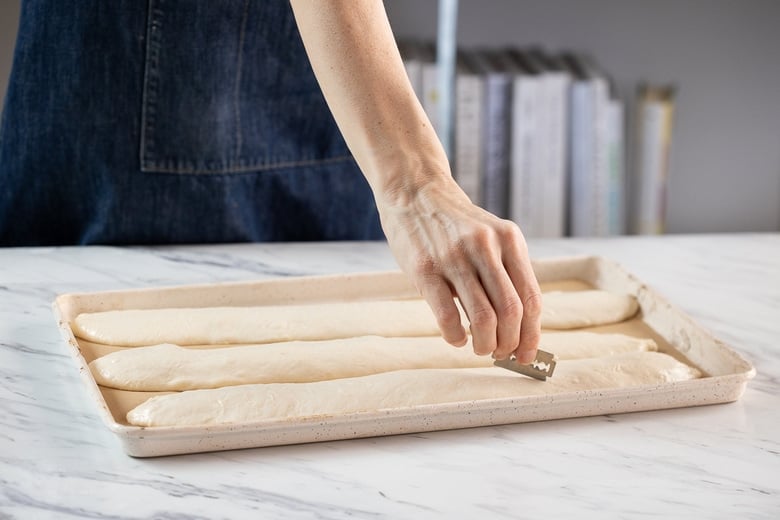
Using a lame (or sharp knife or razor blade), make 3-5 diagonal slashes into each piece of dough.
BAKE! Place a handful of ice cubes onto the second baking sheet. Immediately place the baguette dough into the oven on the middle rack and place the baking sheet with ice on the rack below. Close the oven door and turn the temperature down to 450°F. Bake for 30 – 35 minutes, or until the bread is a deep golden brown.
Remove from the oven and cool on a wire rack.

How to store Baguettes
Bread is best eaten on the day that it’s made, but if stored in paper will keep an additional day.
You can freeze baguettes sliced or whole. If slicing, freeze individual slices on a baking sheet, then place into a freezer bag. If freezing whole, wrap tightly with aluminum foil or plastic freezer wrap, then place in a freezer bag. Bread will keep this way for a few months.
Enjoy the process of learning how to make Sourdough Baguettes and let us know how it goes! Take a peek at all our sourdough recipes!
Happy Baking!
More Favorite sourdough recipes
- Jalapeño Cheddar Cheese Sourdough Bread
- Simple Sourdough Starter
- Sourdough Pizza Crust
- No-Knead Sourdough Bread
- Rosemary Olive Sourdough Bread
- Sourdough Crackers
- Vegan Banana Bread
- Overnight Sourdough Waffles
- Sourdough Pancakes
- Sourdough Scones
- Sourdough Biscuits
- Sourdough Buns
- Sourdough croutons

Sourdough Baguette Recipe
- Prep Time: 36 hours
- Cook Time: 35 mins
- Total Time: 36 hours 35 minutes
- Yield: 3 14-inch baguettes
- Category: bread, sourdough, baked
- Method: baked
- Cuisine: French
- Diet: Vegan
Description
This sourdough baguette is everything you want in the French classic–a crunchy crust, an open, airy crumb, and lots and lots of flavor. And it’s easier to make than you think! Eat it plain, slathered in butter, or serve it with your favorite soup. For best results, this recipe requires a kitchen scale, a baguette pan and 3 days time!
Ingredients
- 65 grams active bubbly starter
- 65 grams tepid water
- 65 grams bread flour
- 420 grams tepid water
- 600 grams bread flour
- 12 grams salt
Instructions
Day 1: (Evening) Levain
Make the levain: In a medium bowl, mix together the starter, water, and bread flour until well-combined. Cover with a plate and rest overnight (8-12 hours) until very bubbly and active. The levain should have many small bubbles across the top and throughout.
Day 2: Mix, stretch and folds, shape, bulk rise overnight.
- Mix. In the morning, transfer all of the levain to a large bowl. Add the water and bread flour, and mix until all of the flour is incorporated and a shaggy dough is formed. Cover with a lid or damp towel and set aside 45 minutes to rest. This is called the autolyse.
- Salt, stretch and fold. After the 45-minute rest period, add the salt to the dough and squeeze and pinch the salt into the dough until evenly distributed. Perform a set of stretch and folds (see video), then cover and set aside for 30 minutes to rest. Continue to perform a set of stretch and folds every 30 minutes for 3 hours, covering and resting in between each round.
- Divide. Gently tip the dough onto a lightly floured surface and cut it into 3 equal portions. Using a circular cupping motion with the palm of your hand, gently roll each ball of dough on the countertop to a create a taut ball. Gently dust with flour and cover with a towel. Bench rest 30 minutes.
- Shape. Sprinkle the countertop with flour and gently pat the first ball of dough into a rectangle, approximately 9-inches long. Fold the top third of the dough down (like folding a business letter) and press it into the dough, using the heel of your hand, to stick the edges together. Rotate the dough 180 degrees and repeat so that both the bottom and top thirds have been folded in. Fold the dough in half once more to create a slim silhouette, and, again, use the heel of your hand to connect the edges. Roll the dough so it’s seam-side down and press and roll the dough out so that a baguette shape forms, pinching the edges to taper them, if necessary.
- Bulk rise. Place them seam side down on a greased baguette pan or heavily dusted, parchment-lined sheet pan. Cover with plastic wrap and refrigerate overnight.
Day 3: Morning. Preheat, score and bake!
- Preheat. The next morning, preheat the oven to 500°F (260°C) with the oven racks positioned in the middle and one level below. Have a baking sheet ready to add ice cubes to. (See notes.)
- Score. When the oven is hot, remove the baguette dough from the fridge. Using a lame (or sharp knife or razor blade), make 3-5 diagonal slashes into each piece of dough (¼-½ inch deep).
- Bake. Place a handful of ice cubes onto the second baking sheet. Immediately place the baguette dough into the oven on the middle rack and place the baking sheet with ice on the rack below. Close the oven door and turn the temperature down to 450°F. Bake for 30 – 35 minutes, or until the bread is a deep golden brown. Remove from the oven and cool on a wire rack.
Bread is best eaten on the day that it’s made, but if stored in paper will keep an additional day. You can freeze baguettes, sliced or whole. If slicing, freeze individual slices on a baking sheet, then place into a freezer bag. If freezing whole, wrap tightly with plastic freezer wrap, then place in a freezer bag. Bread will keep this way for a few months.
Notes
Stretch and folds: To perform a series of stretch and folds, imagine the dough in 4 quadrants. Grab the dough in the 12 o’clock position and pull it up and over toward yourself (toward the 6 o’clock position). Then, rotate the bowl a quarter turn to the right and grab the dough in the 12 o’clock position again (formerly 9 o’clock), bringing it up and down toward 6 o’clock once more. Repeat this step 2 more times until each quadrant of the dough has made it to the 12 o’clock position and has been stretched and folded onto itself. The dough will look like a little parcel.
Baking: When transferring the cold baguette dough to a parchment-lined pan, it will be snake-ish and hard to work with. Move quickly and efficiently so you don’t disrupt the shape of the baguette too much. Alternatively, you can bake the baguettes directly on the baguette pan until you get more comfortable working with the dough. Keep in mind, the baguette pan will leave slight perforations on the bottom of the bread.
Steam: Create steam by placing ice cubes on a sheet pan on the lowest rack, under the baguettes.
Nutrition
- Serving Size: ¼ of a baguette
- Calories: 196
- Sugar: 0.2 g
- Sodium: 388.7 mg
- Fat: 0.9 g
- Saturated Fat: 0.1 g
- Carbohydrates: 39.3 g
- Fiber: 1.3 g
- Protein: 6.5 g
- Cholesterol: 0 mg


My baguette tasted good but came out a strange dull brown….I’m at 5400′ altitude. Could this affect the color?
Thank you, Jeanne
Hi Jeanne, interesting. Did you add any other type of flour? I have not heard of altitude affecting the color- but this doesn’t mean it couldn’t. Does anyone else know the answer to this?
Thank you for this wonderful recipe. The clear instructions made what I thought was an impossible task into a very approachable one. (Oh, and the bread is delicious!)
Perfect Jocelyn, so happy they worked out for you!
I made my baguettes in a covered ceramic baker and omited the ice. I baked at 35 mins but didn’t get the browning I thought I should.
Hi Alice, I usually bake these uncovered on a sheet pan- you could try uncovering them at the end until they brown up a bit?
Do you know about how much active starter in grams it ends up being? I fed my starter this morning before reading this recipe. Thanks!
Hi Sarah- 65 grams. 🙂
Thank you for giving us such easy steps to follow. The baguettes turned out fantastic. After 35min I took them out of oven and had to put back in oven for a further 10min upside down for the bottom to brown. Should I have taken out the pan with ice at halftime? I feel that’s why it didn’t go crusty and brown underneath. It worked fine though!
Hi Nitsa- I am glad you were able to make this work! And I am not sure- I suppose you could try that next time and see if that makes a difference?
Can I use AP flour instead of bread flour?
Some people have with success, but I personally havent so not 100% positive here. My guess is, it should be ok?
I added the salt when I added the flour and water!!! Did I completely ruin it??? 😭😭😭
No it should be ok. 🙂
We made this recipe for the first time – ever – cooking with a sourdough starter. It turned out PERFECT. Our baguettes are something to sing about. I followed the recipe to a “T”. Thank you to the author!
Amazing, so happy to hear this!
Hi,I am struggling to understand the timeline too, it says make the levain overnight, then bulk rise / shape. This takes me to about mid day.Should I then leave the baguettes out until the evening before popping them in the fridge? Or put in the fridge straight after shaping? Thank you!
Hi Deborah, refrigerate when you are done shaping ( mid day-ish) and bake in the morning.
Hi Sylvia,
Thank you for your answer, for some reason I am still getting really small bubbles inside, like the dough is underproofed.
Ps: your no knead sourdough recipe has been a life changer, thank you so much for it 🙂
Thanks Deborah! You can try fiddling with the time- if your fridge is super cold, it may take a bit longer.
I’m having a little bit of a hard time understanding the timeline. Is it
Mix dough (stretch and folds for first 3 hrs) Bulk rise (6-8hrs?) THEN dump out to shape? Or do you dump out to shape after the first 3hrs of stretch and folds? Thank you!
Hi Chelsea- Shape after the first 3 hours. Then bulk rise in the fridge over night. 🙂
My bread is flat, it was nice starter full of bubbles, the dough nicely spring back, baked in 480 under cover ,than 450 and came back flat ….what could be wrong ?
Hi Lenik, I think it may be overproofed. I would try lessening the rising time?
Is 6 hours the refrigerator long enough?
You are right on the edge there! Could be ok??
Omg so good!!! So crispy on the outside and chewy soft in the middle. A dream!!! I did the stretch and folds at night and quite honestly skipped some bench rest time because of bedtime and it still turned out perfectly. Thank you!!!
awesome Angeli!
Absolutely delicious. This was the second time trying baguettes are they turned out so delicious. They were airy and light on the inside and crisp and the outside. This will be my go to recipe.
So glad these worked out for you Tiffany!
Loving this recipe! It’s very forgiving of my goofs and errors (e.g., one time I forgot bench rest; another I dropped my baguette pan upside down when I was taking it out of the fridge). This week I subbed 50g of the flour with ground flaxseed and I upped the water by about 15g since flax absorbs so much. It came out amazing (although more “rustic” looking). I also used half the dough to make a loaf and it was epic as well! Happy to share images if you’d like.
Awesome to hear Julie!
I accidentally added salt to the mixture before the first 45 min rest. Is this going to mess up my bread? How can I fix it?
Hey Kiley! You should be ok- can’t really fix it at this point- I would just keep going. 🙂
This recipe does not appear to have any bulk rising requirement, only a second rise in the refrigerator. Is there a reason for omitting the bulk rise?
See “day two” of the recipe card!
This recipe covers about 6-8 during day 2. To avoid over bulk fermentation, I don’t want my sd in fridge for much longer than 8hrs. Where in the recipe can you take a break in terms of steps, that won’t harm the sd end result? Thanks in advance, it’s a great recipe!
Hey Rachelle! I’m not sure I understand the question… to take a “break” at any point, place the dough in the fridge (not really a true break) but this will slow down the fermentation. Hope that helps?
Perfect, Thanks!
I was so worried I would mess this up as I’m very new to the sourdough adventure, but your directions and video were so helpful and easy to follow that my finished baguettes were amazing. Thank you so much for this recipe. I have shared it with many of my sourdough friends.
What a great feeling! So happy it worked out for you!
This was my first time doing a baguette of any kind, and they turned out perfectly. I used my wholemeal starter, and the baguettes are a 350g/150g organic white bread flour/organic wholemeal bread flour.
The crust, rise and crumb were far better than I’d ever expected. Great recipe, thank you so much.
Great to hear Paul!
Is it possible to do a shorter second proof out of the fridge so I can bake them on the second day?
Hi Ros, I think so, but haven’t tried. But I don’t see why not.
What’s the longest you can leave the baguettes in the fridge for the second rise?
It really depends on your fridge temp. Perhaps 12 hours?
I am having trouble viewing the video. After the ad plays, it changes to a different video
Hi there, just refresh the page. Click play. You can skip the ad and then halfway through the video will ask if you want to “stay”, click that to keep watching. 🙂
question, can you use this same recipe to make a sourdough loaf and simply keep it in one lump? or is this recipe only for sourdough *baguettes*
Hi Alex- I haven’t tried- but I don’t see why not?
I was hosting our monthly dinner club and wanted to make this bread ahead of the party. So, I partially cooked the loaves – around 20 minutes. (I did leave one in for our dinner that night.) After cooling, wrapped in foil and then frozen. Day of party pulled them and after thawed baked 8-10 minutes till nicely browned. I think I will do this from now on with my extra loaves.
This is my favorite sourdough bread recipe now. Thank you!
Awesome to hear!
I’ve used this recipe a couple times and they have been delicious, but the baguettes seem to flatten after the second proofing. Is my fridge too cold, am I proofing too long?
To me it sounds over proofed? Perhaps try shortening the first proof?
Sounds like a great plan! Question did you use the ice cubes in oar or final bake?
No, I just thawed them and then baked about 8 minutes.