This sourdough baguette is everything you want in the French classic–a crunchy crust, an open, airy crumb, and lots and lots of flavor. And it’s easier to make than you think! Eat it plain, slathered in butter, or serve it with your favorite soup. For best results, this recipe requires sourdough starter, kitchen scale, a baguette pan and 3 days. See all our sourdough recipes here!

How to make Sourdough Baguettes! By now, many of you have perfected your Easy Sourdough Bread, and I thought I’d share a recipe for Sourdough Baguettes that will introduce a couple of new terms and techniques to add to your growing repertoire. This recipe was created by my friend, Kris Osborne, over at Baked- the blog.
She’ll introduce you to the terms “levain” and “autolyse”, two things I intentionally omitted from the Sourdough Bread recipe to keep it as simple as possible. But I know you are ready now! You’ll recognize the stretch and fold technique and will have, by now, be able to do this with your eyes closed. I’m so excited for you to try this. Keep in mind this recipe takes 3 days.
How to make Sourdough Baguettes| step-by-step Video
Sourdough Baguette ingredients
- Active, bubbly starter (make sure it doubles within 6 hours of feeding)
- Bread flour -try for organic, locally milled, if possible. 🙂
- Salt
- A scale
- Baguette Pan
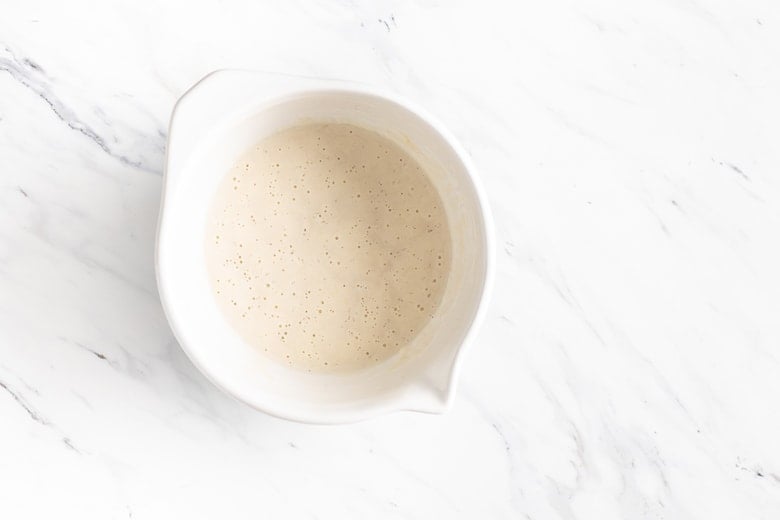
STEP ONE: The night before you plan to make the baguette dough, make the levain: In a medium bowl, mix together the starter, water, and bread flour until well-combined. Cover with a plate and rest overnight (8-12 hours) until very bubbly and active.

The levain should have many small bubbles across the top and throughout.
STEP TWO: Day two, morning. Transfer all of the levain to a large bowl. Add the water and bread flour, and mix until all of the flour is incorporated and a shaggy dough is formed. Cover with a lid or damp towel and set aside 45 minutes to rest. This is called the autolyse.
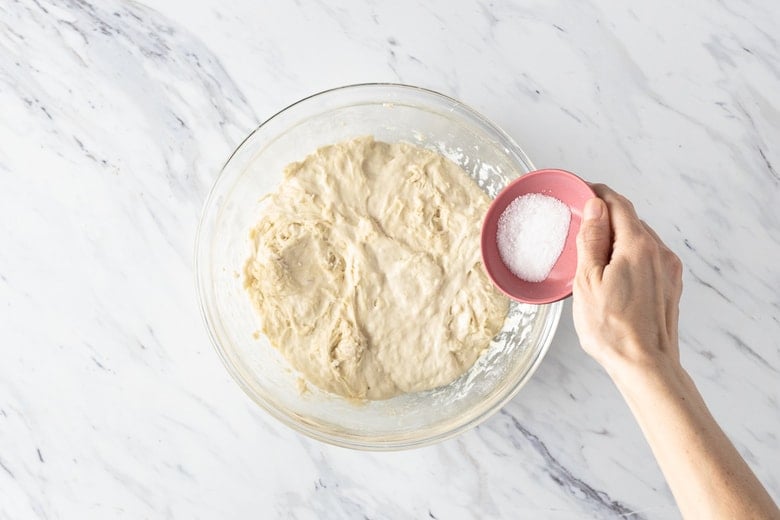
STEP THREE After the 45-minute rest period, add the salt to the dough and squeeze and pinch the salt into the dough until evenly distributed. Perform a set of stretch and folds (see notes), then cover and set aside for 30 minutes to rest.
STEP FOUR: Continue to perform a set of “stretch and folds” every 30 minutes for 3 hours, covering and resting in between each round.
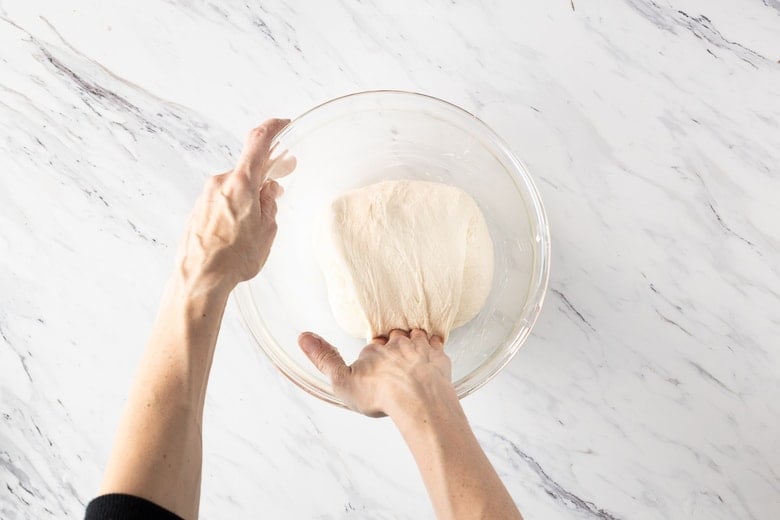
How to do the Stretch and folds
To perform a series of stretch and folds, imagine the dough in 4 quadrants. Grab the dough in the 12 o’clock position and pull it up and over toward yourself (toward the 6 o’clock position). Watch the video above.
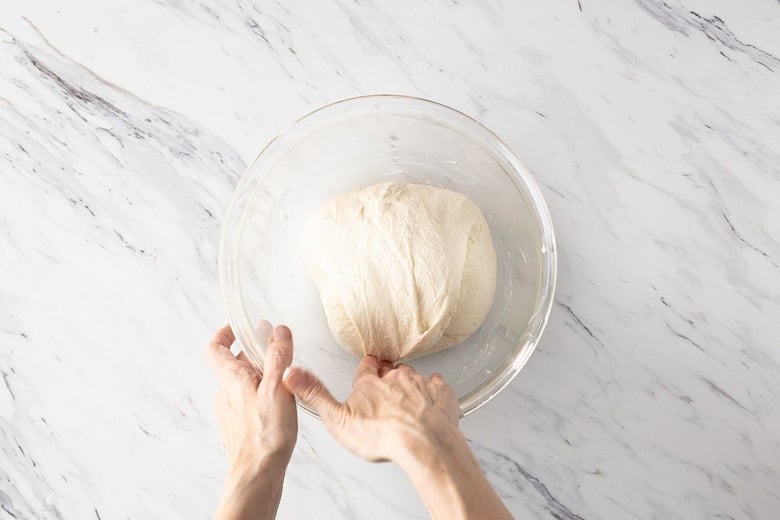
Then, rotate the bowl a quarter turn to the right and grab the dough in the 12 o’clock position again (formerly 9 o’clock), bringing it up and down toward 6 o’clock once more. Repeat this step 2 more times until each quadrant of the dough has made it to the 12 o’clock position and has been stretched and folded onto itself.
The dough will look like a little parcel.
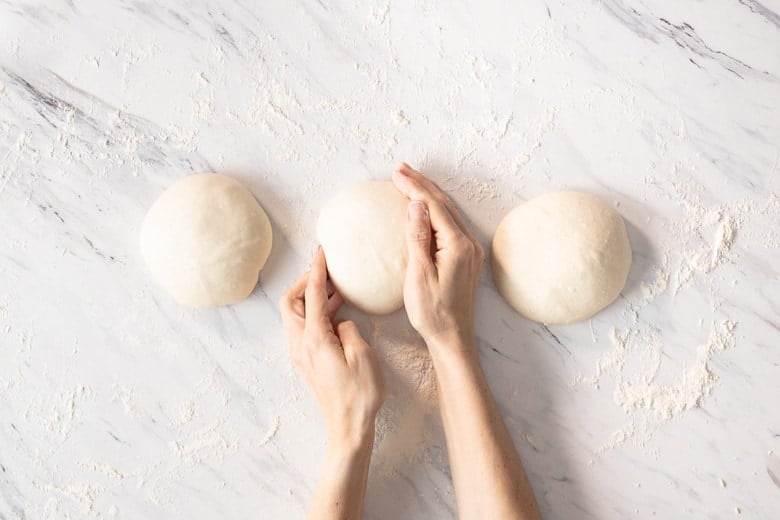
STEP FIVE Shape! Gently tip the dough onto a lightly floured surface and cut it into 3 equal portions. Using a circular cupping motion with the palm of your hand, gently roll each ball of dough on the countertop to create a taut ball.
Gently dust with flour and cover with a towel. Bench rest 30 minutes.
Sprinkle your countertop with flour and gently pat the first ball of dough into a rectangle, approximately 9-inches long. Fold the top third of the dough down (like folding a business letter) and press it into the dough, using the heel of your hand, to stick the edges together.
Rotate the dough 180 degrees and repeat so that both the bottom and top thirds have been folded in. Fold the dough in half once more to create a slim silhouette, and, again, use the heel of your hand to connect the edges. Roll the dough so it’s seam-side down and press and roll the dough out so that a baguette shape forms, pinching the edges to taper them, if necessary.
Place seam side down on a greased baguette pan or on floured parchment-lined sheet pan. Please refer to video above!
STEP SIX. Cover with plastic wrap and refrigerate overnight.
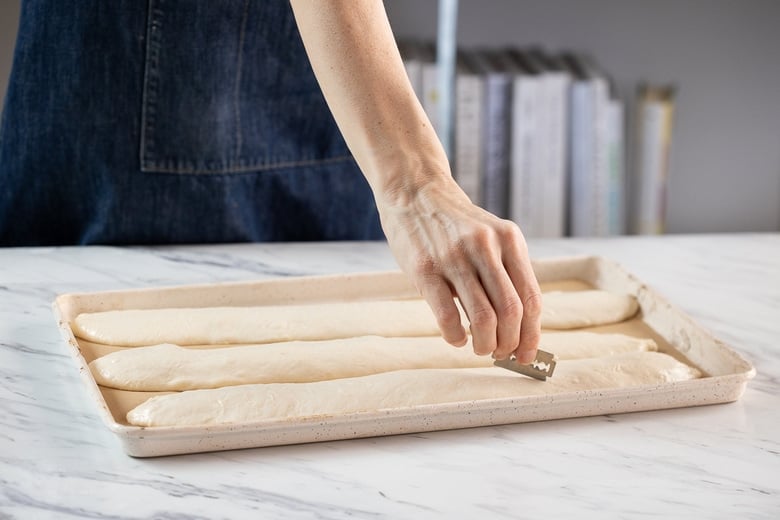
STEP SEVEN: Day 3: The next morning, preheat the oven to 500°F (260°C) with the oven racks positioned in the middle and one level below.
Bake the baguettes directly on baking sheet or the baguette pan. Keep in mind, the baguette pan will leave slight perforations on the bottom of the bread.
Using a lame (or sharp knife or razor blade), make 3-5 diagonal slashes into each piece of dough.
BAKE! Place a handful of ice cubes onto the second baking sheet. Immediately place the baguette dough into the oven on the middle rack and place the baking sheet with ice on the rack below. Close the oven door and turn the temperature down to 450°F. Bake for 30 – 35 minutes, or until the bread is a deep golden brown.
Remove from the oven and cool on a wire rack.

How to store Baguettes
Bread is best eaten on the day that it’s made, but if stored in paper will keep an additional day.
You can freeze baguettes sliced or whole. If slicing, freeze individual slices on a baking sheet, then place into a freezer bag. If freezing whole, wrap tightly with aluminum foil or plastic freezer wrap, then place in a freezer bag. Bread will keep this way for a few months.

Enjoy the process of learning how to make Sourdough Baguettes and let us know how it goes! Take a peek at all our sourdough recipes!
Happy Baking!
More Favorite sourdough recipes
- Jalapeño Cheddar Cheese Sourdough Bread
- Simple Sourdough Starter
- Sourdough Pizza Crust
- No-Knead Sourdough Bread
- Rosemary Olive Sourdough Bread
- Sourdough Crackers
- Vegan Banana Bread
- Overnight Sourdough Waffles
- Sourdough Pancakes
- Sourdough Scones
- Sourdough Biscuits
- Sourdough Buns
- Sourdough croutons

Sourdough Baguette Recipe
- Prep Time: 36 hours
- Cook Time: 35 mins
- Total Time: 36 hours 35 minutes
- Yield: 3 14-inch baguettes
- Category: bread, sourdough, baked
- Method: baked
- Cuisine: French
- Diet: Vegan
Description
This sourdough baguette is everything you want in the French classic–a crunchy crust, an open, airy crumb, and lots and lots of flavor. And it’s easier to make than you think! Eat it plain, slathered in butter, or serve it with your favorite soup. For best results, this recipe requires a kitchen scale, a baguette pan and 3 days time!
Ingredients
For the levain:
- 65 grams active bubbly starter
- 65 grams tepid water
- 65 grams bread flour
For the dough:
- 420 grams tepid water
- 600 grams bread flour
- 12 grams salt
Instructions
Day 1: (Evening) Make the Levain
Make the levain: In a medium bowl, mix together the starter, water, and bread flour until well-combined. Cover with a plate and rest overnight (8-12 hours) until very bubbly and active. The levain should have many small bubbles across the top and throughout.
Day 2: Mix the dough, first rise, and shape.
- In the morning, transfer all of the levain to a large bowl. Add the water and bread flour, and mix until all of the flour is incorporated and a shaggy dough is formed. Cover with a lid or damp towel and set aside 45 minutes to rest. This is called the autolyse.
- After the 45 minute rest period, add the salt to the dough and squeeze and pinch the salt into the dough until evenly distributed. Perform a set of stretch and folds (see video), then cover and set aside for 30 minutes to rest.
- Continue to perform a set of stretch and folds every 30 minutes for 3 hours, covering and resting in between each round.
- Gently tip the dough onto a lightly floured surface and cut it into 3 equal portions. Using a circular cupping motion with the palm of your hand, gently roll each ball of dough on the countertop to a create a taut ball. Gently dust with flour and cover with a towel. Bench rest 30 minutes.
- Shape: Sprinkle your countertop with flour and gently pat the first ball of dough into a rectangle, approximately 9-inches long. Fold the top third of the dough down (like folding a business letter) and press it into the dough, using the heel of your hand, to stick the edges together. Rotate the dough 180 degrees and repeat so that both the bottom and top thirds have been folded in. Fold the dough in half once more to create a slim silhouette, and, again, use the heel of your hand to connect the edges. Roll the dough so it’s seam-side down and press and roll the dough out so that a baguette shape forms, pinching the edges to taper them, if necessary.
- Place seam side down on a greased baguette pan or heavily dusted, parchment-lined sheet pan.
- Cover with plastic wrap and refrigerate overnight.
Day 3: Morning. Preheat, score and bake!
The next morning, preheat the oven to 500°F (260°C) with the oven racks positioned in the middle and one level below. Have a baking sheet ready to add ice cubes to. (See notes.)
Score: When the oven is hot, remove the baguette dough from the fridge. Using a lame (or sharp knife or razor blade), make 3-5 diagonal slashes into each piece of dough (¼-½ inch deep).
Bake: Place a handful of ice cubes onto the second baking sheet. Immediately place the baguette dough into the oven on the middle rack and place the baking sheet with ice on the rack below. Close the oven door and turn the temperature down to 450°F. Bake for 30 – 35 minutes, or until the bread is a deep golden brown. Remove from the oven and cool on a wire rack.
Bread is best eaten on the day that it’s made, but if stored in paper will keep an additional day. You can freeze baguettes sliced or whole. If slicing, freeze individual slices on a baking sheet, then place into a freezer bag. If freezing whole, wrap tightly with plastic freezer wrap, then place in a freezer bag. Bread will keep this way for a few months.
Notes
Stretch and folds: To perform a series of stretch and folds, imagine the dough in 4 quadrants. Grab the dough in the 12 o’clock position and pull it up and over toward yourself (toward the 6 o’clock position). Then, rotate the bowl a quarter turn to the right and grab the dough in the 12 o’clock position again (formerly 9 o’clock), bringing it up and down toward 6 o’clock once more. Repeat this step 2 more times until each quadrant of the dough has made it to the 12 o’clock position and has been stretched and folded onto itself. The dough will look like a little parcel.
Baking: When transferring the cold baguette dough to a parchment-lined pan, it will be snake-ish and hard to work with. Move quickly and efficiently so you don’t disrupt the shape of the baguette too much. Alternatively, you can bake the baguettes directly on the baguette pan until you get more comfortable working with the dough. Keep in mind, the baguette pan will leave slight perforations on the bottom of the bread.
Steam: Create steam by placing ice cubes on a sheet pan on the lowest rack, under the baguettes.
Nutrition
- Serving Size: ¼ of a baguette
- Calories: 196
- Sugar: 0.2 g
- Sodium: 388.7 mg
- Fat: 0.9 g
- Saturated Fat: 0.1 g
- Carbohydrates: 39.3 g
- Fiber: 1.3 g
- Protein: 6.5 g
- Cholesterol: 0 mg


Just took my loaves out of the oven. They are beautiful! And delicious. Love this recipe. I was concerned that I had missed a step because there was not a long bulk rise period after the 3 hr folding step. But no! There wasn’t one. Made the process go quickly. I could not get my loaves long and narrow. But now that I know this recipe is so good, I will try again!
Great to hear this worked out Sandra!
First time making any type of sourdough and this was an excellent recipe!!! Thanks so much – baguettes turned out great.
Awesome to hear!
Love the baguettes. How would you adapt recipe for boule shape?
Hi Terri, refer to our Easy Sourdough Bread recipe!
This is my first attempt at sourdough. Just waiting (impatiently!) for my levin to ferment. I have had great success with regular baguettes baking on a pre-heated pizza stone as opposed to a sheet pan. Would a pizza stone be good here or should I do what I usually do on a first attempt and just follow the recipe exactly? Thanks!
I haven’t tried that but love the idea of it! Could you experiment with one baguette first -before committing to all three? Please let me know how it turns out!
Great recipe! I have made it three times and each time they came out delicious. I’ve followed the recipe for the overnight rise and bake and I have also baked it on the same day without refrigerating and it also came out nice!! Thank you!!
Oh good to know! Thanks so much for sharing Lani!
Hi, I am looking for this step on the notes but I dont seem to be able to locate it – Prepare a baking sheet with parchment paper and have a second baking sheet ready to add ice cubes to. (See notes.)
Not sure how exactly do i do this step?
Hi Maxine! I added some notes in the recipe card. Thanks for pointing that out!
Do I need to use a baguette pan?
Hi Kathleen, no, you don’t have to, but it does seem to help keep their shape. 🙂
Very easy to make delicious sourdough baguettes!
Awesome to hear Terri!
Really yummy recipe! I left my bread in the fridge for closer to 24 hours because I wanted to have it with dinner and it still turned out great. Everyone loved it and so did I. It was not quite as airy as the recipe shows but still tasted delicious and that could have been my fault. Overall delicious recipe 🙂
Thanks Carrie! Glad it worked for you!
I would really love to know the weight of the leven ready to add to the flour mixture so I can make this with active starter. Have you weighed it before?
I have not Mia, but will the next time I make these!
I weighed it at 195g after fed.
Hi! I’m in the midst of this recipe and on day 2 right before the refrigeration. I started the process last night at 9pm and restarted 9am this morning. It’s now 2pm, should I leave the bread in fridge for 16-18 hours until tomorrow morning? Or is that too long?
Sorry I think I missed this. What did you end up doing?
Great and super easy recipe! Very delicious bread. But as for me, it’s rather ciabatta than french baguette.
Particulary love it! Thanks a lot❤️
Thanks Tetiana- glad you are enjoying it!
What is the best thing to use when greasing the baguette pans?
Hi Candice- I use spray olive oil. 😉
This recipe looks fantastic, thank you.
Am I understanding this correctly, after stretching and folding every 30 minutes for three hours, you shape the dough and put it into the fridge to cold ferment overnight? After the last stretch and fold, you don’t leave the dough to double in size, you shape and put in the fridge?
Yes, that is correct. It will rise in the fridge.
Love this recipe. I have one question. I use all purpose flour instead of bread flour for the leaving. Is that okay
Yes, if it seems to turn out for you?
Hi,
I wondered if I were to add toppings (poppy or sunflower seeds) to this when would be the best time. After shaping and putting in the fridge for overnight proof? Or just before baking?
I would add before putting in the fridge, they may stick better?
Is there any possibility that the stretch and fold scan be done every 15 minutes? I don’t want to ruin my baguettes but I’m impatient. I’ve been using your recipes for years now and they’re great!
I guess you could… but I don’t think that will make the process any faster? Just more work? 🙂
How much fed sourdough starter do you use ? I understand you tell us how to make it but I would like to know in grams how much it makes
Hi Sophie! Jump to the recipe card- in the first section; you’ll see it 65 grams. 🙂
I’ve made plenty of baguettes, I know how to pre-shape and shape.
This dough hydration is too high. Dough doesn’t keep its shape and is too sticky to shape into baguettes. Shaping should be fun, this was not.
I’m sorry this was frustrating for you. Is it possible the water was mismeasured? The hydration seems pretty perfect to me…
So far, this is the best sourdough baguette recipe I have found. Thank you so much for sharing. My bubbles were not quite as large as shown in the photos, but I think that was likely my own fault as I kind of forgot about the dough a couple times and did not give it the refrigerator time suggested. It was a busy weekend and I had a lot going on. It was still wonderful and everyone who ate it loved it.
A quick note to people after reading the reviews that didn’t turn out so well: Starter and Culture are not the same. I keep my CULTURE in the refrigerator, but when you make the starter you want to schedule it so that the levian is fired up and ready to go on the counter. I take the culture out of the fridge, mix it with 100F water and then mix in the flour. In 6-8 hours is is nearly 3 times its original size. This is when you want to mix in the flour as it needs more food. This starter uses more of the culture compared to the amount of flour than any other recipe I make, but it works. The flip side of this is that it is very susceptible to over-proofing if you don’t refrigerate as suggested to slow it down. The schedule is a little more critical because of this, but is definitely produces as great sourdough flavor and big rise if followed correctly. It needs to go right from the refrigerator into the oven after slicing the top.
Thanks Andy, appreciate this- helpful!
Totally worth the time. Delicious!
Great to hear!
I have just finished all the stretch and folds and dumped the dough out on the counter to preshape but it is much looser and sticky than I think it should be. Should I do anything else or just carry on?
Carry on!
I love this recipe, but whenever I bake it, mine burns by about 15 minutes in! I turn it down to 450, keep the steam the whole time, but it still burns. Would you recommend covering it with foil for some portion of time? My oven is new, but seems to cook things quickly
Hi Carly- I wonder if you could try placing a sheet pan on a rack below it?
Instructions are easy to follow. Only question I had was on the second rise, should dough be placed in the fridge at the beginning of that step or just before going to bed?
Hey Ian- Place in the fridge right after you complete that step. 🙂
Well thought out recipe. Thanks for not adding all sorts of unnecessary steps. Think I can get a couple boules out of this?
Thanks David! You may want to take a peek at out Easy Sourdough Bread?