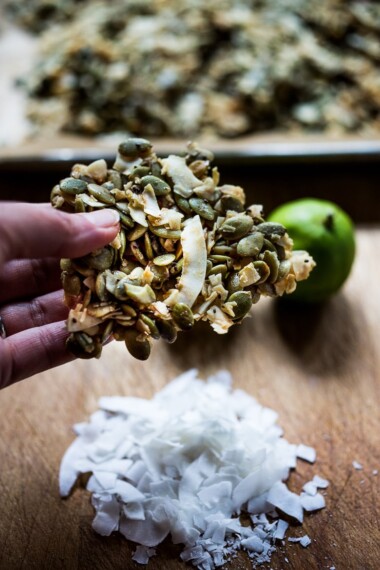
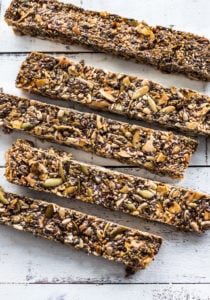
These gluten-free granola bars (aka Seed Bars) are easy and delicious! They’re nut-free, oil-free, and grain-free, made with seeds and coconut- super crunchy, energizing, and satisfying.
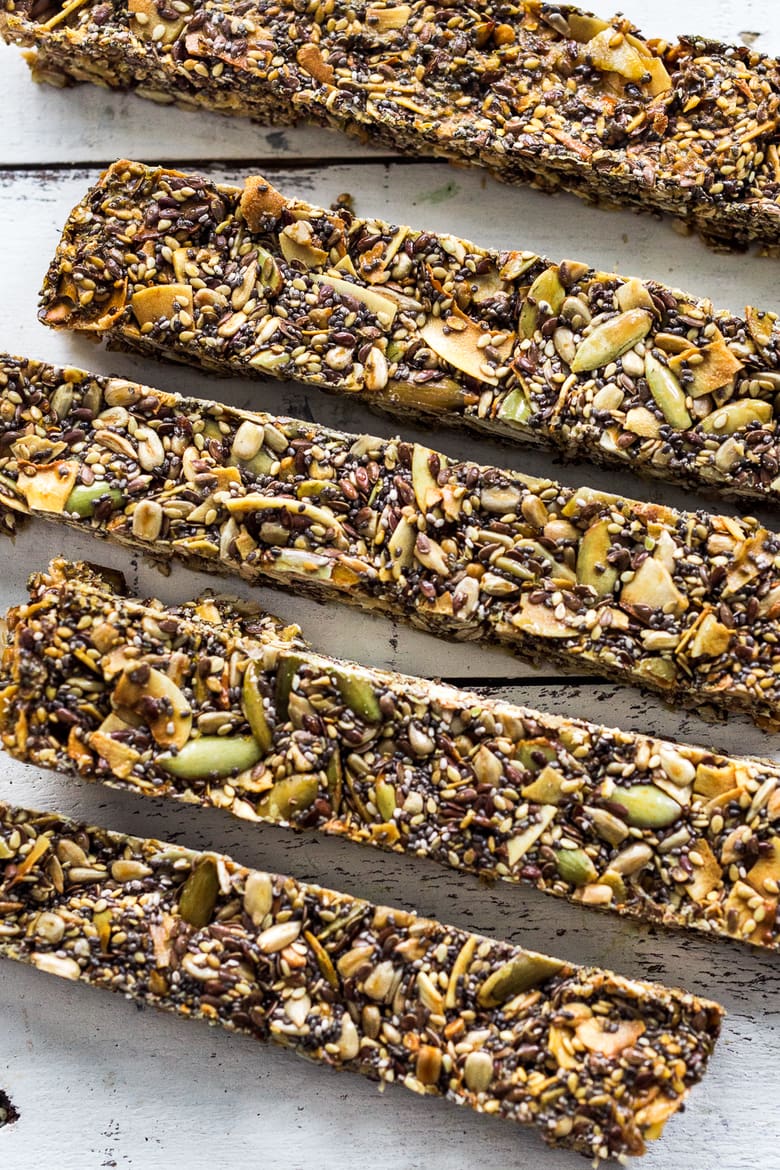
Seed Bars require only 5-10 minutes of hands-on time before baking in the oven. High in protein and fiber, these nutritious bars make for a simple breakfast on the go or an energy-boosting midday snack!
Because they are full of little scrubbing seeds they do a great job of keeping your digestive system healthy!
What I personally love about them is how convenient they are as a “grab and go” snack- keeping me feeling energized and fueled whether I’m running errands, hiking or cross-country skiing. Easily transportable, I keep a little zip-lock bag tucked away in the glove compartment of my car for hunger emergencies. Pretty handy.
Gluten-Free Granola Bars Video
Why You’ll Love This!
- Diet-friendly. Nut-free, oil-free, paleo, dairy-free, gluten-free, and vegan adaptable!
- Super energizing. Perfect for on-the-go when you need a boost!
- Quick and easy. Only 5 minutes of hands-on time.
- So nutritious. Full of so many healthy ingredients that support a strong digestive system.
- High in protein. Perfect for a mid-day crash or post-workout.
Gluten-Free Granola Bar Ingredients
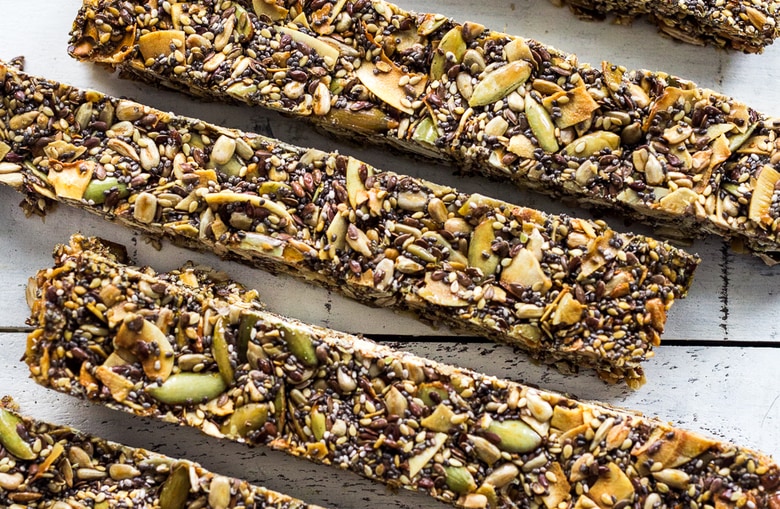
- Super seeds: raw pumpkin seeds, sunflower seeds, chia seeds, sesame seeds, flax seeds (or hemp seeds)
- Large flaked coconut: unsweetened
- Salt
- Vanilla extract
- Honey: Or brown rice syrup or maple syrup. If you can have honey, it is ideal for flavor and binding!
How to Make Grain-Free Granola Bars
- Preheat oven to 300 degrees F.
- Mix the seeds, coconut flakes, and salt together in a medium or large bowl. Stir in vanilla and warm honey.
- Place a piece of parchment in an 8 x 8 baking dish. Spray lightly with oil.
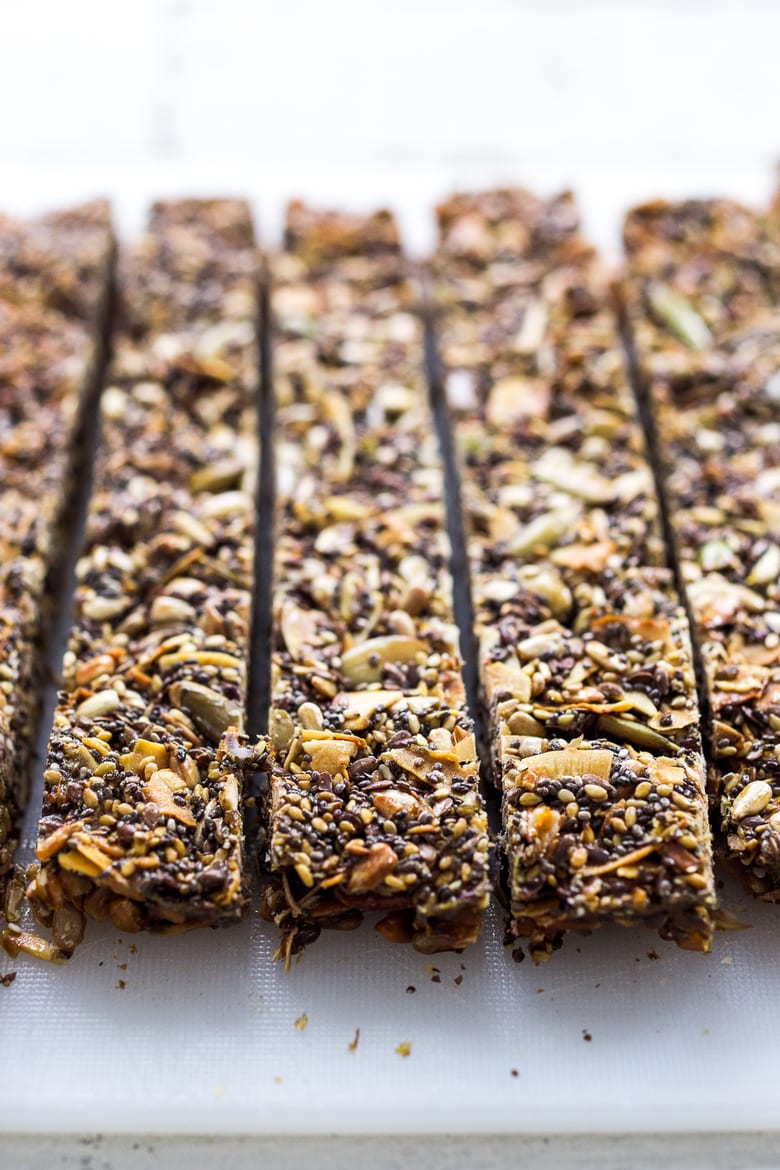
- Pour seed mix into a lightly greased, parchment-lined pan, and using a wet metal spatula, spread it out, into corners and edges and press down firmly until you have a compacted, smooth surface.
- Place on the middle rack in the oven, check at 25 mins, rotate if need be, and continue baking. For a chewy consistency, take them out at 40-45 minutes, for a crispy crunchy consistency, let it cook the full 50 -55 minutes. Remember, all ovens are different! Start watching at 35 min and remove when golden.
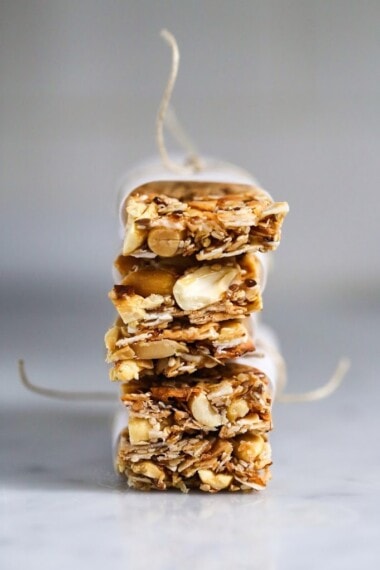
- Remove from oven, and cool completely. You could place it in the fridge to cool faster. When it’s completely cooled, take the parchment out of the pan, turn it over, and remove the parchment. Flip back over and cut into desired shapes or bars. Store at room temp.
FAQs
Wrap lightly in parchment and leave on the counter. Wrapping too tightly or placing in the fridge can cause them to soften.
Made with superfood seeds, these bars are high in protein and fiber and packed with health-boosting nutrients, vitamins and minerals! Many of the seeds are a great source of healthy fats too.
Use brown rice syrup or maple syrup with a tablespoon of ground flax. They may turn out slightly more crumbly. But still delicious!
Place the jar of honey in a bowl or small saucepan of hot water.
These bars are made up entirely of nutritious seeds (and coconut flakes), whereas granola bars are usually made with oats (and nuts or chocolate chips).
STORAGE
Leave your Seed Bars out on the counter wrapped in parchment, and they should stay crisp. The energy bars keep for up to 10 days!
We are on our third batch this month. I just make the Seed Bars and leave them out on the counter in the kitchen for easy snacking. They magically disappear!
Also, leaving them out, uncovered also keeps them nice and crisp.
Tell me what you think … I hope you love these Seed Bars as much as we do.
xoxo
More recipes you may like!

Seed Bar Recipe
- Prep Time: 5
- Cook Time: 55
- Total Time: 1 hour
- Yield: 10 1x
- Category: snack, breakfast
- Method: baked
- Cuisine: American
- Diet: Vegan
Description
These gluten-free granola bars, aka Seed Bars, are easy and delicious! They are nut-free, oil-free, and grain-free, made with seeds and coconut. They are super crunchy, energizing, and satisfying.
Ingredients
- 1/2 cup pumpkin seeds ( raw)
- 1/2 cup sunflower seeds ( raw)
- 1 heaping cup large flaked coconut (unsweetened)
- 1/4 cup sesame seeds
- 1/4 cup chia seeds
- 1/4 cup flax seeds ( or sub hemp seeds )
- generous pinch salt
- 1 teaspoon vanilla
- 1/2 cup honey ( warmed for easier mixing- heat jar in a hot water bath) or brown rice syrup or maple syrup- see notes
Instructions
- Preheat oven to 300F
- Mix the seeds, coconut flakes, and salt together in a medium bowl. Stir in vanilla and warm honey, until uniformly combined.
- Place a piece of parchment in an 8 x 8 baking pan ( all the way up the sides too). Spray lightly with oil.
- Pour seed mix into a lightly greased, parchment-lined pan, and using a wet metal spatula, spread it out, into corners and edges and press down firmly until you have a compacted, smooth surface at a uniform depth.
- Place on the middle rack in the oven, check at 25 mins, rotate if need be, and continue baking. For a chewy consistency, take them out at 40-45 minutes, for a crispy crunchy consistency, let it cook the full 50 -55 minutes. Keep in mind, all ovens are different, so heat may vary. The key is….You want to take them out when they are perfectly golden, before they get too dark. So watch them like a hawk after 35-40 minutes. If you take them out too early (before they are golden) they can too sticky. Pay attention to the color. For example, I’ve cooked these in two different ovens. In the gas oven, 50-55 minutes delivered perfectly golden bars. In the electric oven, 40 minutes were enough for perfectly golden. 55 minutes would have totally burnt them.
- Remove from oven, and cool completely. You could place it in the fridge to cool faster. When it’s completely cooled, take the parchment out of the pan, turn it over, and remove the parchment. Flip back over and cut into desired shapes or bars. Store at room temp.
Notes
To keep them crisp, wrap very lightly in parchment. Sealing them too tightly may cause them to get soft. I usually just leave them on a plate uncovered on the counter. Keeps up to 10 days.
You can easily make this vegan by substituting brown rice syrup, or maple syrup and 1 tablespoon ground flax. They may be slightly more crumbly, but not too bad!
Do NOT use sugar-free syrup- it will NOT work here. Honey or, brown rice syrup or real maple syrup!
If you don’t have an 8×8 pan, you could make a “crackle” on a sheet pan. Basically place the mixture on a parchment-lined sheet pan, pressing down hard with a spatula, into an 8-10-inch round. It will spread out and become thin in the oven. Check at 35-40 minutes and pull it out when it is deeply golden. Let it cool completely. Break apart into sections.
Nutrition
- Serving Size: 1/10th of the recipe
- Calories: 222
- Sugar: 14.5 g
- Sodium: 34.4 mg
- Fat: 14.9 g
- Saturated Fat: 5 g
- Carbohydrates: 20.8 g
- Fiber: 4.5 g
- Protein: 5.3 g
- Cholesterol: 0 mg
Just made these as hopeful new additions to my child’s lunch. They are delicious. Thank you!
How do I store them and for how long?
Just lightly wrap and leave on the counter for up to 10 days.
Scrumptious 🥰 thank you 🙏🏻
These turned out delicious! I made it as written, but used a loaf pan and baked half of the batter at a time. perfect in my gas oven after 45 mins. Absolutely a keeper. Thank you for the recipe — I have been searching for one like it!
Awesome! Glad you liked this! 🙌
I Replaced the coconut with quinoa puffs as my daughter doesn’t like coconut and it was what I had in the cupboard, they worked out great. Definitely need to wait until they have cooled completely before cutting, can tell the difference-if it’s breaking apart – wait longer
Yay! Glad it worked Kyie! 🙌
Good, healthy bar’s, I’ve been looking for these for a long time.
Easy to prepare, just follow instructions and they come out perfectly.
I’ve just tried the bars for the first time. At about 25 mins I got a really strong smell. At 30 mins I decided to check on them and them were super brown on the top, and getting burnt on the periphery! Disappointed with the result
Oh shoot! that shouldn’t have happened. Did you use the top rack or convection?
Love love love this recipe. I make these once a fortnight and leave them in an airtight jar in my pantry and they’re so good for a pre-game snack, midday snack or just a healthy sweet treat.
Great to hear and glad you like! 🙌
Great recipe, except in my electric oven by 30 minutes it was already brown! Next time I’ll check on it a little bit earlier. Thank you
I loved the idea of home made bars but mine got burnt the sides and bottom looked way too dark . What could have possibly gone wrong ? I do bake often and my twin toddlers love chia seed bars from Trader Joe’s . I know oven are different . However I did check at 40 mins and I omitted sunflower seeds and coconut flakes – did not have it handy . I’m going to try again . Could it possibly be the thickness of the bar because of lesser ingredients? Wanted your inputs before I delve into this again . Hate wasting 🙁
It may be. Did you replace with other ingredients? Also all ovens run differently. Use middle rack and perhaps lower your heat slightly.
Can I replace half the honey with tahini ? And half the coconut with walnuts and more sunflower seeds ?
Also if I can’t then can I replace half the honey with mashed ripe banana ? Is that possible lol sorry, I forgot to ask in my previous question:)
Hi- the honey is the binder here. If you replace it the bars will not stick together.
Feel free to change up the nuts and seeds, but the honey holds things together.
Could you give your exact measurement for the honey in metric. I find imperial is terribly inaccurate, even trying conversion measures incorrect. So if you do not mind giving me your actual measurement. Thanks . Beautiful recipe.
340 Grams – You can always just google it. Sorry I dont have a converter.
Hi, these bars sound wonderful! I’m diabetic so avoid honey and maple syrup. Do you know of a binder that could work with these bars? Maybe chia egg? or real egg? Thanks!
That is a great question. I’m not sure! I’ll start thinking about it.
Raw unprocessed honey will not harm diabetics. I have that confirmed from the naturopath.
Sugar is sugar, whether it has or hasn’t been pasteurised, cooked with or processed in some other way.
Even if it were true that raw, unprocessed honey was completely fine for diabetics, using it in this recipe would mean it was no longer raw or unprocessed.
We love these bars!! My toddlers can munch them no problem if I cut the baking time and leave them soft and crumbly. I recently bought some puffed rice and was thinking of adding it into the recipe to add some bulk. Any thoughts or suggestions? I think I’ll experiment.
Sounds good! Let me know how it turns out!
This recipe is awesome! My partner loves it so much I find myself making a new batch every few days now! He is addicted to them.
I don’t mind as it’s such a simple recipe to make and such brilliant results every time. Amazing flavours and texture and it’s so good for you too!
He says he has no need to hang-out in seedy bars now he gets the perfect ones at home! 😂
yay! Haha! love it! Glad you both are enjoying!
I like this recipe since it isn’t too sweet and doesn’t have heavy nutbutters. I added some almond meal that I had on hand. Raw honey didn’t need to be heated since it was liquid enough for mixing. Excellent with coffee in the morning!
It looks and tastes delicious.
Super yummy and you can take them to school. Kids approved
Yes, very packable!
A million times better than any bar you can find at the grocery store. The whole family loves these.
Thanks Kylie! Appreciate this!!! xo
Delicious and best veggan option
Hi Sylvia!
Just tried this recipe tonight, followed to a tee and found that it bubbled when it still had 8mins to go. Hoping it cools and solidifies by morning but tastes nice either way!
Let us know the outcome, thanks!
Delish! I just made these bars and my daughter & I each tried a piece and had to have more! We both love them. I need more recipes with fibre for her constipation, so wanted to try this one.
I followed your recipe to a T. Cooked for 40 mins and they were already getting quite brown around the edges, but turned out perfect.
Love that they have no nuts so can be packed in her lunch for school next week.
Thank you!
Andrea
Great to hear Andrea!
Thanks for the recipe. I baked mine this afternoon, turns out ok.
I am not a baker of any sort, in fact this may the first thing I have baked for 30 years. Very impressed with initial batch, now I will be a regular baker. I doubled up on the ingredients.
Haha! I Love it DAVE! Great to hear!
These taste great and feel healthy — thank you!
What might be a good substitute for the coconut? I really hate dried coconut.
YOu could leave them out and replace with more of the seeds.