New to sourdough baking? Here’s my easy Sourdough Bread recipe with thousands of success stories! Includes easy step-by-step videos and instructions, my best pro tips, troubleshooting, and everything you need to master sourdough bread baking. With over 1400+ 5-star reviews, this sourdough bread method ensures success on your very first try.
Are we free enough to open to the flow, no matter what it may contain?– Dorothy Hunt
We’ve tested and perfected our sourdough baking method to make it as simple as possible. This no-knead overnight sourdough bread takes 24 hours from start to finish with 45 minutes of hands-on time. Most readers have success with their very first loaf. Just read all the reviews!
Last week, I shared my method for an easy sourdough starter. By now, your starter should be ready to use, so I want to share my easy, beginner's recipe for no-knead sourdough bread that my friend Bee (H is for Love) taught me over 15 years ago! I’ve been refining and perfecting this method ever since, and it has proven to be foolproof.
This Sourdough recipe is flexible and easy, but most importantly, it works with my schedule. It doesn't require much hands-on time- although there is a tiny bit, just enough to make it feel wonderfully gratifying. The sourdough is made the night before and rises overnight on the counter (10-12 hours), before it is baked in the morning. Inversely, you can mix the dough early in the morning and bake it that night. It's very flexible and forgiving- even when you think you messed it up, it manages to surprise you with a beautiful loaf.
TIP: When searching for a Sourdough Bread Recipe (there are many!), the key is to choose one that fits your schedule. This allows you to easily incorporate bread-baking into your week without adjusting your plans. Always consider the hands-on and proofing times (usually two) to ensure it suits your schedule and lifestyle.
What Our Readers are Saying
One reader, Nidhi Vaidya says: “This recipe has never failed me! It always produces a beautiful loaf. Whenever a friend says they want to start sourdough, I point them this way.” ⭐⭐⭐⭐⭐
️Stephanie says: “This recipe is perfection! Easy to follow and fool-proof! I love to cook and have never been much of a baker and never made bread! I dislike store bought bread and am excited to make this wholesome bread weekly! “⭐⭐⭐⭐⭐
Ann says: “My previous attempts at sourdough were big fails, but I tried out this recipe and my sourdough loaf is picture perfect and delicious.” ⭐⭐⭐⭐⭐
Table of Contents
- What is Sourdough Bread?
- Why this sourdough bread Recipe Works
- Getting Started: What you need to know before you bake
- Sourdough Bread video (start-to-finish)
- No-Knead Sourdough Bread Ingredients
- What equipment do I need?
- Preparing your Sourdough Starter
- Sourdough Baking Schedule
- How to make Sourdough Bread (Step-by-Step Guide)
- Storing your sourdough bread
- Chef’s Tips for the Best Sourdough Bread
- Sourdough FAQS
- Practice Makes Perfect!
- More sourdough recipes you’ll love!
- Sourdough Bread Recipe
What is Sourdough Bread?
Sourdough bread is made using a natural, fermented leavening agent (called a starter) that doesn’t require commercial yeast. The “starter” , a mix of flour and water that is fermented, contains wild yeast from the air and good bacteria. This is what makes sourdough bread rise and gives it its tangy flavor and light, chewy texture. Because sourdough is fermented and has no preservatives or additives, sourdough bread is easier to digest than store-bought yeasted bread, making it a much healthier option!
Why this sourdough bread Recipe Works
- Easy Schedule: Feed the starter in the morning, then mix the dough at night, proof it overnight on the counter (10-12 hours), and shape, proof (one hour) and bake it in the morning. (Alternatively, the dough can be made in the morning and baked at night). It’s very flexible and can be placed in the fridge if something comes up, and you can’t bake in the morning, slowing the process down.
- Simplified, Easy Process: We’ve removed all the complex and intimidating processes that deter beginners from even starting. It is pared down as much as possible, while explaining the “whys,” resulting in a beautiful loaf the very first try.
- This sourdough bread requires no kneading and no fussing – it couldn’t be any easier to make, thanks to several basic techniques that anyone can follow, which I walk you through in the videos.
Getting Started: What you need to know before you bake
- The schedule. This no-knead overnight sourdough bread takes 24 hours from start to finish with about 45 minutes of hands-on time. You’ll feed your starter in the morning → mix the dough at night →let it proof overnight →shape it, and bake it in the morning. See our detailed baking schedule below.
- The starter. An active, happy starter is crucial to success here. Read through, preparing your sourdough starter below to ensure success your very first time.
- What you’ll need. Read through the ingredients list and the baking equipment list. Some items, such as a Dutch oven and thermometer, are essential here.
- Watch the video for a clear understanding of the process before you start.
Sourdough Bread video (start-to-finish)
This 16-minute, step-by-step sourdough video guide will walk you through the process of making sourdough bread from start to finish, with me personally. Don’t see the video? Ensure your ad blocker is disabled, try a different browser, or view the content on my YouTube channel.
***Scroll down to the recipe card for clear, detailed instructions
No-Knead Sourdough Bread Ingredients
- Sourdough starter – You can make sourdough starter at home (it takes 5-8 days) or purchase it here. To maintain it, store it in a jar in the fridge and feed it, like a pet. 🙂 Yes, you can even name it. If properly fed and cared for it can live for hundreds of years! My starter is called Vita.
- Flour – use organic bread flour and rye flour. All-purpose flour works in a pinch, but for your first loaf, bread flour produces a better loaf. You can substitute whole wheat flour for the rye.
- Water– use tap water, filtered water, or mineral water. Distilled water lacks minerals so don’t use that.
- Salt– fine sea salt or Himalayan pink salt
- Optional extras: rye flour, fennel seeds, caraway seeds, chia seeds, rice flour
What equipment do I need?
Here is what you absolutely need:
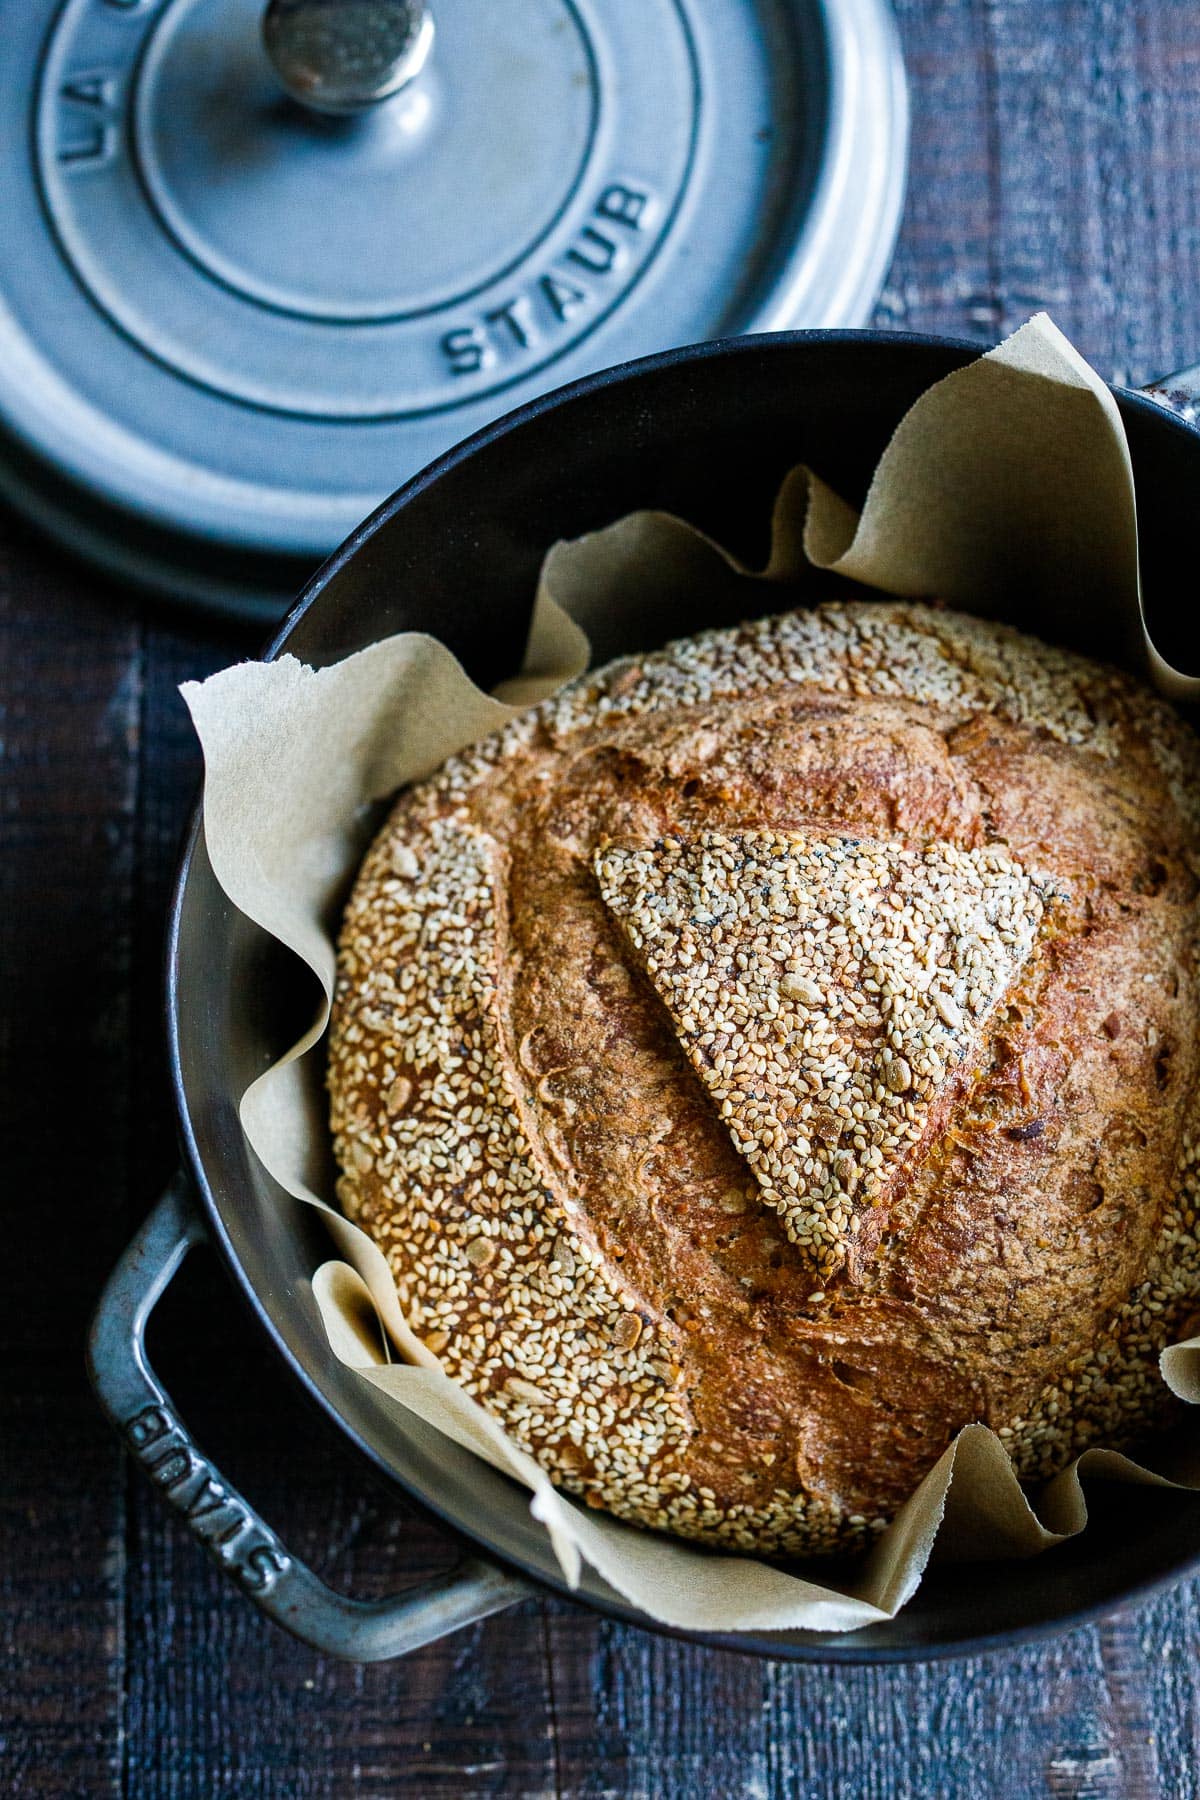
- A Dutch Oven – 4 ½-quart to 6-quart Dutch ovens works best. I use and love this 5.5 Quart Staub Dutch Oven because of its metal knob and dark interior (it’s easy to keep clean). But something as simple and inexpensive as this cast iron dutch oven will work. Here are my favorite Dutch Oven picks for Bread baking!
- High-Temp Parchment Paper– this “If You Care” Parchment Paper does not burn!
- A large bowl- glass or ceramic mixing bowl
- Measuring cups or a kitchen scale
- Sharp knife, razor blade or scissors
- Thermometer
- Kitchen towel or plastic wrap.
Here are some optional extras: rice flour, dough whisk, banneton, dough scraper and a lame (scoring blade). An oven thermometer is also nice (to double-check that your oven is calibrated).
We offer this Sourdough-Making Kit at our Bowl and Pitcher Shop if you are interested.
Preparing your Sourdough Starter
- Be sure your sourdough starter is active and happy! It should double in size within 6-8 hours of feeding. If it is not doubling in size, it will not rise your bread. For troubleshooting sourdough starter, please visit our dedicated sourdough starter page and scroll to the troubleshooting section.
- When making sourdough bread, use a starter either right at its peak, or after it has peaked.
- For a more “sour” taste, use a starter that is “hungry”, and hasn’t been recently been fed.
Sourdough Baking Schedule
Keep in mind that rising time is affected by weather and seasons. In winter, cold kitchens will lengthen the rising time. In summer or warm weather, hot kitchens will shorten the rising time. So this is a rough estimate based on 70°F weather.
- Morning (6:00 a.m. to 10:00 a.m.): Feed the sourdough starter. 8-12 hours before you plan to mix up the dough, feed your starter, allowing time to peak before using. (Or feel free to use an unfed starter for a more “sour taste”, straight from the fridge at 8 pm)
- Night (8 pm – 10 pm): Mix the dough. Do two sets of stretch and folds, 15 mins apart (see 1st video)
- Proof it Overnight. Cover the dough, let it proof (rise) overnight 8-14 hours at 65-70F on the kitchen counter.
- Next Morning (6 am-10 am) Shape and Bake. Check your dough when you awake, and when it has almost doubled in size, stretch, fold, and shape. ( see 2nd video). Place in a parchment-lined bowl, seam-side down. Place this in the fridge for 1 hour while you preheat the oven.
- Bake 20-25 minutes (or until internal temp reaches 200°F). Remove lid, and bake 10-15 more minutes, until very deeply golden and internal temp reaches 208F. Let it cool on a rack before cutting.
How to make Sourdough Bread (Step-by-Step Guide)
***Scroll down to the recipe card for concise measurements & instructions.
Step 1: Feed the starter in the morning.
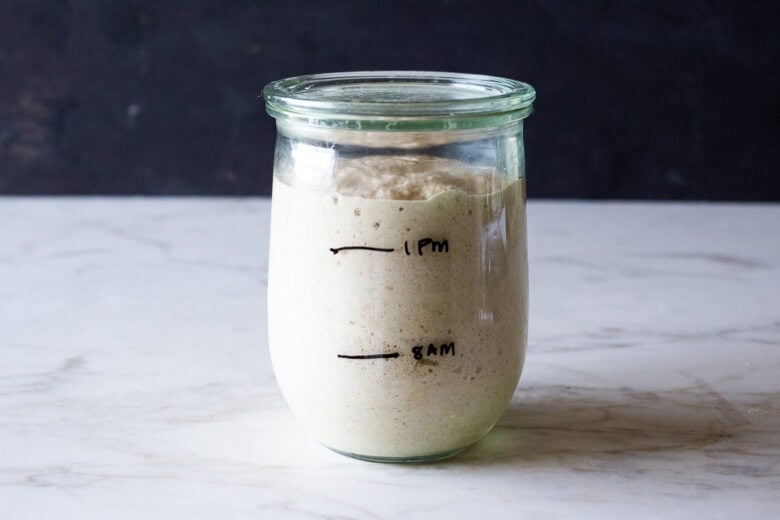
Feed your sourdough starter in the morning, 8-12 hours before making your bread dough -leaving it out on the counter and using it slightly after it peaks. Always use a slightly “hungry” starter. TIP: You know your starter is active and healthy if it doubles within 6 hours of feeding. In the evening, make the dough after the starter has peaked.
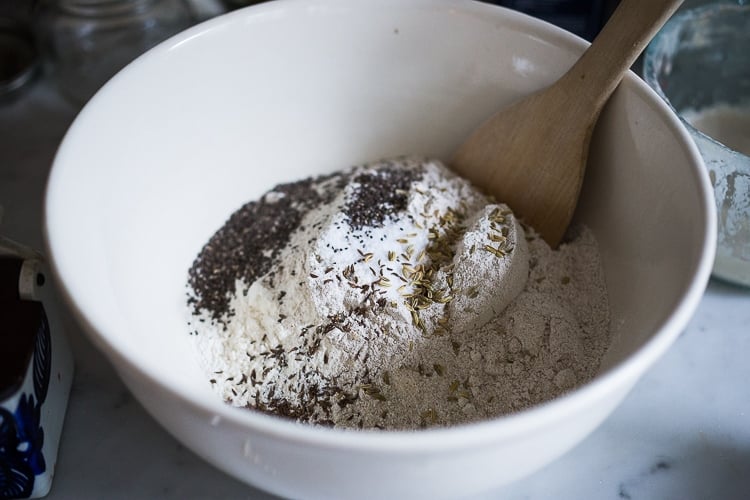
Step 2: Weigh the flour.
In a large bowl, weigh the bread flour (520 grams) using a kitchen scale, being careful not to include the weight of the bowl. Here I’m using roughly 4 cups of flour, spooned and leveled. (3 1/2 cups of organic white bread flour plus a 1/2 cup rye flour.)
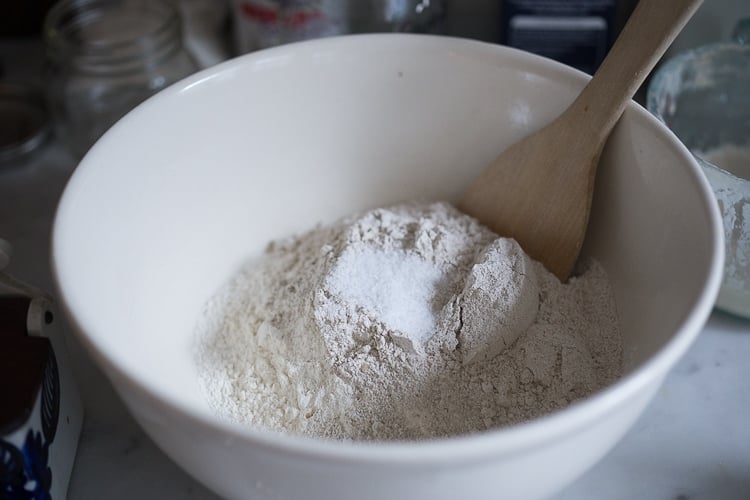
Add two teaspoons of salt and, if you like, seeds; here I’ve added one teaspoon of fennel seeds, half a teaspoon of caraway seeds, and one tablespoon of chia seeds- I love this combination. Yes, you can add other spices and seeds. Get creative, but for the first loaf, I suggest going easy.
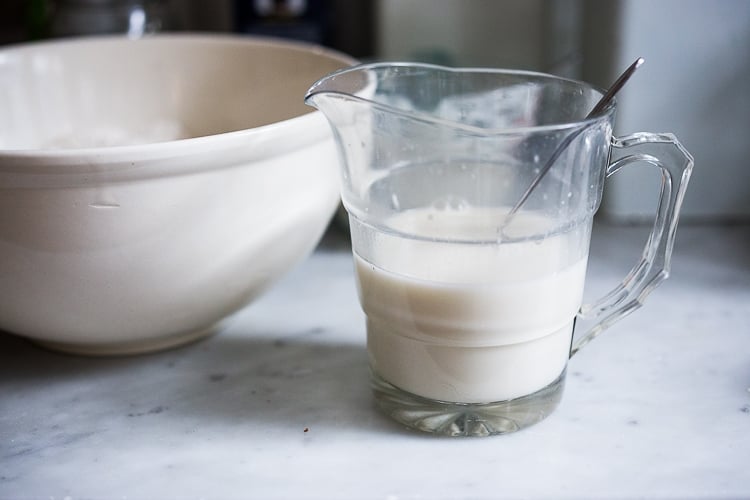
Step 3: Mix the starter with water.
Stir down the starter, then mix 1/3 cup of sourdough starter (90 grams) with 1 3/4 cups of water (385 grams) using a fork.
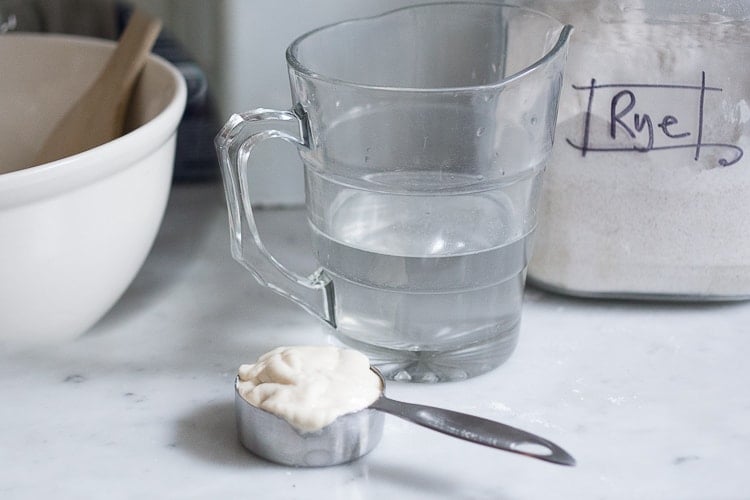
It will look like cloudy water.
Step 4: Mix the dough (wet and dry ingredients).
Pour the starter-water mixture into the flour mixture and stir, using a fork, into a thick, sticky ball. Switch to a wooden spoon. Mix the dough for one minute to incorporate all the bread flour, using the wooden spoon. Just try your best to incorporate all the flour.
It will be thick, shaggy, and hard to mix. If the flour absolutely won’t mix in, then add a tablespoon of water at a time to incorporate it. Sometimes whole grain flour is “thirstier” than white flour, so you may need a little more water, a tablespoon at a time.
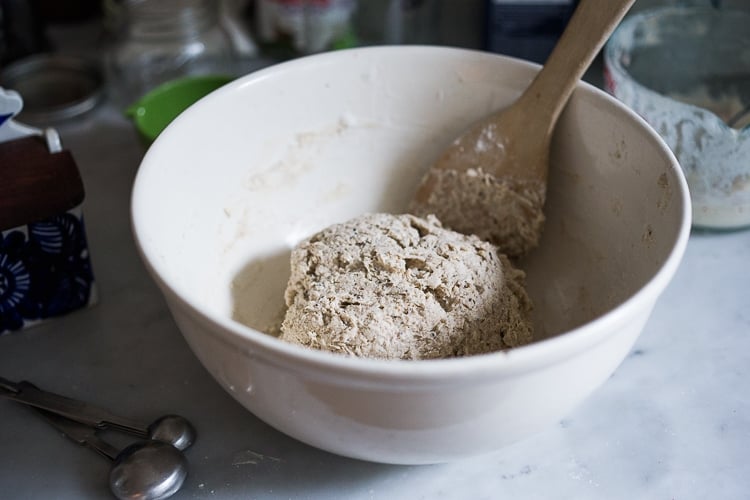
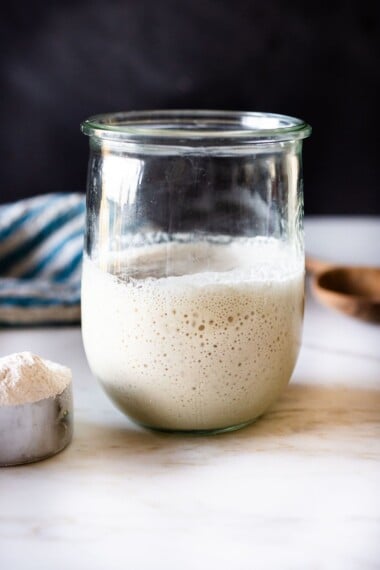
The dough will be heavy, thick and sticky (see photo above) to begin with, but will loosen up as it rests. Cover with a damp kitchen towel for 15 minutes, letting the dough rest.
Step 5: Stretch & fold technique #1 (Video)
Do two sets of “stretch and folds”, 15 minutes apart. This helps to build the gluten. Watch the first video below. With wet hands, stretch and fold. Let the dough rest 15 minutes covered, then repeat.
Stretch & fold video (Technique #1)
Don’t see the video? Allow 15-20 seconds to load it right here. If still not showing, check that your ad blocker is off, refresh the page, or try a different browser.
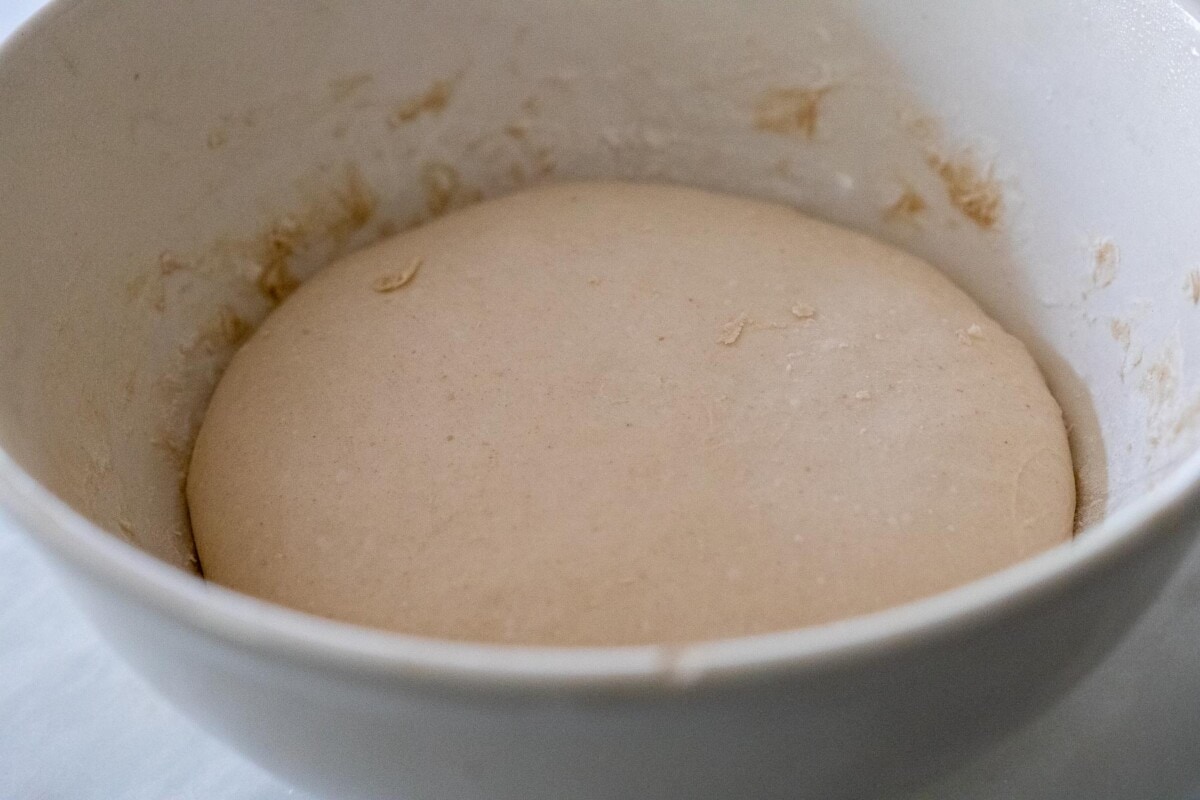
Step 6: Proof the dough overnight.
Cover the bowl with a damp kitchen towel (wet it thoroughly, then wring it out) or plastic wrap, and let the dough rise on the kitchen counter overnight 8-12 hours, at room temperature. This is called the bulk fermentation. Every environment is different, and seasons will affect the rising time. Warmer homes will proof dough much faster, colder homes, much slower. In midwinter in the Northwest, I’ve even proofed for as long as 18 hours on the counter. Here in Santa Barbara, in summer, the dough was ready in 8 hours.
How to tell if your dough is proofed correctly.
Tip: You can’t always look at the clock; you MUST look at the dough.
- Dough should be slightly domed, springy, somewhat jiggly like a happy, full belly, almost doubled. Shake the bowl and look for a happy jiggle.
- Do the poke test. Carefully poke the dough with a floured finger, 1/2 inch deep. If it is easy to indent, and the dough springs back, this is a good sign that it has risen enough. If the dough feels very firm and hard to indent, it probably needs to proof longer. If the dough doesn’t spring back, holding the indentation, or feels overly soft, bubbly, liquidy, or loose, it is likely over-proofed ( but still bake it).
Prepare the shaping bowl. Place a piece of parchment paper in a bowl. I prefer using a high-sided, medium-sized bowl over a flat or shallow one to help shore up the sides. You can also use a banneton (scroll down).
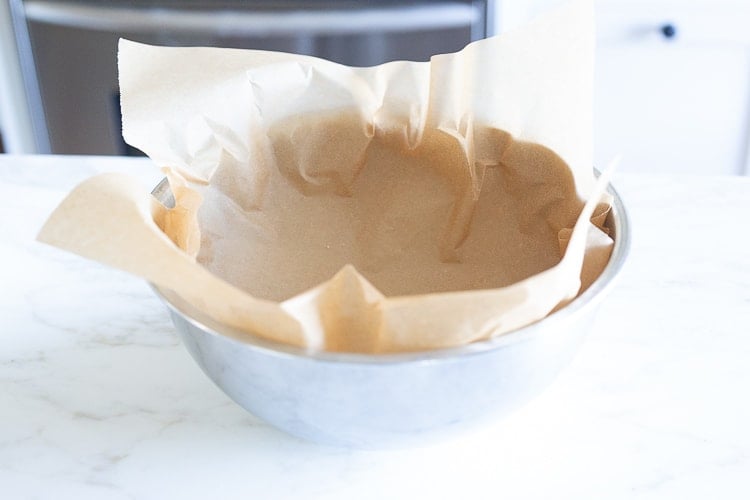
Tip on parchment paper: I use the “If You Care” brand of parchment baking paper. It is designed for high heat and does not stick or burn. If unsure about yours, spray it with a bit of olive oil to prevent sticking.
What is a banneton? And some tips.
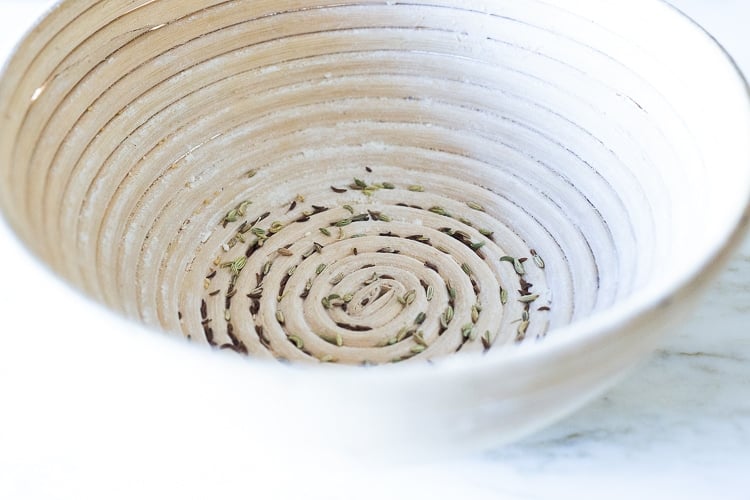
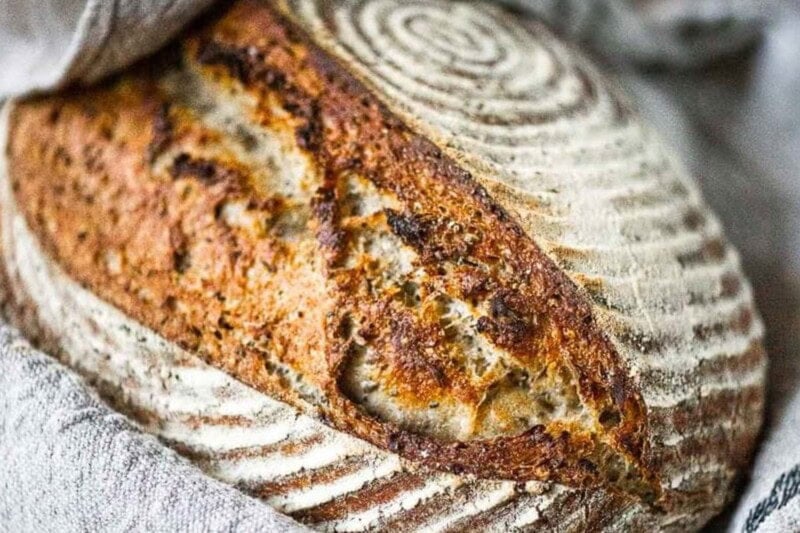
As you progress in your baking journey, you may want to use a Banneton (bread-proofing basket below). A banneton is a ridged basket that makes pretty rings on the bread. If using a Banneton, use rice flour to prevent dough from sticking, and place any seeds on the bottom, placing the dough seam-side up (because you will flip it).
It can be a bit tricky to flip the Banneton into a hot Dutch oven and have it land centered. I prefer to flip it onto parchment paper, score, then place the parchment and dough into the hot Dutch oven. When using a piece of parchment paper in a regular bowl, there is no need to flip; simply lift the parchment and place it in the Dutch oven. Much easier than a banneton.
Step 7: Stretch & shape technique #2 (Video)
Watch the 2nd video below for our “stretch and shape” technique to use after the dough has been proofed. Loosen the dough from the edges of a bowl with a wet spatula or wet plastic dough scraper, sliding it down the sides of the bowl.
Stretch & Shape Video (Technique #2)
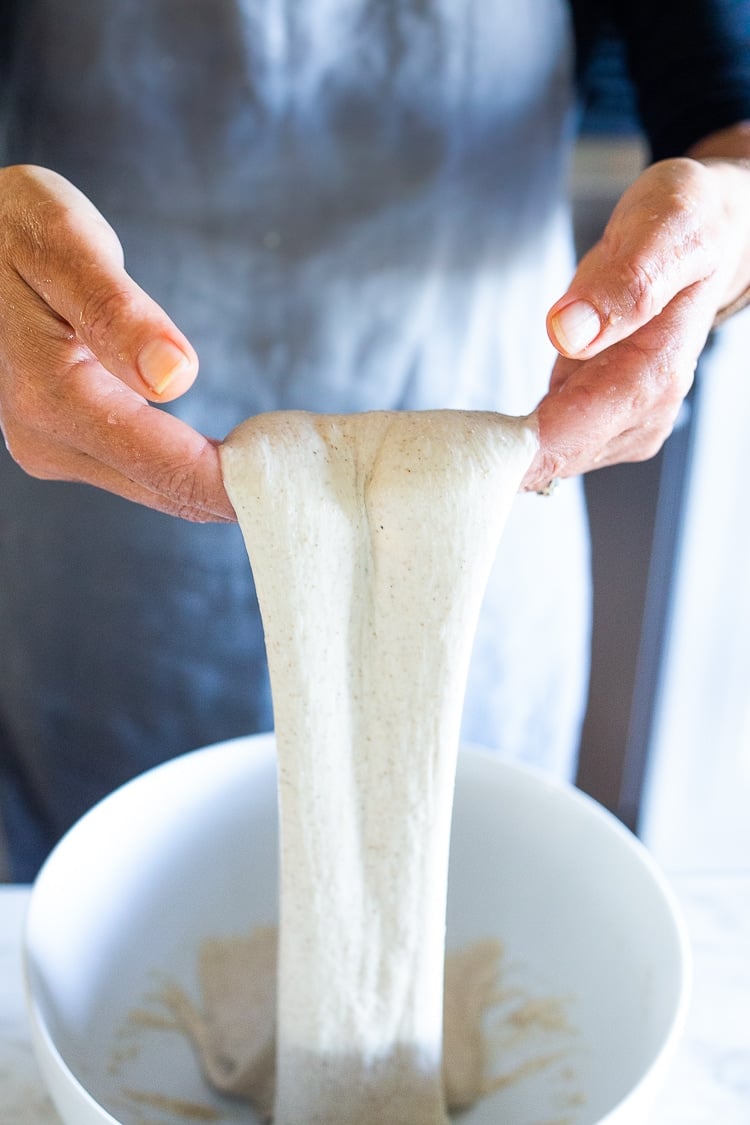
With wet hands, carefully pull the dough up on each side, lift it up about 1 foot high, and place it back down, folding it on top of itself gently.
Give the bowl a quarter turn and do this again with wet hands (repeat this 15 minutes later.) Then, the third time you lift and stretch, you will either lift it all the way up into your parchment-lined bowl, seam side down (easiest) or into the floured proofing basket, seam side up (pinching it closed).
As you see above, after proofing the dough overnight, it will become much looser. The starter has metabolized the flour overnight. This can be tricky to handle. However, using wet hands and learning the second stretch and shape technique in the second video above will make the wet dough much easier to handle. Trust me here. 🙂
After the second set, lift the dough into the parchment-lined bowl, seam side down. Many sourdough recipes call for placing the dough on a work surface to shape it, creating surface tension. You can do this, but this time we are skipping this step and using a stretch-and-shape technique instead, to keep it simple.
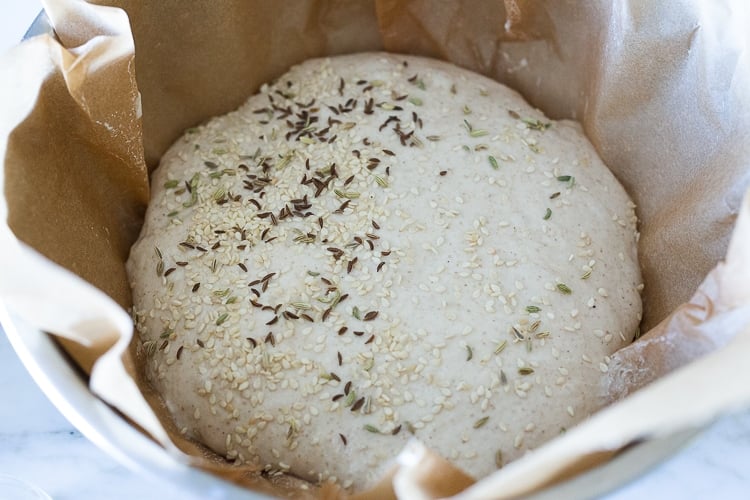
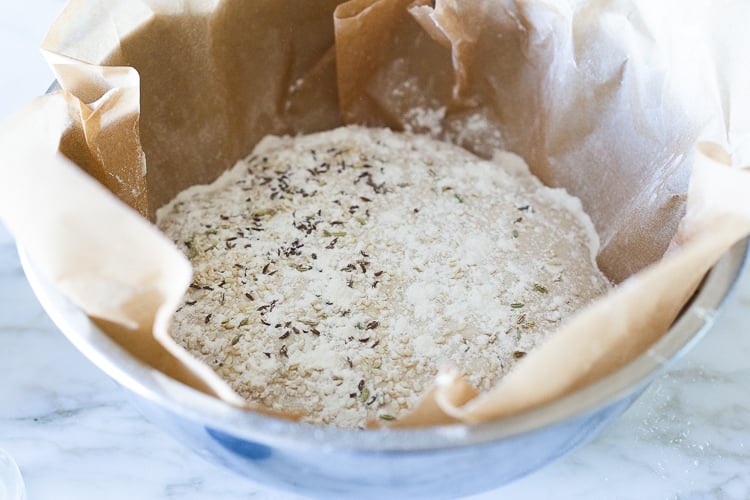
Sprinkle the top of the dough with seeds and dust with flour or rice flour (which makes it easier to score)especially if using the banneton, get those sides sprinkled well- so it flips out without catching!
Step 8: Second “rise” and preheat the oven.
Place the dough in the fridge for one hour (or up to 3 hours) while you heat up the oven to 500°F with your Dutch oven inside (please see notes) for 60 minutes. Chilling the dough will make it easier to score and give it a little more “oven spring”. It is not really intended to rise here.
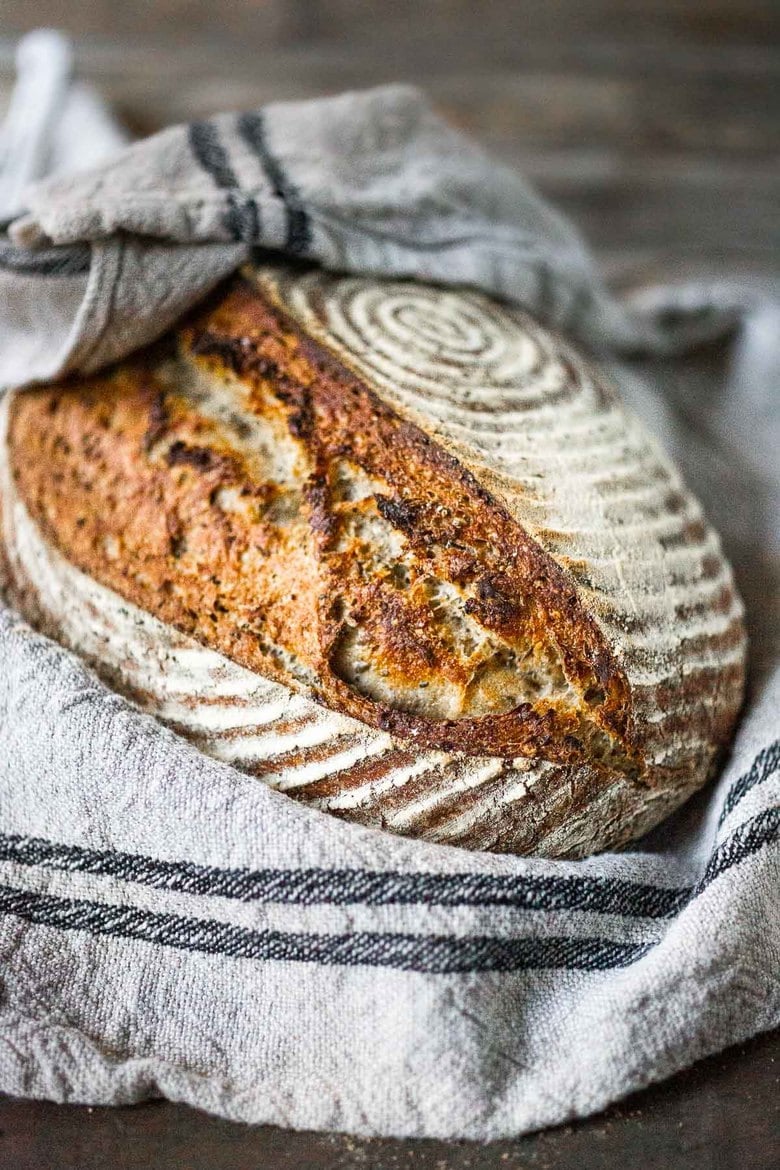
Step 9: Score the sourdough.
Score: Grease your blade or lame, and score the dough swiftly and deeply, at a 45-degree angle, 3/4 inch deep. Score where you want the dough to puff up. You can do one simple slash, a crescent, or a crisscross, or feel free to add other designs. (Just google sourdough scoring designs and be mesmerized for hours!) Oiling the knife helps. The lame really does make this 100 times easier!
Step 10: Bake it.
Carefully take out the Dutch oven from the oven and close the oven door. Remove the lid and gently lift your dough, holding onto the parchment corners, and lift it into the Dutch oven, and quickly cover. Place in the middle of the oven for 18-22 mins.
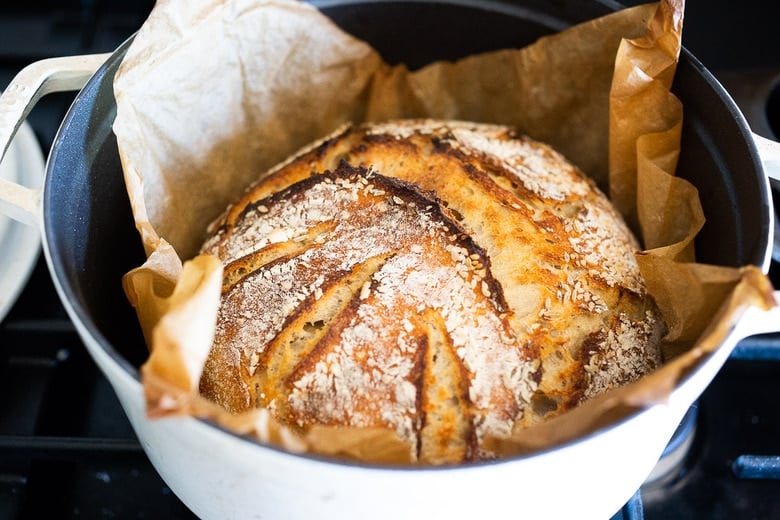
Remove the lid; it should be nicely puffed, lightly golden, and around 200F. This is your goal; if the temperature is not 200°F, replace the lid. Once the internal temp reaches 200°F, uncover and bake 10-15 minutes until deeply golden and internal temp reaches 208°F. Allow your loaves to get crusty and deeply golden. Let them go a bit longer than you might think.
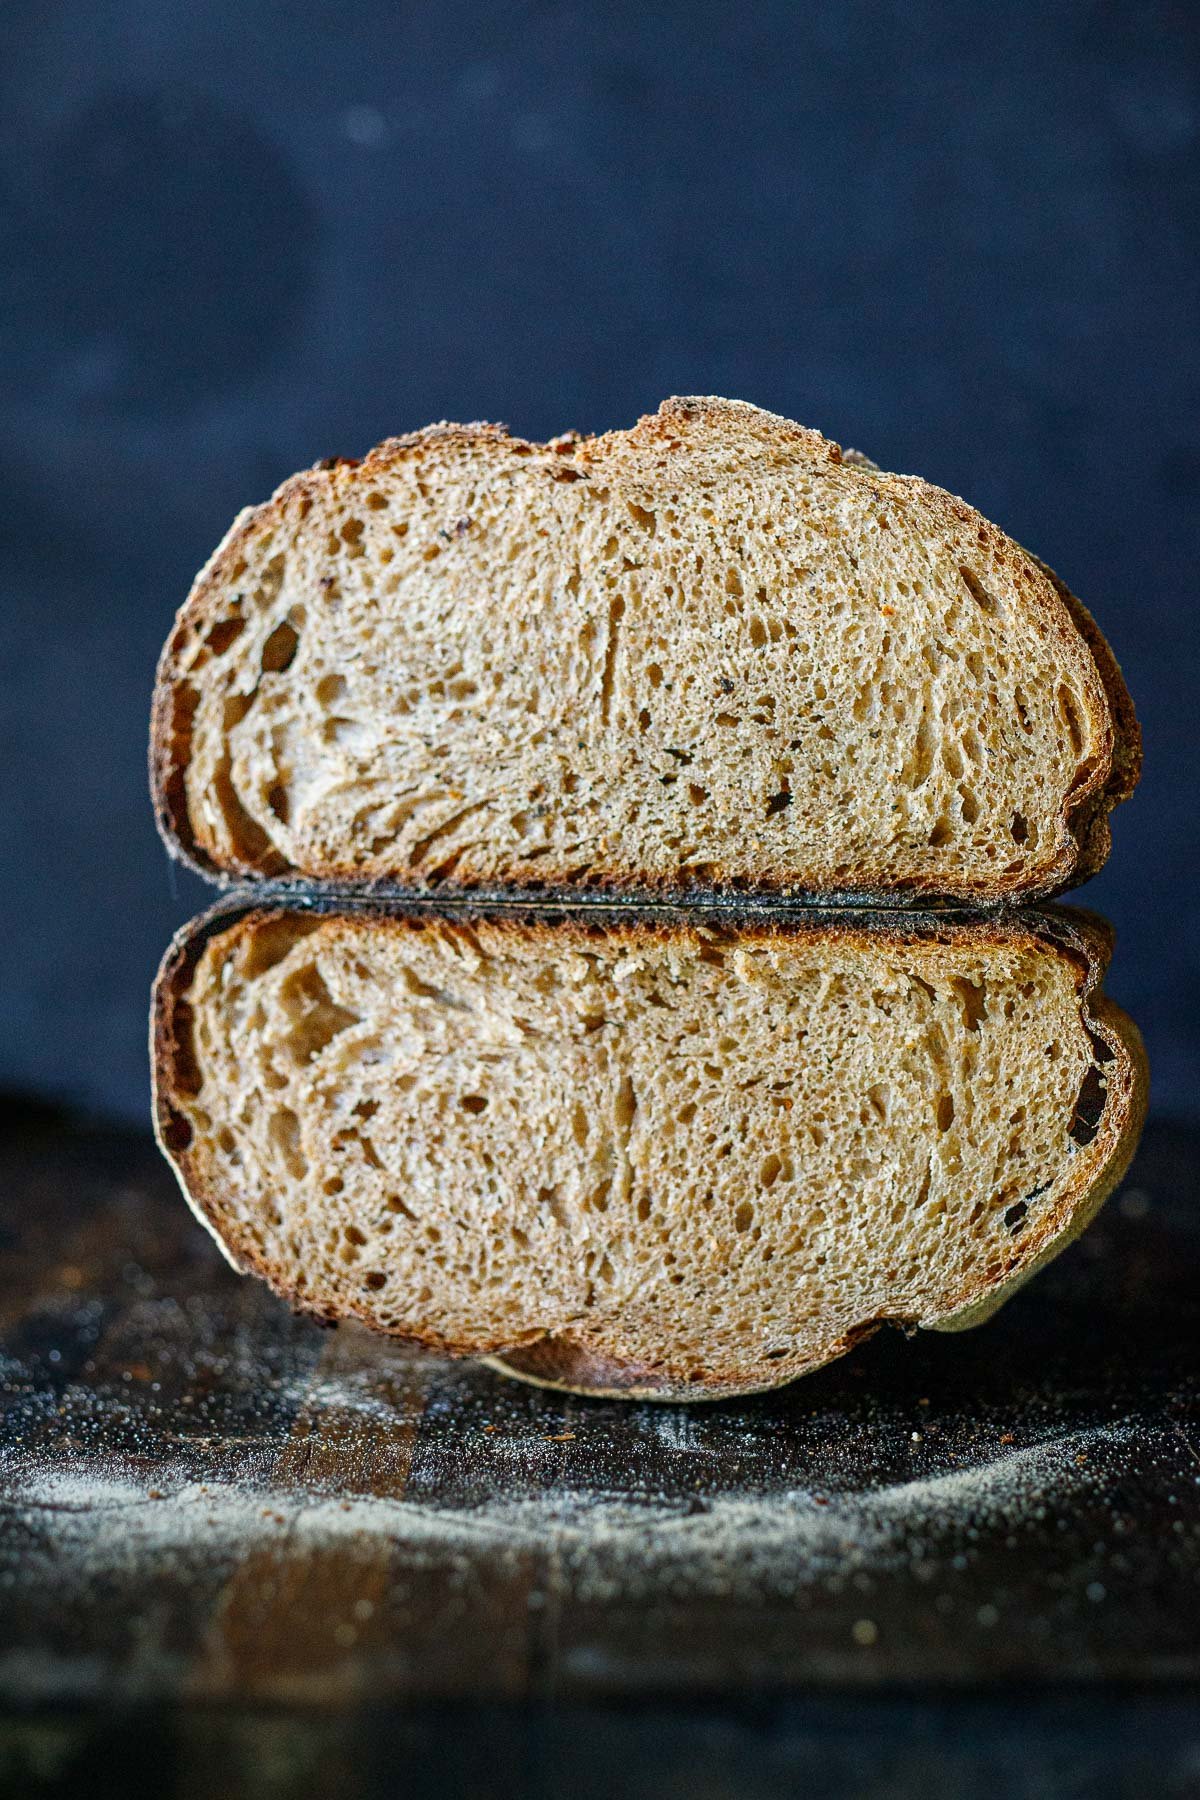
Step 11: Cool and rest.

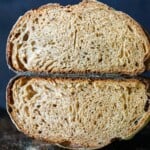
Remove it, place it on a wire rack, and let it cool completely before cutting. This is the HARDEST part! 😂 It will smell heavenly, and you will feel proud. Bask in it! It truly is an accomplishment!

Storing your sourdough bread
- If you plan to eat your sourdough bread within one to two days, store it cut side down on a cutting board, covered with a kitchen towel.
- If you plan to eat within 3-4 days, store the bread in a paper bag, which will help keep the crust crisp.
- You can also store it in a plastic bag in the fridge for up to a week, but you will lose the crispy crust.
- Freeze (either whole or sliced) in a freezer bag for up to 3 months.
Chef’s Tips for the Best Sourdough Bread
- STARTER: Using your starter slightly after its peak will ensure your bread rises sufficiently. Make sure your starter is healthy, strong, and “hungry”, and doubles in size 6 hours after feeding. If you like a more “sour” taste, use an un-fed starter that has been stored in the fridge 5-6 days- and use without feeding it first.
- FLOUR: For your very first loaf, I highly suggest just using Organic White Bread Flour and be sure to weigh it. ***Please “zero out” the weight of the bowl. Weigh the flour without salt, seeds, or other additions. Try substituting a 1/2 cup of flour for another kind. For example, 3 1/2 cups white bread flour, plus 1/2 cup rye or whole wheat. If you add more whole-grain flour than that, your loaf will be quite heavy and dense. I really don’t want this for your first loaf, and neither do you. You want it to be amazing, so you feel inspired to make it again and again. So be patient. After several practice loaves -yes, feel free to experiment with other flours as much as you like!
- WATER: (Hydration) A wet dough will produce a lot of beautiful air pockets, but it is much harder to work with, in the beginning. A drier dough will yield a slightly denser, less airy loaf, but it will be easier to work with in the beginning. This one falls towards the latter – at 75% hydration- but you can easily adjust this down the road, as you practice, by adding a little more water or less flour in the initial mixing stage. To calculate the hydration level, you divide the water grams by the flour grams. In this case 385 divided by 520 = .75 or 75% hydration. As you get more comfortable, try for 80%-85% hydration, adding in a few extra folds at both stages.
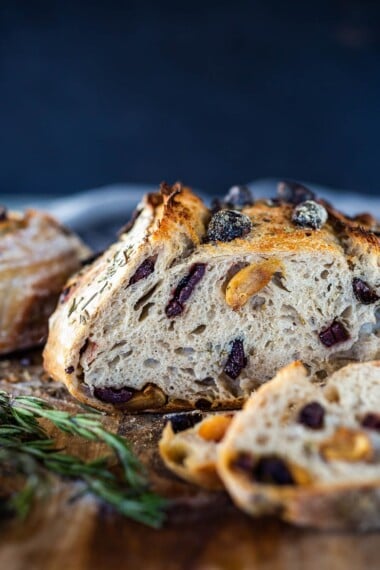
- ADDITIONS: If you want to start adding things to your bread- nuts, olives, cheese, dried fruit, roasted garlic, etc., I recommend folding these in after it rises overnight. Use this recipe for Rosemary Olive Sourdough Bread as a guide.
- LONG COLD PROOF: After the first set of stretch and folds, cover and place in the fridge until almost doubled. This can take anywhere from 36-72 hours, depending on your fridge temp. It is easiest to see this in a clear glass bowl or clear-sided measuring container. Once almost doubled, pull from the fridge, let it come to room temp, do the second set of stretch and folds, let rise one hour, and bake.
- BAKING: Always preheat the oven. If you have convection, use it! Use a 4-6 quart Dutch oven: Make sure your Dutch oven can handle a 500°F oven. Plastic handles will melt. If not, 475F or 450F will suffice, but you’ll need to bake it longer (25-30-ish minutes) before removing the lid (remember the goal is for bread to be 200F when the lid comes off), then bake for 10-15 more minutes uncovered. Always check bread with a thermometer.
- TAKE NOTES: Note your rising times and baking times and adjust accordingly the next time. All kitchen environments and oven temps are different.
Sourdough Bread Variations
Once you master this sourdough bread recipe, you can get creative by adding more ingredients to the dough. This Rosemary Olive Sourdough Bread shows one approach, while our Jalapeño Cheddar Sourdough Bread shows a different method. When you feel confident, try our sourdough baguette recipe– a little more challenging, but totally doable!
Troubleshooting Sourdough Bread (when things go wrong)
- If your loaf is flat, hard, or has overly big holes. Likely the dough was over-proofed. It’s very easy to overproof dough in warm climates. You can tell if it is over-proofed if the dough is flat and runny, with lots of air bubbles at the top, or if it doesn’t spring back when you do the poke test, or if it breaks when stretched. Even still, you could try baking it (might as well at this point, right?). Do the 2nd video stretch and folds-it will be runny, so manage as best you can and put it in the fridge to firm it up a bit before baking.) Turn “imperfect loaves” into sourdough croutons.
- If your bread is gummy or dense, this can indicate your bread is underproofed during the initial overnight rise, or your sourdough starter wasn’t “strong/active” enough. Double-check that your starter is doubling in size within 6-8 hours of feeding (see our troubleshooting section in this Sourdough Starter post). This can happen if you are accustomed to baking in the summer and are now transitioning into winter; the kitchen is colder, so the dough will require longer proofing. Gummy bread can be turned into croutons.
- If your dough is not rising. This is most likely an issue with your sourdough starter- please read through this troubleshooting section. Double-check that your starter is doubling in size within 6-8 hours of being fed. Also, sourdough may not puff up as much as yeasted dough. It may only rise by 1 1/2 or 1 3/4 (not actually doubling in size). Just look for that slight dome and jiggly belly feel, and do the “poke test”. It should feel like a full belly with a slight dome and a bouncy spring to the touch. Check the temp with a thermometer. If it is under 70°F, it might just take a little longer to proof. If it is warmer, it may have peaked without you noticing, and now it is going down. If you want to be very precise about the rise height and time, you can measure the overnight rise in a 2-quart measuring container with clear sides the first few times to get an idea of the rise level and timing. It should rise by 1.5 or 1.75, so not quite double. I found this practice to be very helpful.
- The loaf is not crispy. This is likely due to not baking long enough, uncovered, in the oven.
- The loaf has no flavor. You probably forgot the salt. This is the most common issue if the bread is bland. Salt is imperative.
- The loaf is too sour. The “hungrier” the starter, the more sour the bread. Feed the starter 8-10 hours before mixing the dough for less sour loaves.
- The loaf is not sour enough. Try using an unfed starter. The longer it’s unfed (but within the 7 days) the more sour it will be.
- The dough is overly wet or overly dry. Many people accidentally mismeasure the flour because they forget to “zero out” the weight of the bowl or measuring cup on the scale! Check your weight (without seeds, salt or any additions) only flour.
- The bread is burnt on the bottom: Most typically in electric ovens. Try lowering the heat to 475°F with a slightly longer bake time (the goal is still to achieve an internal temperature of 200°F when you remove the lid). Alternatively, try placing a sheet pan under the Dutch oven (without preheating the sheet pan). Or add a layer of cornmeal below the parchment.
Sourdough FAQS
Sourdough bread is more easily digestible than bread made with commercial yeast, due to the natural fermentation process. This can be beneficial for people with gluten sensitivities. Sourdough bread, made with organic, non-GMO flour, is higher in nutrients and lower in glyphosates.
Bread made with sourdough starter has so much more flavor and complexity than yeasted bread. It is also much easier to digest because it is fermented. Many people who are gluten-sensitive do much better with bread made from sourdough starter.
If your bread is gummy or overly moist after baking, most likely, the dough was underproofed, or your starter is too young or insufficiently active. Try proofing longer, and double-check your starter is healthy and active and doubles after 6 hours of feeding.
Underproofing the dough can cause bread to be dense- by not allowing enough time for the carbon dioxide to develop and create the bubbles in the dough that create the airy texture. An inactive starter can also be the culprit.
Most likely, the sourdough has over-proofed and has collapsed, creating a flat hard loaf. It is still edible, but not as light and airy as it should be.
Besides the reasons above (underproofing the dough and an inactive starter), sourdough can be overly dense if you use too much whole-grain flour or not enough water.
Most likely, the salt was left out or mismeasured.
Active and healthy sourdough starter is the secret to perfect sourdough bread! Care and proper feeding of your starter will ensure your sourdough loaves are beautiful, flavorful, light, and airy. A Sourdough Starter that doubles in size within 6 hours of feeding is the best sign that the starter is healthy and active.
Practice Makes Perfect!
Baking sourdough is such a satisfying process. Making your first “good” loaf is the BEST feeling ever! Know that every time you bake, your bread will improve as long as your starter is healthy and active.
I suggest that you make the exact same loaf repeatedly, to get it down before changing any variables. Take notes each time. Consider this first month of baking as “practicing”. The most challenging aspect is getting to know your environment, including kitchen temperature, oven temperature, and timing, as well as ensuring your starter is healthy.
So just be patient, keep trying, and don’t give up. I promise you will get it -read the reviews for inspiration and enjoy the sourdough process!
After you try our sourdough bread, let us know how it turns out in the comments below. Your notes will also help other readers. Sign up here to join our community and receive our latest recipes and weekly newsletter! xoxo Sylvia
More sourdough recipes you'll love!


Sourdough Bread Recipe
- Prep Time: 13 hours
- Cook Time: 35 mins
- Total Time: 13 hours 35 minutes
- Yield: 1 loaf 1x
- Category: Baked, baking, sourdough recipes
- Method: bread
- Cuisine: American
- Diet: Vegan
Description
An easy Sourdough Bread recipe that rises overnight and bakes in the morning. A simple flexible recipe made with sourdough starter, that can be adapted to your needs. View the 3 instructional videos above for more details. If you don’t see the videos, make sure your ad blocker is off.
Ingredients
- 4 cups organic white bread flour, spooned and leveled (520 grams total flour) -please don’t include the bowl’s weight. I highly recommend weighing the flour for the first few loaves. (See notes for adding other types of flour.)
- 2 teaspoons fine sea salt (12 grams)
- 1 7/8 cups water (385 grams)
- 90 grams homemade sourdough starter or store-bought starter (1/3 cup) fed 8-12 hours earlier, using it slightly after peaking (For a more “sour” taste, use an unfed starter, 4–6 days after feeding if refrigerated- see notes.)
Optional additions:
- rice flour (my favorite for dusting a banneton).
- Seeds for flavoring: fennel seeds, chia seeds, flax seeds, caraway seeds, sesame seeds, poppy seeds, dill seeds, celery seeds, nigella seeds, etc. (optional, but tasty) My favorite is 1 teaspoon fennel seeds, 1/2 teaspoon caraway and 1 tablespoon chia seeds
- Substitute 1/2 cup rye flour, spelt flour or whole wheat flour or other whole-grain flour for 1/2 cup of the white bread flour if you like- resisting the temptation to add more for your first few loaves. (62 grams max).
- Add herbs (fresh or dried- rosemary, thyme, sage, etc).
- Add nuts, olives, garlic, dried fruit or cheese (please see this Rosemary Olive Sourdough Bread Post, for more “how-to” instructions).
Instructions
- 8 am. Twelve hours before mixing your dough, feed your sourdough starter, leaving it out on the counter making sure it doubles in size within 6 hours. (See notes for extra sour). OR, if you keep your starter in the fridge and fed it in the last 7 days- it is OK to use it straight from the jar, cold, without feeding. Best to use starter after it peaks, when it is “hungry”.
- 8:00 pm PLEASE use a kitchen scale if this is your first loaf. Weigh the flour in a medium bowl (***zero-ing out the weight of the bowl). Then add salt, spices, and seeds. Mix starter and water in a small bowl until cloudy and well mixed. Pour the starter-water into flour, incorporating all the flour using a fork. It should be a thick, shaggy, heavy, sticky dough. See video. Mix for about 1-2 minutes using a wood spoon- it will be hard to mix. Don’t worry about tidy dough here, just get the flour all mixed in, cover with a wet kitchen towel, and let rest 15 minutes. It will loosen up as it rests. (Alternatively, mix starter and water in the bowl first, then add the salt and flour-like in my 3rd video- either way works.)
- 8:20 pm: Do the first set of stretches and folds. (See the 1st video in post) With one wet hand (put a bowl of water next to you) pull the dough from one side and stretch it upward, then fold it up and over to the center of the dough. Quarter turn the bowl and repeat, stretching up and folding it over the middle, repeat for about 30 seconds or until the dough gets firm and resists. This helps strengthen the gluten. Cover, rest, and repeat the process 15 minutes later. With wet fingers, stretch up and fold over, turning, repeating, for 30 seconds until the dough gets firm and resists. Then turn the dough over in the bowl. Yes, you could do this a couple more times if you would like to build the gluten, but not imperative. 🙂
- 8:35 pm Proof overnight, at room temp. Cover the bowl with plastic wrap, wax wrap, or a damp kitchen towel (to keep the moisture in) and place it on your kitchen counter for 8-12 hours. (see notes on temperature) 68-70F is the ideal temp. (If it is warmer, check at 6-8 hours. If it is very cold, it may take up to 18 hours in winter.)
- 6-8 AM Check the dough in the morning. The dough should have expanded, with a slight springy dome to the top. It won’t necessarily double in size ( maybe 1.5 -1.75 times bigger) but will have expanded. Do the POKE TEST: With a floured finger, poke into the dough. If it indents easily and mostly springs back to its original shape, it has probably risen enough. If it feels firm or very hard to indent, let it rise longer. If it feels loose, runny, or indents too easily or doesn’t spring back, it is most likely over-proofed (bake it anyway).
- Line a high-sided bowl with parchment. This brand of parchment does not stick to the bread- but if you are unsure about yours, spray oil your parchment lightly before putting the dough in it. (If you are a seasoned bread baker, you do not actually need parchment -this is only for easier transport, bread will not stick to the inside of a Dutch oven.) I like using a high-sided medium-sized bowl versus a flat or shallow bowl to help shore up the sides. You can also use a rice-floured Banneton (bread proofing basket) if you have one.
- 6-8 AM- 2nd Set of STRETCH and SHAPE : (Watch 2nd video -Stretch and Shape video). Loosen the dough from all edges of a bowl using your wet fingers, a wet spatula, or a wet plastic dough scraper, sliding down the sides of the bowl. With both wet hands, carefully pull the dough straight up, in the middle and lift it, stretching straight up in the air- about 1-2 feet (see photo) and place it back down, gently folding it on top of itself. In this first stretch, the dough may feel quite loose and runny. This is OK. It should firm up as it stretches and folds. (Note: If your dough breaks here, it is probably over-proofed, bake it anyway. If your dough won’t stretch like the photo and feels too tight or firm, it needs to proof longer). After the first stretch, give the bowl a quarter turn, wait 30-60 seconds, wet your hands again and stretch it up high again, folding over itself in the bowl. Wait 30-60 seconds. (You could repeat this one more time, 15 minutes later). Then, the third time you lift and stretch, you will lift it all the way into your parchment-lined bowl, folding over itself like you’ve been doing. (Alternatively, lift it into your floured proofing basket seam side up. ( If seam up, pinch the seam closed). Sprinkle top with seeds and flour (get the sides too), gently rubbing it to even coat –and add seeds if you like. If using a banneton, sprinkle the seeds in the banneton before adding the dough.
- FINAL RISE and PREHEAT OVEN: Place the bowl in the refrigerator for one hour uncovered which will firm up the bread, and make scoring easier and help boost “oven spring”. It won’t rise in the fridge. (You could also keep it in the fridge for 3-4 hours if you want to bake later.) Preheat the oven (for 1 FULL hour) to 500F with your dutch oven inside and lid on (see notes). If you have convection- use it. You can also bake the bread at 45oF or 475F. You want your oven as hot so don’t skimp on the preheat. I usually preheat for 1 full hour.
- SCORE & BAKE When ready to bake, place the dough by the stove. Pull out the Dutch oven, close the oven, and remove the lid. Score the bread in the bowl, using a very sharp knife, lame, razor blade, (or try scissors dipped in cold water), score the dough swiftly and deeply, at a 45-degree angle, 3/4- 1-inch deep. One deep slash is just fine. Or criss-cross, or crescent shape. (Or feel free to add other designs, for ideas -google “scoring bread”). You want to score where you want the dough to puff out from. You can also cut with wet kitchen scissors. Carefully lift the parchment by the corners and place both bread and parchment directly into the Dutch oven. Cover quickly. It is OK if parchment peaks out. You want to score and transfer as quickly as possible. (Alternately, if using a proofing basket, cover the basket with parchment, carefully flip the dough into the parchment in the palm of your hand and then center the parchment and dough into your dutch oven, then score).
- BAKE. Place the Dutch oven in the middle of the 500°F oven for 20 minutes with convection on, or 25 minutes without convection (or 28 minutes at 450°F). Remove lid. It should be puffed and just lightly golden, and the internal temperature should be close to 200°F (if not, put the lid back on for a few more minutes). Once it’s 200°F, lower the heat to 450°F, and bake uncovered for 10-15 minutes until deeply golden and the internal temperature reaches 204-208°F. No pale loaves please, let them get golden! (For a less “crusty” loaf, increase covered baking time, lower uncovered baking time. You can play with this for the desired results.)
- COOL: It will smell heavenly. Remove from the dutch oven, let it cool 1 hour on a rack or tilted up on its side, before slicing so you don’t let the steam out and don’t smash it- be patient. This is the hardest part. 😉. Take a picture! Feel proud. You did it!
- SERVE: This type of bread is always BEST, served toasted! Then lather it with butter, ghee or olive oil. Add mashed avocado and salted tomatoes, almond butter, honey or jam. A piece of toast can turn into a great meal. See this Mushroom Toast!
- STORE: Store the bread wrapped in a kitchen towel for the first day or two to keep the crust nice and crispy, then move it to a zip-lock bag or waxed bread bag to keep it moist for longer. Bread can also be sliced and frozen. Make sourdough croutons with leftover bread- great in salads and soups!


Notes
Sourdough starter : Using your starter after its peak will ensure your bread rises sufficiently. Make sure your starter is healthy, hungry, and strong, able to double in size 4-8 hours after feeding. If you store your starter in the fridge and last fed it over a week ago, make sure to feed the morning before making bread. If it has only been 3-7 days since last feeding (and you keep it in the fridge), it is OK to make bread without feeding. Use a 1/3 cup starter for your bread dough and place the remaining back in the fridge and feed a week after the last feeding. BUT if it has been a week after your last feeding, pull it out of the fridge, discard (or save for pancakes, waffles, or give away) all but 1/2 cup. Feed it. Let it metabolize the flour 4-8 hours before mixing up the bread dough. Use a 1/3 cup of starter (90 grams) for the bread, place the remaining back in the fridge, and feed in a week. For a more “sour” flavor, use starter that has been in the fridge 4-6 days. Do not feed before using it. The sourdough starter is the sourest the longer it goes without feeding.
Dutch Oven or Bread Baker: Make sure your dutch oven or bread baker can handle a 500F oven. If not, 450F will suffice, and bake 25 minutes before removing the lid. Aim for an internal bread temp of 200F when removing lid- before baking it uncovered. Take notes and adjust the next time!
NO DUTCH OVEN? If you don’t have a dutch oven, you can try baking your bread on a sheet pan, covered with a large metal bowl or pyrex bowl to keep the steam in. It will yield a flatter loaf but it does work. Bake 25-30 minutes covered, remove the bowl, bake until golden 10-15 more minutes until golden, and be sure to check internal temp with a thermometer. It may take a few practices tries to perfect this.
Smaller Loaves: If you would like to create two smaller loaves, divide after the overnight rise, shape, place in the fridge while the oven preheats and bake each at 450F for 18 minutes (or until internal temp is 200F) uncover, lower heat to 425F and bake until golden and internal temp is 204-208F. You may have to fiddle with this timing.
LOAF PAN: Yes you can bake this in a loaf pan. Shape and place it in an oiled loaf pan ( or line with parchment) for the last hour in the fridge, while oven preheats. Bake uncovered at 450 for 15 minutes, lower heat to 425 and bake another 25-ish minutes or until internal temp reaches 204-208F. You may need to play with this according to your oven. Place on middle or lower rack.
PRACTICE: As you practice making your loaves (yes, it is a fun practice) you’ll get a feel for the dough and you’ll begin to notices how changes in seasons (changes in temperature) affect the loaves and their proofing time. I suggest making the exact same loaf repeatedly several times. Warmer temps will call for shorter proofing, cooler temps, longer proofing. You can also change the proofing time by adjusting the sourdough starter amount. For a faster rise, you can add a little more starter, for example, a 1/2 or 2/3 cup. For a longer cooler rise, say in the fridge for 36-48 hours, you can reduce the starter amount to 1/4 cup or even 3 tablespoons. You can play with ratios to get the proofing time just how you want it. Take notes! You can also adjust the hydration for an airier loaf, either reducing flour or increasing water. So many variables!!! *Remember your starter and your dough are actual living “creatures” that are affected by your particular environment. The most important advice I can give you is to pay close attention to your particular “creature”, observe it carefully, and look for signs- it is communicating with you. Pay attention. 🙂 Work with it, not against it. Be patient, respond thoughtfully.
Perfecting bread is a lifelong process, and I’m still learning too. 😉
Nutrition
- Serving Size: 1 slice ( 1/12 of a loaf)
- Calories: 154
- Sugar: 0.2 g
- Sodium: 582.3 mg
- Fat: 1.1 g
- Saturated Fat: 0.2 g
- Carbohydrates: 32.7 g
- Fiber: 4.9 g
- Protein: 6 g
- Cholesterol: 0 mg


Love this recipe. Is the hour long refrigeration necessary?
Yes. 😉
Hi Sylvia
I love your website and am a big fan of the sourdough recipes but due to work commitments I’m having trouble following the exact timeline in one complete sequence. Can I interrupt the process at any stage by resting the dough in the fridge before restarting the sequence? If so at what stage would be best to stop the sequence and how long could I rest it for? Many thanks . Colleen
Hi Collen, yes you can rest the dough, although it will rise some in the fridge. Rest after the first set of stretch and folds or after second stretch and folds.
Thanks for much for sharing this wonderful recipe. I’ve made the bread 8 times and it’s consistently delightful. One question—what kind of non-stick parchment paper do you use to handle the 500 degree heat? I’ve had some poor results with a variety of non stick parchments adhering to the bottom of the bread. Thank you!
Glad this worked for you! The parchment is linked in the recipe card- it is called “If You Care” brand.
I had the same problem with parchment which glued to the bottom of the bread, but now I just spread a little olive oil on parchment and now it removed easily
Oh! Good to know! ThanksGreg-helpful!
Hi Sylvia, I’m new to sourdough baking and had tried a couple of other methods that turned out just OK, but this recipe makes a beautiful, crusty, risen loaf every time, and your schedule works really well for me. It’s been successful with half white and half wholemeal and seeds too, so couldn’t be better. Thank you!
Yay Jill!!! Glad you are enjoying it.
Measurements for your loaf are way off. What a waste
Oh dear. Sorry about that. Can you give some more specifics about what happened?
I am new to sourdough baking and have watched countless videos on how to make bread. Yours is by far the easiest to follow. I have made many loaves in the last month. I found that the dough needs a little more time stretching and folding. Maybe this is because I use half bread flour and half whole wheat. I use 100 g of starter, right out of the fridge. I stretch and fold twice 15 minutes apart and then wait 30 minutes to do another one right before I cover it to rest over night, no more than 10 hours. In the morning I stretch and fold twice 15 minutes apart and keep hitting the sides to strengthen the dough a little more. I put it in the parchment lined bowl and then in the fridge for at least an hour but have left it in there longer because I was unable to bake it right away. I am having a little trouble with the scoring on top. The designs want to spread out more than I’d like. I bake the bread in a hot Dutch oven for 25 minutes at 500 F. I take the lid off and back for another 20 minutes. Maybe my bread needs more time because it is half whole wheat? All in all you have taught me how to make a delicious sourdough bread. I don’t buy bread or bagels anymore. I just make them. Thank you!
I am so glad this has worked for you. Sounds like you have nailed- love it! Such a good feeling!
Hi Sylvia! I wanted to ask a question before I started this recipe. Could I decrease the hydration to 65%? I have tried two other recipes recently and my dough ends up pancake flat each time! I also live in SA and have been proofing in the oven which may be a bit high. Will overnight in a chilled kitchen work for proofing?
Hey Jen, I’d just try the recipe as is the first time- left overnight, in the cool kitchen. Do you know the temp there? If it is under 60F it just may take a little longer, but your bread will taste better for it. Your bread, if it is coming out flat sounds over-proofed, probably from proofing in the too warm oven. Please let me know how it turns out, OK? 🙂
It worked! Even in my chilly SA kitchen! Thank you for this lovely no-fuss recipe, I’ll be sending it to everyone I know 🙂
Great recipe with so many useful tips. So much detail and work in this post, really appreciated as a beginner I followed the recipe very carefully and baked my first ever bread today. It came out pretty good. I would bake it just a bit longer next time as my oven max temp is only 240°C. Thanks for sharing!
Yes Joanna, oven temp is a bit low, so longer would really help. Also, make sure you preheat the dutch oven for a long time!!!
Hi Sylvia. Love this recipe and very easy to follow this is my second loaf and on both occasions the parchment paper has stuck to the bread at the end of cooklng. I floured the parchment paper and the bottom of Dutch oven, wonderin If you had an explanation for this, otherwise it is fab. Many thanks
Sorry about that. It is probably the type of Parchment you are using. Try flouring more heavily the parchment- rice flour works really well here. Or try “If you Care” brand parchment. It never sticks.
Nowhere was I able to find an amount for the salt needed.
Go down to the recipe card. 2 teaspoons. 😉
Never saw what I would call a recipe card. Still looking.
Hi Virginia, sorry- it is at the bottom of the post. You can acess it easily from the top of the post and click the “skip to recipe” button- it will take you down there.
Thank you. My first attempt totally surprised me. The loaf was lovely to look at and tasted amazing.
Hi Sylvia
Love the recipe & have experimented with different combinations of flour. My starters ( I have 5 different ones) have developed water on top. Can you tell me what to do? Refeed starter for a few days or dump?
it just means they are hungry. Feed!
I’m on my second attempt at this, the first attempt, after proofing overnight in perhaps a too-hot room was flat and liquidy. This time I left it overnight in the fridge and it is kind of the same result. It’s in my instant pot right now to proof but its sticky, wet and bubbling now and I don’t see it getting any dryer or firmer. The dough seems so wet when I’m stretching it at night and it never firms up. Should I make a dryer dough?
Hi Abby, it can be tricky when the weather is warmer. Mine was over proofing over night too, left on the counter in a 75-80F kitchen. I resorted to making the dough in the morning, letting it rise 6 hours and baking it the same day- because some people like me need more than 6 hours sleep. 🙂 My point is… it may only take 6 hours of rising time in a warm climate. I always find baking bread in the colder months to be much easier. I’ve heard some people putting it in a cooler with an ice pack overnight. Sounds like a pain, but it might work. When you mix up the dough, is it thick to begin with? Like in the video?
Hi Sylvia!
This is my 8th attempt in making sourdough and I simply can’t get it right. I have followed couple of good recipes and nothing has worked. I have a very strong starter (which I started originally in April) floats well when tested. I use bakers white flour and follows every single step like in the recipe, but something goes wrong in the oven. It has a nice oven spring but comes out hard and raw (gummy). Every stage comes out perfect except for baking. I have a fan forced oven with a max temperature of 230C when fully heated for 1hr. please advice me how I should bake in this temperature as I am using your recipe this time and it’s in bulk fermentation right now. I also do have a Dutch oven.
I think the problem is your oven temp may be too low. You want it to at least 250C. When you say bakers white flour- is it “bread flour”? It could also be too much protein in the flour, which you could try blending with other flours. Lastly, it might be proofing long enough. After your long rise, do the poke test. It should indent easily then bounce almost back to the original shape. Don’t give up you are so close!
Hi Sylvia!
I’ve been using your recipe for several months now, and I love the results. However, the weather has turned hot, and I think that has led to my most recent loaf (today) being too flat. I saw that coming, since the dough was very loose this morning as I was doing the “stretch and fold” process. I’m deducing that the dough was overproofed because of the warmer temperatures, since everything else (ingredients, timing) was the same as usual.
My question: Is it best to shorten the overnight rising time (which may mean having to get up very early in the morning, alas) or are there are other things that I can do to fix the problem while the weather remains hot?
Thank you!
Other than find a cooler spot- you will need to shorten the rise. You could place in the fridge overnight night, pull it out early morning and rise for a shorter time during the day. Or you could place it in a cooler- with an ice pack?
Great recipe and tips thanks so much I really am amazed every time I open the Dutch oven and then taste the bread it’s just like a one you would buy from a good bakery from home with hardly any effort it’s actually crazy
When using cheese etc when is it best to add these ?
Is it during the Final lift and stretch ?
During the final lift and stretch you could lift it right onto a floured surface and pat it into 8 x 12 inch rectangle. Add the cheese on top, then trifold. Let rest a couple minutes, then flatten just a little, and trifold again. Then shape and place into the fridge for the final rise.
Hi Sylvia,
My first 3 loaves were awesome!
Then my next loaves did not get that “crusty” exterior that we all love.
I didn’t change anything up-using a Dutch oven on convection and then finishing the last 5 minutes without the lid.
I’d appreciate your thoughts.
Thank you, Craig
I’d try just adding more time uncovered! Sometimes I’ll even place bread directly on the oven rack at the end. It’s a little tricky, but gets loaf extra crusty.
Hello Sylvia,
I am a novice. Your instructions and videos helped me. I am in my third loaf and seems to get better. I read your responses and make adjustments as needed. Is it okay to add Indian chapati flour to this? I am going to try and let you know.
I think Chapati flour would work great!
Hi Sylvia
I have made the starter AND the bread (using white bread flour) and t was delicious! Is it possible to make the sourdough bread with gluten free flour? Do you have a suggested recipe? I am good to use the sour dough starter that I created with wheat flour.
Hi Janet, great to hear! I don’t have a recipe for GF Bread. I’m sure there are lots out there if you search. If you find a good one will you share it with us?
I am a big fan !
How do I feed my starter after one week in the fridge ,like ones a week ?
Yes, read the maintenance section. Once a week.;)
Absolutely delicious, we added everything bagel seasoning just before baking. This will be my go to sourdough recipe from now on. Too easy!
Could I put the halved dough into 5 X 9 loaf pans? If so, cooking time and temperatures would need adjusting?
Hi Joyce- I have not tried it this way so I would be guessing. Let me know how it goes.
I’ve been following this overnight loaf recipe for two months and I have brilliant, reliable success…..so much so that I now bake 4 loaves a week for family. I work full time but this method suits me perfectly. You really do need to respond to the dough as weather and flour make such a difference. Thank you so much for sharing!
I have made this recipe a few times now and absolutely love it! The bread turns out better than any other recipe I’ve followed and the instructions are so clear and helpful! One question I had though – If I wanted to split the dough to make two smaller loaves, when would be the best time to do that during this process? Another recipe I followed suggested before the final rise, but I am wondering if that would be the best place here?
I think that is what I would do.
Good day.
I couldn’t believe that it just for two days my sourdough starter very active and ready to a bake bread. I used hard wheat flour and feed my starter the same flour.Actually the 1st and 2nd time of trying to do this sourdough starter didn’t work at all and I gave up to try it again then suddenly I guest the flour I used before is not good at all and the temperature where I live now.Nothing to do during this time because of the pandemic then I asked myself why not to try and practice right!!!I am very happy and glad that this it worked and turns very good Sourdough Bread. Thank you for sharing your recipe and the video is very precisely detailed and clear!
Stay safe…
The starter need time, even if very active, to get stronger. It will get better and better.
I’ve been making this bread for weeks and love it! So easy and flavorful! I want to know how to best store it, because by day 2, it’s too hard to eat. I’ve tried leaving it cut side down on the cutting board, wrapped in a tea towel, in a zip lock bag, etc. Any advice?
I use a zip lock bag or that thick beeswax paper.
Just made my third loaf in almost a week! Love this bread! Since I baked at night, I kept mine on the cooling rack (it’s round and about the same size as the loaf). For the first day I wrapped all of it (bread on rack) in a large flour sack towel and left out on the table. Then, by the second day after baking, I sliced what was left, placed in a ziplock bag and stored in the freezer. I think leaving it face down on the cutting board, if it’s wooden would allow the board to absorb moisture from the bread. That might be why it got so hard.
I am SO thankful for this recipe, the videos and all of the hints. I have easily made 2-3 loaves every weekend since April. I have divided the dough to make two mini loaves and I have doubled the dough to make 2 normal size. Generally I end up giving at least 1 loaf away every time I bake. Yesterday my nephew and his family came over right after I pulled two loaves out of the ovens. He offered to give me one of his children in exchange for a loaf. 🙂 We shared one loaf with them at dinner and I sent the other loaf (and their children) home with them. So just a warning, if you like eating this bread, don’t share it with others because once they taste it they will forever be dropping hints for more! Seriously though, during this Covid season, I am having so much fun with this recipe every weekend!
Hahaha! Thanks for making my chuckle Terry. Glad you like it!