Description
An easy Sourdough Bread recipe that rises overnight and bakes in the morning. A simple flexible recipe made with sourdough starter, that can be adapted to your needs. View the 3 instructional videos above for more details. If you don’t see the videos, make sure your ad blocker is off.
Ingredients
- 4 cups organic white bread flour, spooned and leveled (520 grams total flour) -please don't include the bowl's weight. I highly recommend weighing the flour for the first few loaves. (See notes for adding other types of flour.)
- 2 teaspoons fine sea salt (12 grams)
- 1 7/8 cups water (385 grams)
- 90 grams homemade sourdough starter or store-bought starter (1/3 cup) fed 8-12 hours earlier, using it slightly after peaking (For a more "sour" taste, use an unfed starter, 4-6 days after feeding if refrigerated- see notes.)
Optional additions:
- rice flour (my favorite for dusting a banneton).
- Seeds for flavoring: fennel seeds, chia seeds, flax seeds, caraway seeds, sesame seeds, poppy seeds, dill seeds, celery seeds, nigella seeds, etc. (optional, but tasty) My favorite is 1 teaspoon fennel seeds, 1/2 teaspoon caraway and 1 tablespoon chia seeds
- Substitute 1/2 cup rye flour, spelt flour or whole wheat flour or other whole-grain flour for 1/2 cup of the white bread flour if you like- resisting the temptation to add more for your first few loaves. (62 grams max).
- Add herbs (fresh or dried- rosemary, thyme, sage, etc).
- Add nuts, olives, garlic, dried fruit or cheese (please see this Rosemary Olive Sourdough Bread Post, for more "how-to" instructions).
Instructions
- 8 am. Twelve hours before mixing your dough, feed your sourdough starter, leaving it out on the counter making sure it doubles in size within 6 hours. (See notes for extra sour). OR, if you keep your starter in the fridge and fed it in the last 7 days- it is OK to use it straight from the jar, cold, without feeding. Best to use starter after it peaks, when it is “hungry”.
- 8:00 pm PLEASE use a kitchen scale if this is your first loaf. Weigh the flour in a medium bowl (***zero-ing out the weight of the bowl). Then add salt, spices, and seeds. Mix starter and water in a small bowl until cloudy and well mixed. Pour the starter-water into flour, incorporating all the flour using a fork. It should be a thick, shaggy, heavy, sticky dough. See video. Mix for about 1-2 minutes using a wood spoon- it will be hard to mix. Don’t worry about tidy dough here, just get the flour all mixed in, cover with a wet kitchen towel, and let rest 15 minutes. It will loosen up as it rests. (Alternatively, mix starter and water in the bowl first, then add the salt and flour-like in my 3rd video- either way works.)
- 8:20 pm: Do the first set of stretches and folds. (See the 1st video in post) With one wet hand (put a bowl of water next to you) pull the dough from one side and stretch it upward, then fold it up and over to the center of the dough. Quarter turn the bowl and repeat, stretching up and folding it over the middle, repeat for about 30 seconds or until the dough gets firm and resists. This helps strengthen the gluten. Cover, rest, and repeat the process 15 minutes later. With wet fingers, stretch up and fold over, turning, repeating, for 30 seconds until the dough gets firm and resists. Then turn the dough over in the bowl. Yes, you could do this a couple more times if you would like to build the gluten, but not imperative. 🙂
- 8:35 pm Proof overnight, at room temp. Cover the bowl with plastic wrap, wax wrap, or a damp kitchen towel (to keep the moisture in) and place it on your kitchen counter for 8-12 hours. (see notes on temperature) 68-70F is the ideal temp. (If it is warmer, check at 6-8 hours. If it is very cold, it may take up to 18 hours in winter.)
- 6-8 AM Check the dough in the morning. The dough should have expanded, with a slight springy dome to the top. It won’t necessarily double in size ( maybe 1.5 -1.75 times bigger) but will have expanded. Do the POKE TEST: With a floured finger, poke into the dough. If it indents easily and mostly springs back to its original shape, it has probably risen enough. If it feels firm or very hard to indent, let it rise longer. If it feels loose, runny, or indents too easily or doesn’t spring back, it is most likely over-proofed (bake it anyway).
- Line a high-sided bowl with parchment. This brand of parchment does not stick to the bread- but if you are unsure about yours, spray oil your parchment lightly before putting the dough in it. (If you are a seasoned bread baker, you do not actually need parchment -this is only for easier transport, bread will not stick to the inside of a Dutch oven.) I like using a high-sided medium-sized bowl versus a flat or shallow bowl to help shore up the sides. You can also use a rice-floured Banneton (bread proofing basket) if you have one.
- 6-8 AM- 2nd Set of STRETCH and SHAPE : (Watch 2nd video -Stretch and Shape video). Loosen the dough from all edges of a bowl using your wet fingers, a wet spatula, or a wet plastic dough scraper, sliding down the sides of the bowl. With both wet hands, carefully pull the dough straight up, in the middle and lift it, stretching straight up in the air- about 1-2 feet (see photo) and place it back down, gently folding it on top of itself. In this first stretch, the dough may feel quite loose and runny. This is OK. It should firm up as it stretches and folds. (Note: If your dough breaks here, it is probably over-proofed, bake it anyway. If your dough won’t stretch like the photo and feels too tight or firm, it needs to proof longer). After the first stretch, give the bowl a quarter turn, wait 30-60 seconds, wet your hands again and stretch it up high again, folding over itself in the bowl. Wait 30-60 seconds. (You could repeat this one more time, 15 minutes later). Then, the third time you lift and stretch, you will lift it all the way into your parchment-lined bowl, folding over itself like you’ve been doing. (Alternatively, lift it into your floured proofing basket seam side up. ( If seam up, pinch the seam closed). Sprinkle top with seeds and flour (get the sides too), gently rubbing it to even coat –and add seeds if you like. If using a banneton, sprinkle the seeds in the banneton before adding the dough.
- FINAL RISE and PREHEAT OVEN: Place the bowl in the refrigerator for one hour uncovered which will firm up the bread, and make scoring easier and help boost “oven spring”. It won’t rise in the fridge. (You could also keep it in the fridge for 3-4 hours if you want to bake later.) Preheat the oven (for 1 FULL hour) to 500F with your dutch oven inside and lid on (see notes). If you have convection- use it. You can also bake the bread at 45oF or 475F. You want your oven as hot so don’t skimp on the preheat. I usually preheat for 1 full hour.
- SCORE & BAKE When ready to bake, place the dough by the stove. Pull out the Dutch oven, close the oven, and remove the lid. Score the bread in the bowl, using a very sharp knife, lame, razor blade, (or try scissors dipped in cold water), score the dough swiftly and deeply, at a 45-degree angle, 3/4- 1-inch deep. One deep slash is just fine. Or criss-cross, or crescent shape. (Or feel free to add other designs, for ideas -google “scoring bread”). You want to score where you want the dough to puff out from. You can also cut with wet kitchen scissors. Carefully lift the parchment by the corners and place both bread and parchment directly into the Dutch oven. Cover quickly. It is OK if parchment peaks out. You want to score and transfer as quickly as possible. (Alternately, if using a proofing basket, cover the basket with parchment, carefully flip the dough into the parchment in the palm of your hand and then center the parchment and dough into your dutch oven, then score).
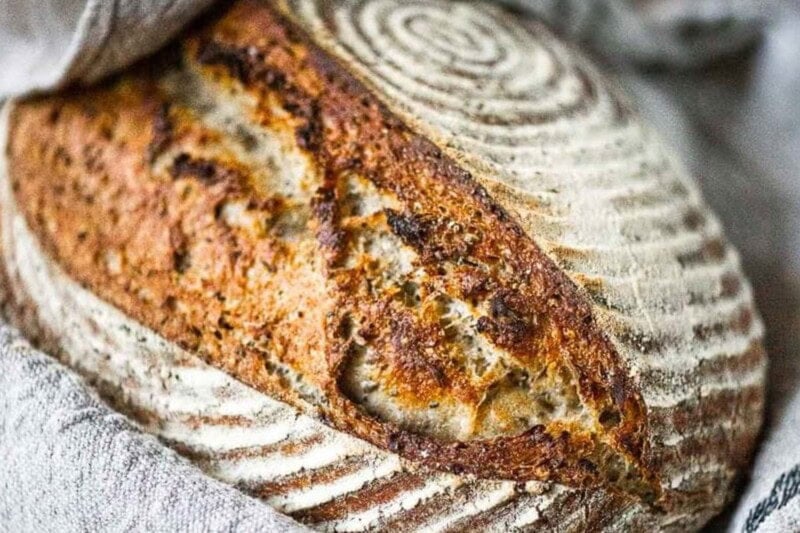
- BAKE. Place the Dutch oven in the middle of the 500°F oven for 20 minutes with convection on, or 25 minutes without convection (or 28 minutes at 450°F). Remove lid. It should be puffed and just lightly golden, and the internal temperature should be close to 200°F (if not, put the lid back on for a few more minutes). Once it’s 200°F, lower the heat to 450°F, and bake uncovered for 10-15 minutes until deeply golden and the internal temperature reaches 204-208°F. No pale loaves please, let them get golden! (For a less “crusty” loaf, increase covered baking time, lower uncovered baking time. You can play with this for the desired results.)
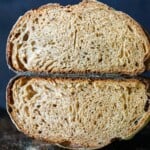
- COOL: It will smell heavenly. Remove from the dutch oven, let it cool 1 hour on a rack or tilted up on its side, before slicing so you don’t let the steam out and don’t smash it- be patient. This is the hardest part. 😉. Take a picture! Feel proud. You did it!
- SERVE: This type of bread is always BEST, served toasted! Then lather it with butter, ghee or olive oil. Add mashed avocado and salted tomatoes, almond butter, honey or jam. A piece of toast can turn into a great meal. See this Mushroom Toast!
- STORE: Store the bread wrapped in a kitchen towel for the first day or two to keep the crust nice and crispy, then move it to a zip-lock bag or waxed bread bag to keep it moist for longer. Bread can also be sliced and frozen. Make sourdough croutons with leftover bread- great in salads and soups!


Notes
Sourdough starter : Using your starter after its peak will ensure your bread rises sufficiently. Make sure your starter is healthy, hungry, and strong, able to double in size 4-8 hours after feeding. If you store your starter in the fridge and last fed it over a week ago, make sure to feed the morning before making bread. If it has only been 3-7 days since last feeding (and you keep it in the fridge), it is OK to make bread without feeding. Use a 1/3 cup starter for your bread dough and place the remaining back in the fridge and feed a week after the last feeding. BUT if it has been a week after your last feeding, pull it out of the fridge, discard (or save for pancakes, waffles, or give away) all but 1/2 cup. Feed it. Let it metabolize the flour 4-8 hours before mixing up the bread dough. Use a 1/3 cup of starter (90 grams) for the bread, place the remaining back in the fridge, and feed in a week. For a more “sour” flavor, use starter that has been in the fridge 4-6 days. Do not feed before using it. The sourdough starter is the sourest the longer it goes without feeding.
Dutch Oven or Bread Baker: Make sure your dutch oven or bread baker can handle a 500F oven. If not, 450F will suffice, and bake 25 minutes before removing the lid. Aim for an internal bread temp of 200F when removing lid- before baking it uncovered. Take notes and adjust the next time!
NO DUTCH OVEN? If you don’t have a dutch oven, you can try baking your bread on a sheet pan, covered with a large metal bowl or pyrex bowl to keep the steam in. It will yield a flatter loaf but it does work. Bake 25-30 minutes covered, remove the bowl, bake until golden 10-15 more minutes until golden, and be sure to check internal temp with a thermometer. It may take a few practices tries to perfect this.
Smaller Loaves: If you would like to create two smaller loaves, divide after the overnight rise, shape, place in the fridge while the oven preheats and bake each at 450F for 18 minutes (or until internal temp is 200F) uncover, lower heat to 425F and bake until golden and internal temp is 204-208F. You may have to fiddle with this timing.
LOAF PAN: Yes you can bake this in a loaf pan. Shape and place it in an oiled loaf pan ( or line with parchment) for the last hour in the fridge, while oven preheats. Bake uncovered at 450 for 15 minutes, lower heat to 425 and bake another 25-ish minutes or until internal temp reaches 204-208F. You may need to play with this according to your oven. Place on middle or lower rack.
PRACTICE: As you practice making your loaves (yes, it is a fun practice) you’ll get a feel for the dough and you’ll begin to notices how changes in seasons (changes in temperature) affect the loaves and their proofing time. I suggest making the exact same loaf repeatedly several times. Warmer temps will call for shorter proofing, cooler temps, longer proofing. You can also change the proofing time by adjusting the sourdough starter amount. For a faster rise, you can add a little more starter, for example, a 1/2 or 2/3 cup. For a longer cooler rise, say in the fridge for 36-48 hours, you can reduce the starter amount to 1/4 cup or even 3 tablespoons. You can play with ratios to get the proofing time just how you want it. Take notes! You can also adjust the hydration for an airier loaf, either reducing flour or increasing water. So many variables!!! *Remember your starter and your dough are actual living “creatures” that are affected by your particular environment. The most important advice I can give you is to pay close attention to your particular “creature”, observe it carefully, and look for signs- it is communicating with you. Pay attention. 🙂 Work with it, not against it. Be patient, respond thoughtfully.
Perfecting bread is a lifelong process, and I’m still learning too. 😉
Nutrition
- Serving Size: 1 slice ( 1/12 of a loaf)
- Calories: 154
- Sugar: 0.2 g
- Sodium: 582.3 mg
- Fat: 1.1 g
- Saturated Fat: 0.2 g
- Carbohydrates: 32.7 g
- Fiber: 4.9 g
- Protein: 6 g
- Cholesterol: 0 mg