This sourdough baguette is everything you want in the French classic–a crunchy crust, an open, airy crumb, and lots and lots of flavor. And it's easier to make than you think! Eat it plain, slathered in butter, or serve it with your favorite soup. For best results, this recipe requires sourdough starter, kitchen scale, a baguette pan and 3 days. See all our sourdough recipes here!

How to make Sourdough Baguettes! By now, many of you have perfected your Easy Sourdough Bread, and I thought I’d share a recipe for Sourdough Baguettes that introduces a couple of new terms and a new technique to add to your growing repertoire. This recipe was created by my friend, Kris Osborne, over at Baked- the blog.
She’ll introduce you to the terms “levain” and “autolyse”, two words I intentionally omitted from the Sourdough Bread recipe to keep it as simple as possible. But I know you are ready now! You’ll recognize the stretch and fold technique and will have, by now, be able to do this with your eyes closed. I’m so excited for you to try this. Keep in mind, this recipe takes 3 days.
How to make Sourdough Baguettes| step-by-step Video
Sourdough Baguette ingredients
- Active, bubbly starter (make sure it doubles within 6 hours of feeding)
- Bread flour -try for organic, locally milled, if possible. 🙂
- Salt- fine sea salt works best.
- A kitchen scale
- Baguette Pan – helpful but not imperative.
STEP ONE: The night before you plan to make the baguette dough, make the levain:
A levain (pronounced luh-VAHN) is simply a portion of your sourdough starter that has been freshly fed and allowed to ferment, specifically prepared to leaven a batch of dough. It's like making a small, active "pre-ferment" from your starter to use at peak strength. Bakers make a levain to create a small, freshly fed portion of starter, giving them better control over the dough's rise, flavor, timing, and consistency.
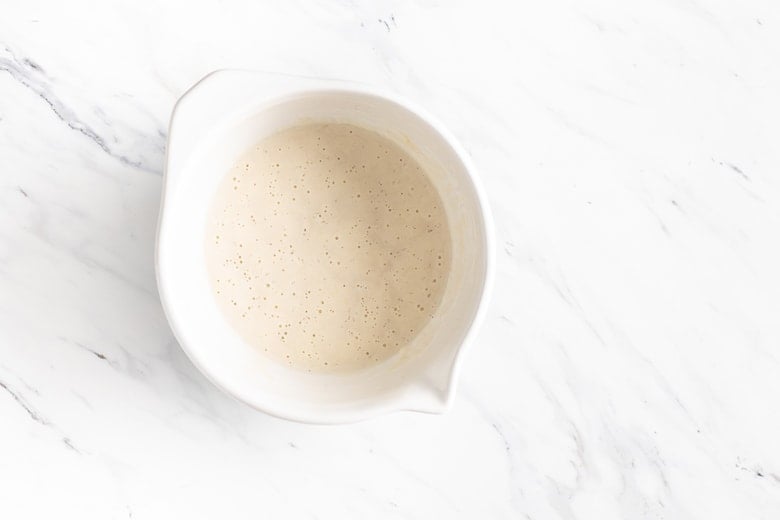
To make the levain, mix the starter, water, and bread flour in a small bowl until well-combined. Cover with a plate and rest overnight (8-12 hours) until very bubbly and active.

The levain should have many small bubbles across the top and throughout.
STEP TWO: Make the autolyse.
Day two, morning. Transfer all of the levain to a large bowl. Add the water and bread flour, and mix until all the flour is incorporated and a shaggy dough forms. Cover with a lid or damp towel and set aside for 45 minutes to rest. This is called the autolyse.
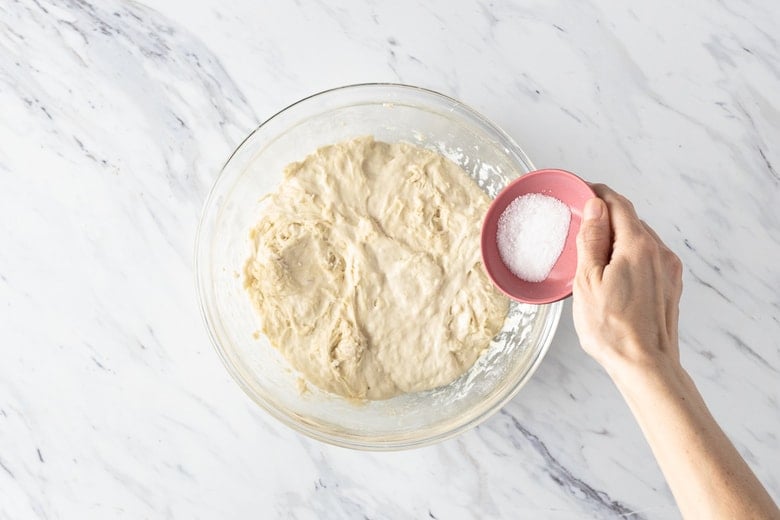
STEP THREE: Add the salt. After the 45-minute rest period, add the salt to the dough and squeeze and pinch the salt into the dough until evenly distributed. Perform a set of stretches and folds (see notes), then cover and set aside for 30 minutes to rest.
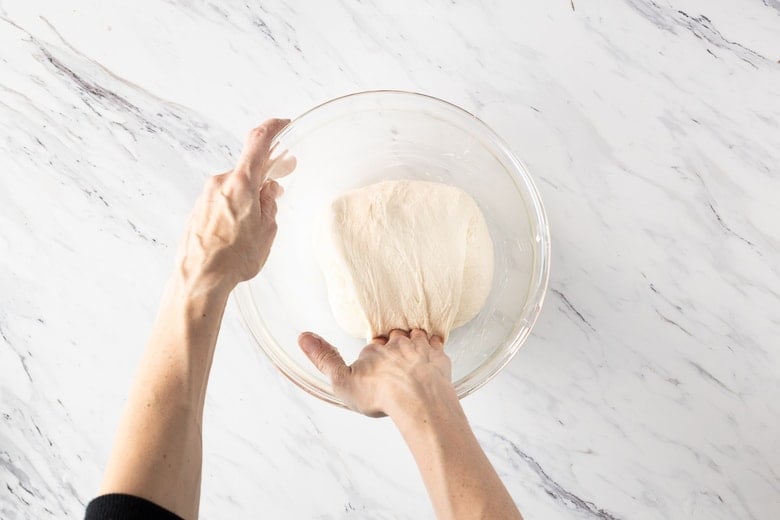
STEP FOUR: stretch and fold. Continue performing a set of “stretch and folds” every 30 minutes for 3 hours, covering and resting between each round.
How to do the Stretch and folds
To perform a series of stretches and folds, imagine the dough in 4 quadrants. Grab the dough in the 12 o'clock position and pull it up and over toward yourself (toward the 6 o'clock position). Watch the video above.
Then, rotate the bowl a quarter turn to the right and grab the dough in the 12 o'clock position again (formerly 9 o'clock), bringing it up and down toward 6 o'clock once more. Repeat this step 2 more times until each quadrant of the dough has made it to the 12 o'clock position and has been stretched and folded onto itself.
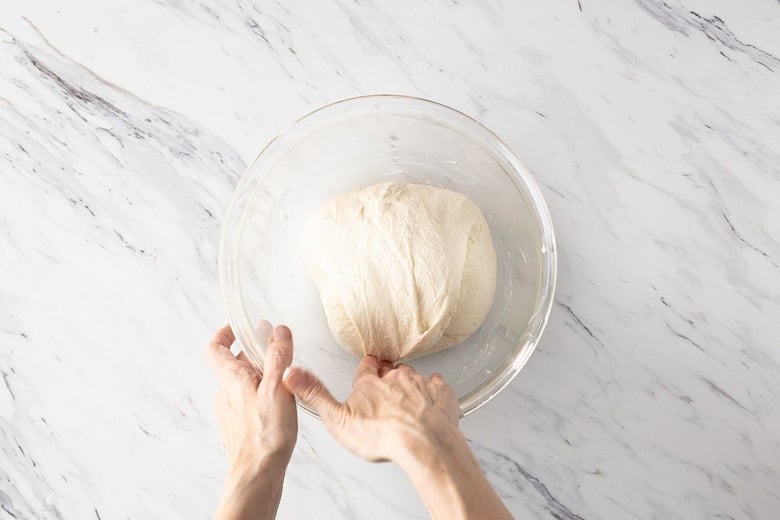
The dough will look like a little parcel.
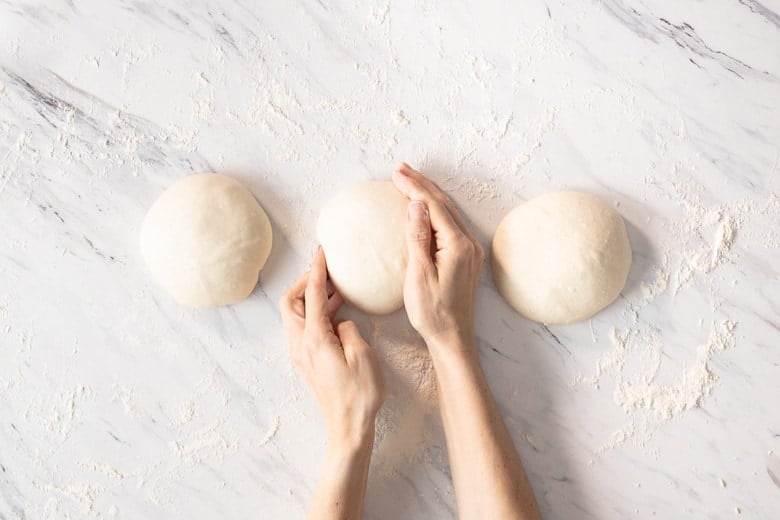
STEP FIVE Shape! Gently tip the dough onto a lightly floured surface and cut it into 3 equal portions. Using a circular cupping motion with the palm of your hand, gently roll each ball of dough on the countertop to create a taut ball.
Gently dust with flour and cover with a towel. Bench rest 30 minutes.
Sprinkle your countertop with flour and gently pat the first ball of dough into a rectangle, approximately 9 inches long. Fold the top third of the dough down (like folding a business letter) and press it into the dough, using the heel of your hand, to stick the edges together.
Rotate the dough 180 degrees and repeat so that both the bottom and top thirds have been folded in. Fold the dough in half once more to create a slim silhouette, and, again, use the heel of your hand to connect the edges. Roll the dough so it's seam-side down and press and roll the dough out so that a baguette shape forms, pinching the edges to taper them, if necessary.
Place seam side down on a greased baguette pan or on floured parchment-lined sheet pan. Please refer to video above!
STEP SIX. Cover with plastic wrap and refrigerate overnight, anywhere from 14-18 hours. This is the long proof.
TIP: Take note of the time so you can adjust next time. In the morning, the dough will have expanded by 70-80% (this is the goal). 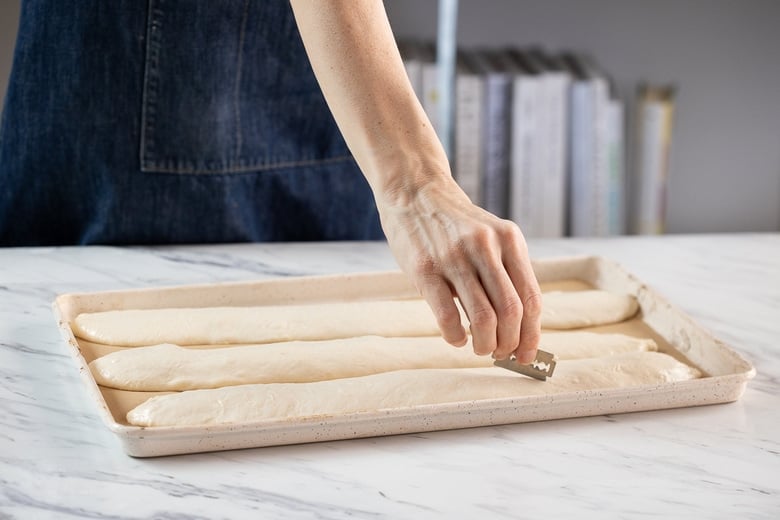
STEP SEVEN. Day 3: The next morning, preheat the oven to 500°F (260°C) with the oven racks positioned in the middle and one level below.
Bake the baguettes directly on a baking sheet or the baguette pan. Keep in mind, the baguette pan will leave slight perforations on the bottom of the bread.
Score. Using a lame (or sharp knife or razor blade), make 3-5 diagonal slashes into each piece of dough.
Step 8: BAKE. Place a handful of ice cubes onto the second baking sheet. Immediately place the baguette dough into the oven on the middle rack and place the baking sheet with ice on the rack below. Close the oven door and turn the temperature down to 450°F. Bake for 30 – 35 minutes, or until the bread is a deep golden brown.
Remove from the oven and cool completely on a wire rack before cutting.

How to store Baguettes
Bread is best eaten on the day that it's made, but if stored in paper will keep an additional day.
You can freeze baguettes, sliced or whole. If slicing, freeze individual slices on a baking sheet, then place into a freezer bag. If freezing whole, wrap tightly with aluminum foil or plastic freezer wrap, then place in a freezer bag. Bread will keep this way for a few months.

Troubleshooting
- Make sure your sourdough starter is active and happy. The starter should double within 6-8 hours of feeding. Read through our sourdough starter recipe for more details.
- The bulk rise time will vary depending on your starter and your fridge temp. The goal is 70-90% expansion. In the morning, do the poke test: let the dough come to room temp. Flour a finger and poke the dough. If it springs back quickly, it may be underproofed. If it doesn’t spring back, it is likely overproofed (bake it anyway!). If it springs back slowly, it is just right.
Enjoy the process of learning how to make Sourdough Baguettes and let us know how it goes! Take a peek at all our sourdough recipes!
Happy Baking!
More Favorite sourdough recipes
- Jalapeño Cheddar Cheese Sourdough Bread
- Simple Sourdough Starter
- Sourdough Pizza Crust
- No-Knead Sourdough Bread
- Rosemary Olive Sourdough Bread
- Sourdough Crackers
- Vegan Banana Bread
- Overnight Sourdough Waffles
- Sourdough Pancakes
- Sourdough Scones
- Sourdough Biscuits
- Sourdough Buns
- Sourdough croutons
Love baking? You might also like our Homemade Pie Crust recipe!

Sourdough Baguette Recipe
- Prep Time: 36 hours
- Cook Time: 35 mins
- Total Time: 36 hours 35 minutes
- Yield: 3 14-inch baguettes 1x
- Category: bread, sourdough, baked
- Method: baked
- Cuisine: French
- Diet: Vegan
Description
This sourdough baguette is everything you want in the French classic–a crunchy crust, an open, airy crumb, and lots and lots of flavor. And it’s easier to make than you think! Eat it plain, slathered in butter, or serve it with your favorite soup. For best results, this recipe requires a kitchen scale, a baguette pan and 3 days time!
Ingredients
- 65 grams active bubbly starter
- 65 grams tepid water
- 65 grams bread flour
- 420 grams tepid water
- 600 grams bread flour
- 12 grams salt
Instructions
Day 1: (Evening) Levain
Make the levain: In a medium bowl, mix together the starter, water, and bread flour until well-combined. Cover with a plate and rest overnight (8-12 hours) until very bubbly and active. The levain should have many small bubbles across the top and throughout.
Day 2: Mix, stretch and folds, shape, bulk rise overnight.
- Mix. In the morning, transfer all of the levain to a large bowl. Add the water and bread flour, and mix until all of the flour is incorporated and a shaggy dough is formed. Cover with a lid or damp towel and set aside 45 minutes to rest. This is called the autolyse.
- Salt, stretch and fold. After the 45-minute rest period, add the salt to the dough and squeeze and pinch the salt into the dough until evenly distributed. Perform a set of stretch and folds (see video), then cover and set aside for 30 minutes to rest. Continue to perform a set of stretch and folds every 30 minutes for 3 hours, covering and resting in between each round.
- Divide. Gently tip the dough onto a lightly floured surface and cut it into 3 equal portions. Using a circular cupping motion with the palm of your hand, gently roll each ball of dough on the countertop to a create a taut ball. Gently dust with flour and cover with a towel. Bench rest 30 minutes.
- Shape. Sprinkle the countertop with flour and gently pat the first ball of dough into a rectangle, approximately 9-inches long. Fold the top third of the dough down (like folding a business letter) and press it into the dough, using the heel of your hand, to stick the edges together. Rotate the dough 180 degrees and repeat so that both the bottom and top thirds have been folded in. Fold the dough in half once more to create a slim silhouette, and, again, use the heel of your hand to connect the edges. Roll the dough so it’s seam-side down and press and roll the dough out so that a baguette shape forms, pinching the edges to taper them, if necessary.
- Bulk rise. 14-18 hours. Place them seam side down on a greased baguette pan or heavily dusted, parchment-lined sheet pan. Cover with plastic wrap and refrigerate overnight 14-18 hours.
Day 3: Morning. Preheat, score and bake!
- Preheat. The next morning, preheat the oven to 500°F (260°C) with the oven racks positioned in the middle and one level below. Have a baking sheet ready to add ice cubes to. (See notes.)
- Score. When the oven is hot, remove the baguette dough from the fridge. Using a lame (or sharp knife or razor blade), make 3-5 diagonal slashes into each piece of dough (¼-½ inch deep).
- Bake. Place a handful of ice cubes onto the second baking sheet. Immediately place the baguette dough into the oven on the middle rack and place the baking sheet with ice on the rack below. Close the oven door and turn the temperature down to 450°F. Bake for 30 – 35 minutes, or until the bread is a deep golden brown. Remove from the oven and cool on a wire rack.
Notes
Stretch and folds: To perform a series of stretch and folds, imagine the dough in 4 quadrants. Grab the dough in the 12 o’clock position and pull it up and over toward yourself (toward the 6 o’clock position). Then, rotate the bowl a quarter turn to the right and grab the dough in the 12 o’clock position again (formerly 9 o’clock), bringing it up and down toward 6 o’clock once more. Repeat this step 2 more times until each quadrant of the dough has made it to the 12 o’clock position and has been stretched and folded onto itself. The dough will look like a little parcel.
Baking: When transferring the cold baguette dough to a parchment-lined pan, it will be snake-ish and hard to work with. Move quickly and efficiently so you don’t disrupt the shape of the baguette too much. Alternatively, you can bake the baguettes directly on the baguette pan until you get more comfortable working with the dough. Keep in mind, the baguette pan will leave slight perforations on the bottom of the bread.
Steam: Create steam by placing ice cubes on a sheet pan on the lowest rack, under the baguettes.
Storage. Bread is best eaten on the day that it’s made, but if stored in paper will keep an additional day. You can freeze baguettes, sliced or whole. If slicing, freeze individual slices on a baking sheet, then place into a freezer bag. If freezing whole, wrap tightly with plastic freezer wrap, then place in a freezer bag. Bread will keep this way for a few months.
How to tell if the dough is proofed long enough? Do the poke test: let dough come to room temp. Flour a finger and poke the dough. If it springs back quickly, it may be underproofed. If it springs back slowly, it is just right. If it doesn’t spring back, it is likely overproofed (bake it anyway!).
Nutrition
- Serving Size: ¼ of a baguette
- Calories: 196
- Sugar: 0.2 g
- Sodium: 388.7 mg
- Fat: 0.9 g
- Saturated Fat: 0.1 g
- Carbohydrates: 39.3 g
- Fiber: 1.3 g
- Protein: 6.5 g
- Cholesterol: 0 mg


I’m really excited to try this, I just said to my mom yesterday that the next thing I want to learn is how to make a baguette! (I learned sourdough baking from your no-knead recipe and have made MANY amazing loaves of different varieties since! 🙂
I wanted to watch the video (I’m a visual learner) but where the video is supposed to be it takes me to Amazon.
Strange Vicki. I see the video there, do you by chance, have your ad blocker turned on? Perhaps try a different browser?
I tried it on my phone and it worked. Must be a blocker or something on the computer. Thank you for your reply! Excited to try the baguettes!
Oh good!
Hi, I love this recipe. I noticed some black mold on the bottom of the baguettes after I baked them. I followed the recipe as is. There are only a few black dots on the bottom, so I will cut them out. But just wondering how I can avoid next time, because I will definitely be making them again. So good!
How soon after you bake them? If it is warm there, you may want to refrigerate after a couple days.
I figured it out. The mold wasn’t from after baking it was because I placed the baguettes on parchment paper in the refrigerator. I bought a baking couche and that solved my problem. I apparently did not go by your full instructions. 😉 Thank you, this is such a great recipe. It’s tomato season here and nothing goes better with fresh sliced tomatoes than baguettes,mozz and balsamic! 🤤
Ok great to know! Glad you were able to figure it out!
I just finished the final shaping and put the loaves in the fridge. But I have a question … how long is your baguette pan? Or, how long do you make your loaves? I think my pan may be a little shorter than the one you show because my loaves seem a little big. Fingers crossed they will stay where they belong and not flow over the sides of each trough. BTW, this is the nicest dough to work with. My best experience yet with sourdough. Could you bake this dough as a boule?
Hi Deb- I want to say the pan is 24 inches? So quite long.
I left the bread in the fridge for a day too long (first time making recipe) so I thought I’d ruined the unbaked loaves but decided to try them anyway. So good! I have since made the three loaves properly and they’re wonderful. Well done. I’m
Oh good! Great to hear!
I love the recipe. Question: I’m still not getting the bottom of the loaves as crusty as I’d like. Any advice? I’ve been baking them on a stone with the cookie sheet and ice cubes on the next rack below. And I’ve had to bake longer than suggested in the recipe.
Hi Mary Anne- are you preheating oven with the stone?
No, I proof the loaves on the stone in the fridge and after removing proofing cloth put straight in the oven.
I would try proofing in the fridge on a parchment-lined sheet pan, and heating up the stone while the oven is preheating?
Thanks. I’ll try that. I think you nailed it because it took so long for the stone to warm up. Love your recipe. It’s become a real favourite in our family.
Really,Really liked this recipe. Hubby liked it to! definitely will be making this quite often. Thank you
Great to hear, thanks Sherry!
I love this recipe. The flavor is wonderful. The only question that I have is that how do you get such cuts in your dough? My dough is so soft it’s hard to get nice cuts on it. Thank you!
You could try flouring the tops beforehand?
I have enjoyed making sourdough baguettes with your recipe! Terrific results.
Thus far I have counter proofed the shaped baguettes and put them in the frig for about an hour before scoring and baking. Baking for about 20 minutes does the trick for me.
I have a couple questions about the recipe’s overnight refrigeration of the shaped baguettes. Aren’t they mainly resting during that period, not rising? If there is no subsequent proofing or taking the shaped baguettes to room temperature, then there must be significant oven spring? Thanks!
Hi Richard, glad this shorter method is working for you. So much simpler- almost like the Overnight Bread! They do slightly proof (but very slowly) during the overnight rise in the fridge- so good for both oven spring and a slower, longer fermentation (good flavor). But I suggest just keep doing what you are doing if it’s working!
Will do. It’s all very satisfying.
…hmm…think that I’ll retry this recipe with the following change; do not form the loaves until after overnight refrigeration…form them about an hour before baking on the 3rd day. Dough was beautiful when I formed them on day 2, but they deflated and kinda dried out in frig even covered in plastic wrap
Oh dear- sounds like they over-proofed in the fridge. If you try it this way will let me know how it goes?
Pretty sure I am overthinking this, but my starter is in the fridge. Can I begin day 1(evening) with the starter directly from the fridge or do I need to feed it that morning or even the night before that? Or maybe even just feed my fridge starter a day or two before I start this?
My friend gave me a couche for Christmas and I am dying to use it. If you have any tips for using a couch, would love your input on that as well.
Thank you and I look forward to making this recipe.
Hi Mary- you should be able to start with your starter directly from the fridge (if it is generally active and healthy and normally doubles within 6 hours of feeding).
These were the best baguettes I’ve ever made! I found the dough lovely to work with. Some slight modifications I made: I let the dough rest for an hour after the last fold to ensure it was nice and airy, then proofed the shaped baguettes on the counter for about 2 hours (until they passed the poke test). I put them in the fridge for about an hour at that point, then baked them straight on the parchment that formed their couche on my baking steel. Turned out great!
thanks Allison- glad these worked for you!
Hello – been making your no kneed sourdough for over a year, and ready to try this. Can you tell me what benefit the extra 2+ hours of stretch and folds have that make them necessary here but not in the no knead sourdough? Still leaning all the techniques! Thank you.
Hi Michael- the extra stretch and folds help to build up the gluten, a more advanced recipe.
Hi
I made it with spelt flour. I want it to be more fluffy and crunchy. What can be addedto it?
I’m not sure. How healthy is your starter? Doubling within 6 hours of feeding?
This came out delicious !! It wasn’t difficult but it did require time.
Great to hear Robyn, yes a little more involved than the overnight sourdough loaf,but turns out well!
Just wondering where the recipe is for the sourdough scones that are featured in your Thanksgiving side dish recipes? I followed the links, but could not see the recipe for the scones, only the baguettes?
Hi Tammy, sorry it was incorrectly linked. Fixed it. Just type sourdough in the search bar and all the sourdough recipes should come up.
And one more question: I don’t have a glass bowl or jar large enough for this. Will plastic do? When storing in the refrigerator, can it be placed in a plastic ziploc bag? I’ve used plastic bowls and bags for Amish friendship bread, which is also a type of sourdough. Thank you so much!
A plastic bowl would work. Not sure about the zip lock, it might not fit especially when dough expands. But of course, you could give it a try.
I haven’t tried this yet – because I’m in the US and don’t have a kitchen scale. Can you please provide an English measurement equivalent for the starter – say in fluid ounces? I can calculate everything else. Thanks in advance!
Hi Gloria- I will do this the next time I make these- but it may be a few weeks.
Thank you! My husband has been asking for sourdough baguettes for WEEKS, so I may go ahead and experiment. I know 65 grams of water is just over 1/4 c. or 4 Tbsp. and the starter would be heavier, so I’d need a lesser amount. Looking forward to trying the recipe.
Ok. 😉 I will try to get this to you this weekend Gloria!
If my starter is made with all purpose flour, would you suggest any changes to the recipe?
As long as it doubles within 6 hours of feeding, I think you are good to go!
Delicious bread and yet I think I’m missing something here. My baguettes didn’t puff up the way yours look in the picture and I think I followed the recipe carefully. Mine were flatter and I wonder about over proofing possibly being the cause. In following your directions, the 2nd days work should be done by the early afternoon. That means that they sit in the refrigerator in the baguette pans for about 18 hours. Say 2 pm to 8 am, when they are baked on day 3. Could that be the cause or do you have another suggestion? I should say I’ve been making sourdough bread for only about 6 months but think I have my stretch and folds down. Thank you for any insight you have!
Hi Ann! It kind of does sound possibly over-proofed. Your fridge may be slightly warmer? You could cut back a few hours? Either that or your starter? Does it double within 6 hours of feeding?
My starter does double quickly. How does this sound? I make the levain in the morning, maybe 7 am. Then let it sit until 3 pm or until very bubbly, then begin the process of making the bread so that it goes into the fridge in the evening. The other idea would be to do as your recipe says and make the levain the night before but wait to begin the bread making until mid day the next day. Would the levain still be healthy mid day after sitting all that time? Thank you again for your input!
Hi Ann, I typically don’t make a levain first, so not sure here? I think it should be fine, but guessing.
I’m missing something here. Where am I wrong? Your recipe says make the levain the night before as step 1. Thank you again, especially for your patience with me.
Sorry Ann, I think I see the confusion here. Making the levain is “step one”. Make it on the evening of Day 1.
Hi Sylvia,
I have the same question as Ann. I made the levain at 9 pm. Made autolyze at 8 am. Based on recipe, I’ll be “done” and ready to refrigerate by 1 pm or so. Can I proof in the counter and bake at night? Otherwise it will be 18 hrs of fridge proofing? If I counter proof- does not having cold dough affect outcome? Thank you!!
Hi Lynn, I don’t see why this wouldn’t work. You could proof on the counter, and place in the fridge when you preheat the oven for the last 45 minutes?
Hi Sylvia, do these have to go in the fridge overnight? Can i proof them on the counter for longer and then bake in the evening without refrigerating?
Hi Elizabeth- funny, I was wondering the same thing. I will do some experimenting and get back. It’s a friend’s recipe so not quite sure here unless I try it. Let me know if you try it oo!
Just baked these loaves this morning! Wonderful!
Excellent Carol!
Beginner bread maker here. Made sourdough starter in January that I’ve been experimenting with unsuccessfully until now. Although this took 3 committed days to make it was worth all the time! Huge hit with everyone!
So happy this worked for you!
Quick question on the salt kosher salt, or fine table salt?
Thank you!
Hi Mari! 🙂 Since the measurement is in weight, you can use either!
Takes three days to make but definitely worth it. By mistake I added the salt at the same time as the flour, water and levain. Still turned out really yummy. I needed to leave in the 3 hours you’re supposed to lift and fold the dough so didn’t get in as many as I should have. Next time I’ll add the salt after resting and be sure to be home for the 3 hours. 🙂
Glad this worked out for you Johanna!
I’ve made this several times now! It works so well, and seems to be a forgiving dough! I’ve tried so many sourdough recipes over the years, and this one was the one that worked! I think it’s because other recipes have you use only a small amount of the levain you make, and this recipe, you use the entire levain! Is this why it works so well? Anyway, thank you for this recipe, I enjoy seeing your Instagram posts!
Thanks Carol! Glad it is working for you!