Whip up these golden, airy popovers in just 15 minutes with only 5 ingredients! Perfect for holiday feasts or to elevate a simple weeknight dinner, the batter can be made ahead and is gluten-free adaptable. Includes a step-by-step video!
A flower does not have to do anything of service; it only has to be a flower. That is enough. ~Thich Nhat Hanh
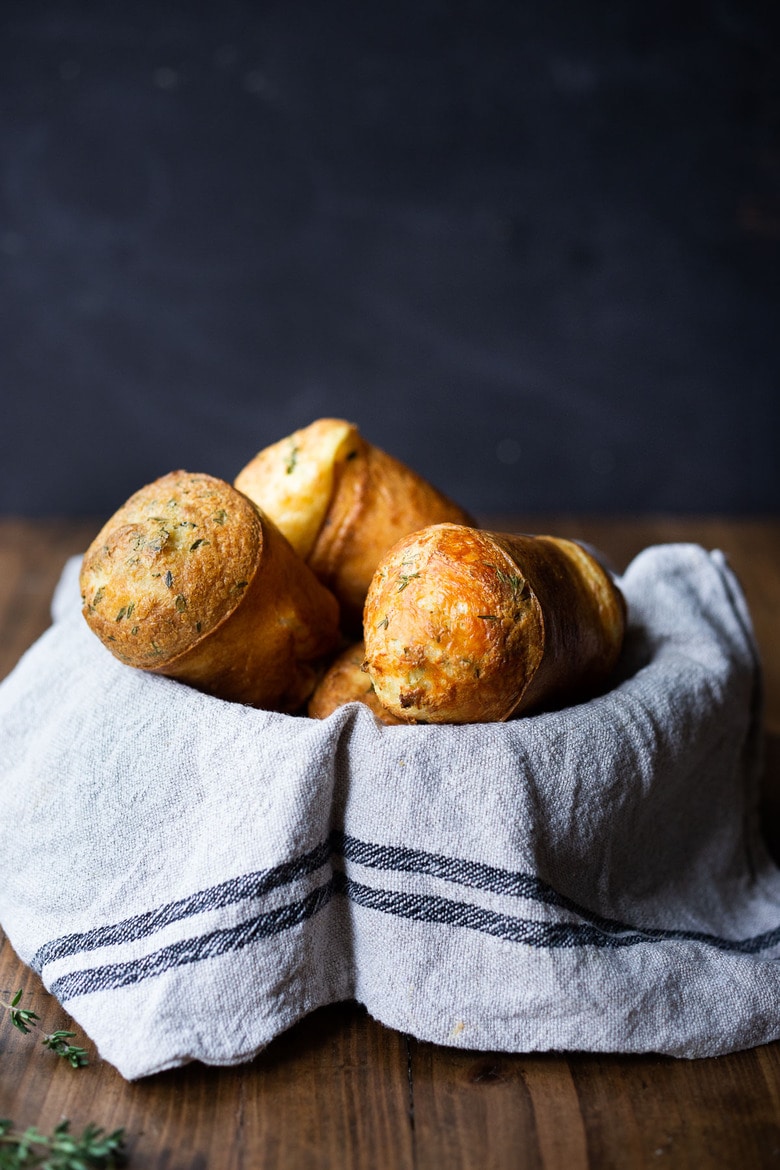
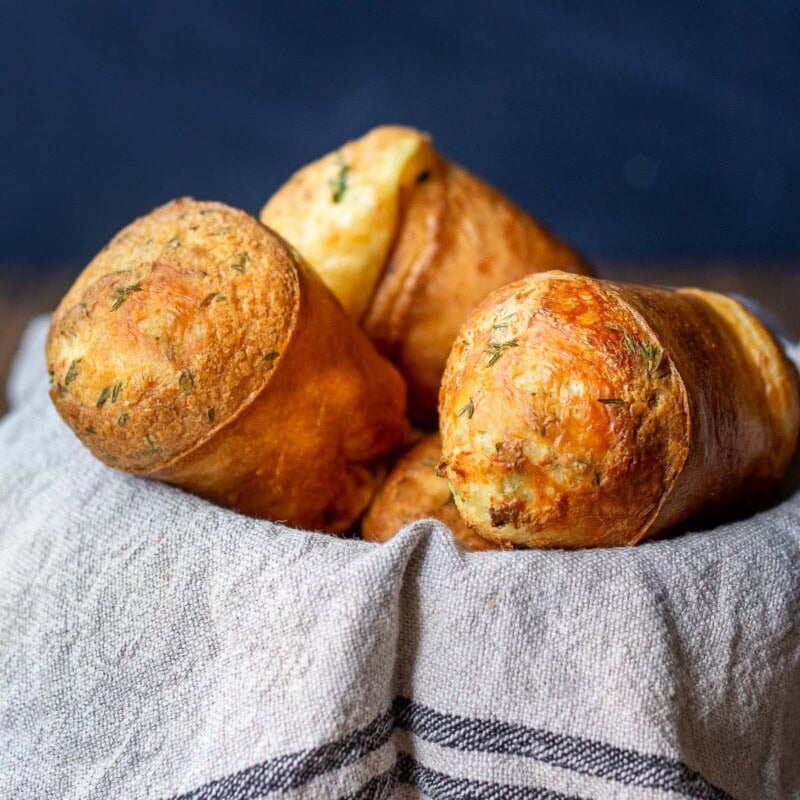
There's something so magical about how a few humble ingredients-eggs, flour, milk, and butter-transform into golden, lofty rolls with crispy edges and soft, airy centers. As a chef, I love mastering and sharing recipes like this that feel impressive but are secretly very simple. This popover recipe has become a reader favorite, earning many five-star reviews from home cooks who say they're "crowd pleasing, always!"
What are Popovers?
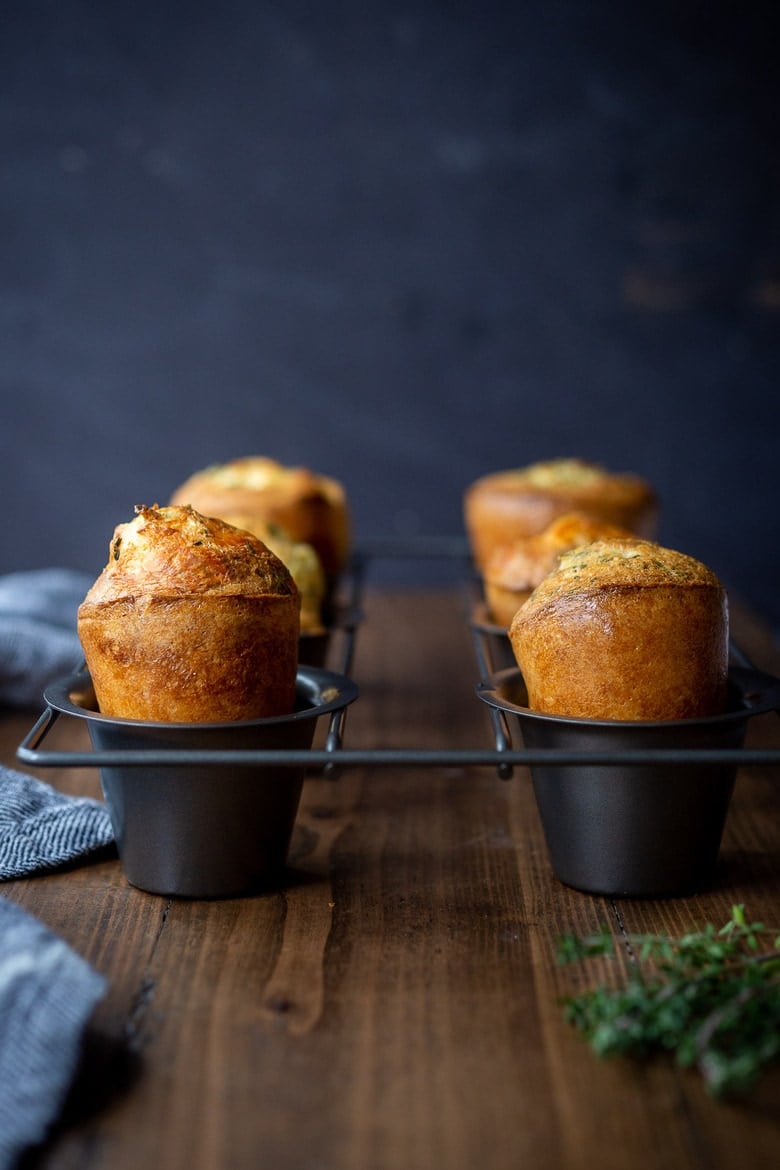
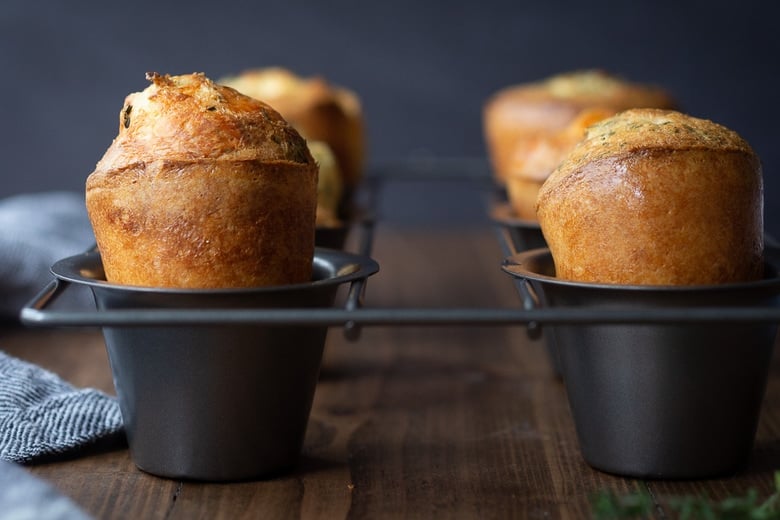
Popovers are the American cousin of the classic British Yorkshire pudding. Delightfully light and airy rolls that puff dramatically in the oven - crisp and golden on the outside, tender and hollow within. Made from a simple batter, they rely on steam (not yeast or baking powder) for their rise. As the batter hits a hot pan, moisture quickly turns to steam, inflating the pastry into a tall, delicate shell that "pops over" the edge of the pan - hence the name.
WATCH: How to Make Foolproof Popovers
Why You’ll Love this Recipe for Popovers
As a chef, I love it when simple, easy recipes turn out to be truly stunning! This popover recipe is made with 5 ingredeints, takes just 15 minutes of hands-on time -just place everything in a blender and bake!
There are a few common challenges when it comes to popovers, most commonly popovers that don’t fully rise, or popovers that collapse after baking. I’ll share my chef’s tips and foolproof method for preventing this!
I’ll also share my basic, 5-ingredient recipe, plus some fun ways to adapt this if you are feeling creative.
Easy Popover Ingredients
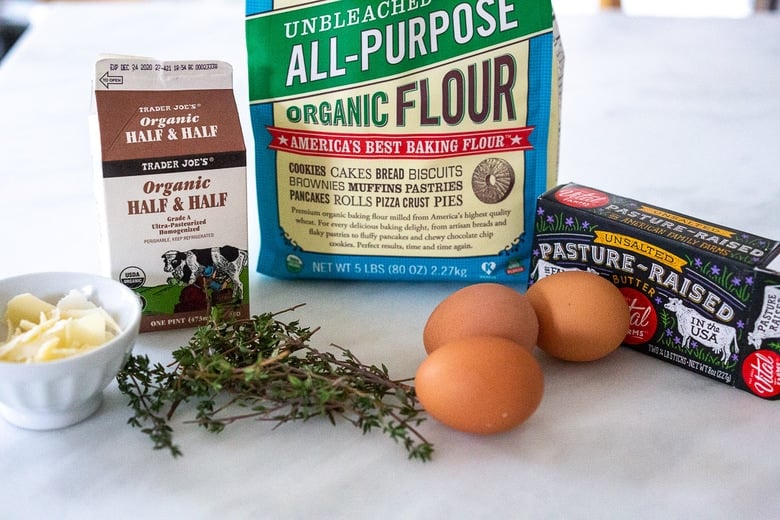
- Extra-large eggs– this is what gives the popovers structure and loft.
- All-purpose flour- or a gluten-free flour blend.
- Whole milk- (or use half & half and water) or a plant-based milk ( fuller fat is best here)
- Butter (divided) adds richness -don’t skip it!
- Salt- for flavor!
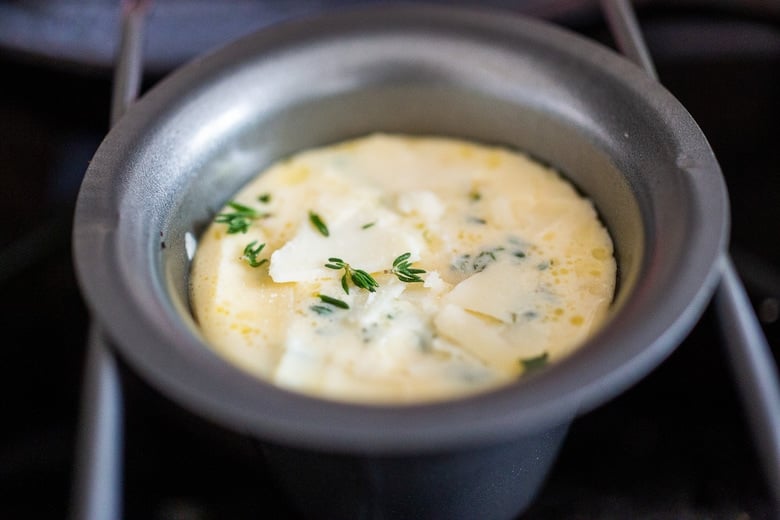
- Optional additions: Fresh thyme or other savory herbs, such as rosemary or sage, parmesan, pecorino, or gruyère
Equipment
A popover pan will elevate your popovers! Yes, you can use a non-stick muffin tin, but a popover pan makes a taller, narrower popover. And trust me, once you make this recipe, you’ll probably make it often.
How to Make Popovers
Preheat the oven to 450°F, with the popover pan inside. Preheating the popover pan will help create the airy loft, so don’t skip this.
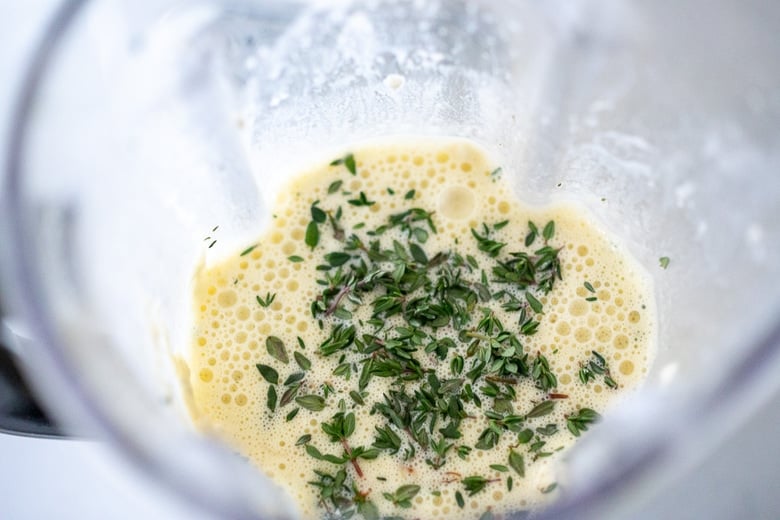
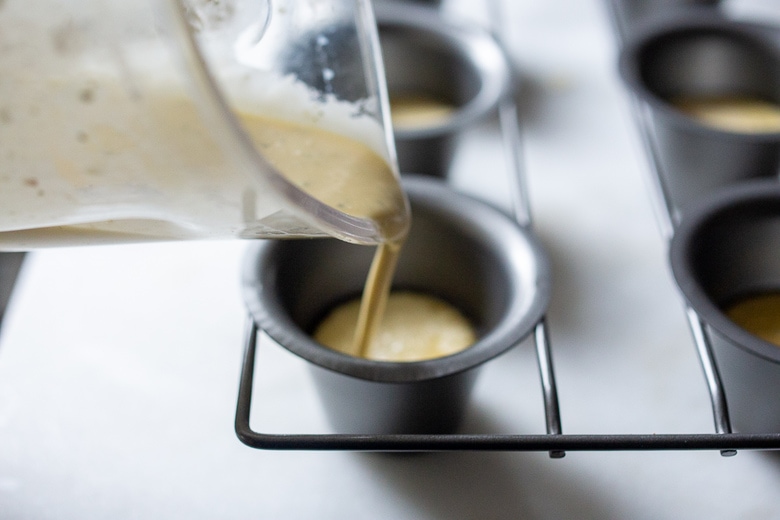
Step one: Blend the Batter. Place the popover ingredients in a blender and blend until smooth. Stir in the optional thyme. Let the batter come to room temperature -cold batter will slow steam formation, leading to less lift and more collapse. I leave the batter in the blender for easy pouring.
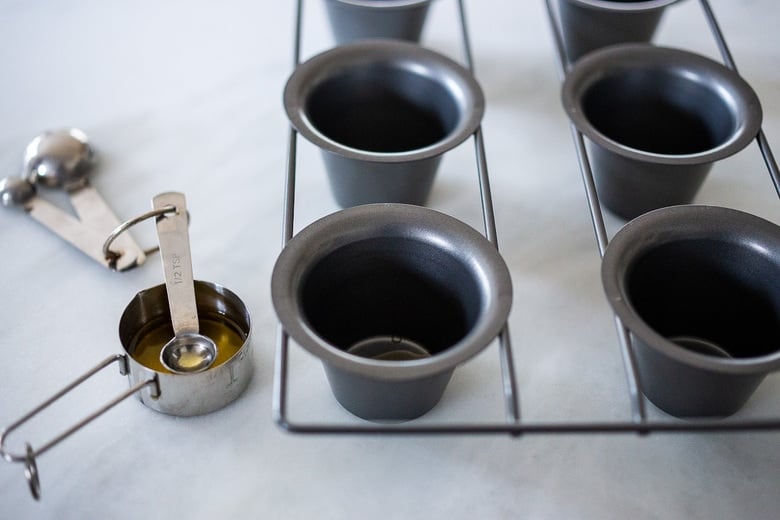
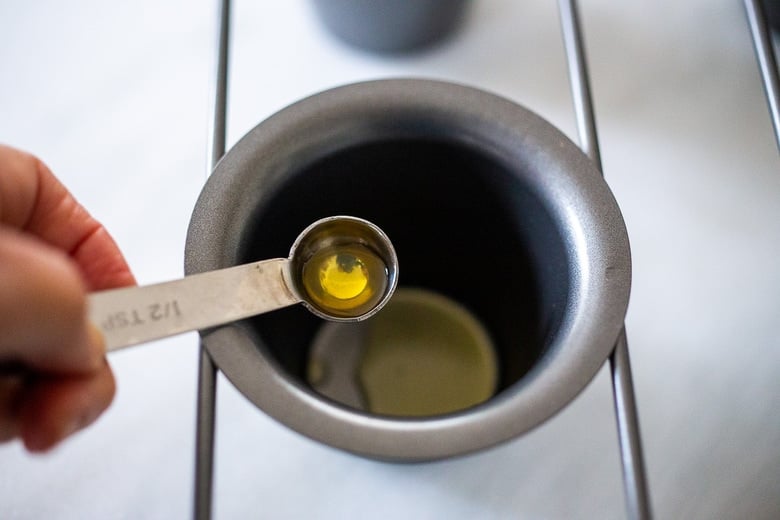
Step 2: Prep the pan. Butter the preheated popover pan – this is what gives the popover its crispy golden exterior. You can use melted butter or little pats of butter. You’ll need to add 1-2 teaspoons of melted butter to each one, brushing it on the sides too. The crispy exterior is what supports the airy interior, so this is imperative to creating a popover that doesn’t collapse.
Step 3: Pour in the popover batter over the butter.
Step 4: Top with optional parmesan or pecorino, if you like. Adding grated cheese adds a ton of flavor and aroma!
Step 5: Bake. Place them in a hot oven for 20-25 minutes until fully puffed and golden brown. Getting them golden brown will help them hold their shape. Lower the heat to 325°F and bake for 5-10 more minutes to help crisp the sides, so they don’t collapse.
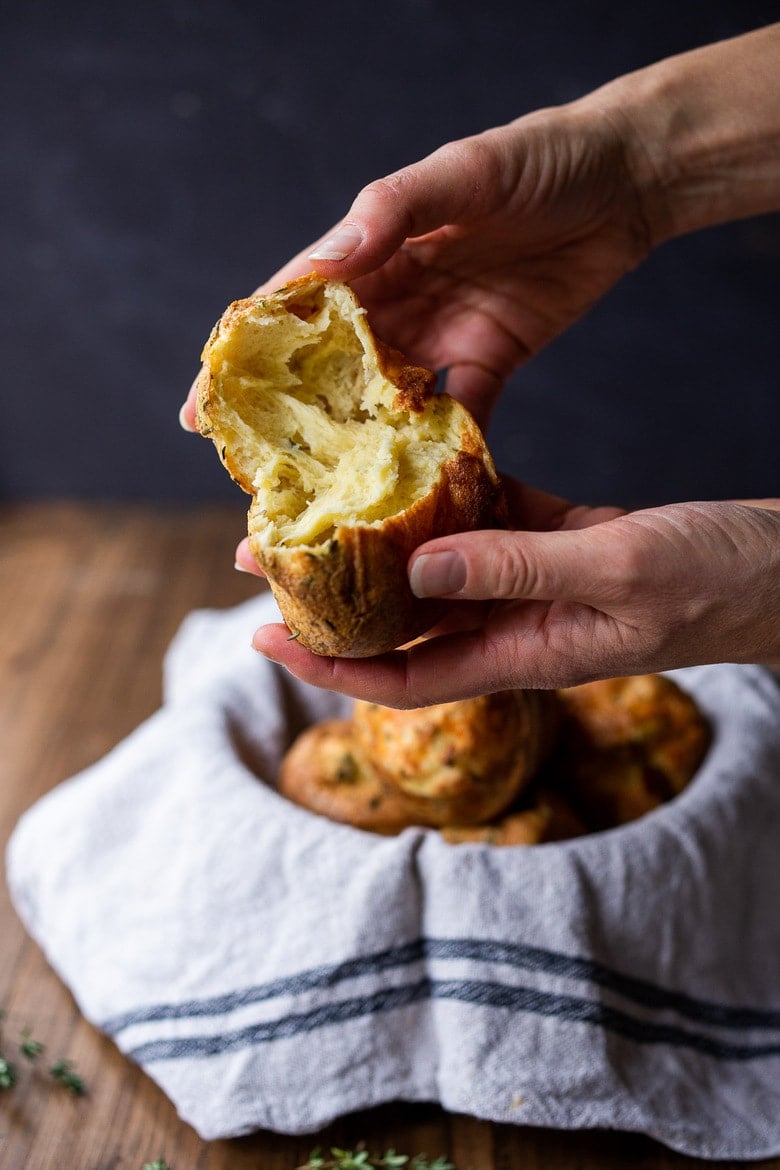
Step 6: Cut a small 1/2-inch slit in the side of the popover using a pairing knife, letting the steam escape. This will help prevent popovers from shrinking down.
Chef’s Tips for making the BEST popovers
- Use a popover pan for taller, loftier, narrower popovers! The BEST.
- Preheat the oven and popover pan, and make sure the batter is at room temperature before baking, to ensure a tall, lofty rise. Do not open the oven door for the first 20 minutes.
- Prevent collapse by baking them long enough (they need the sides to be golden brown and crispy to be strong enough to hold the airy center). Once golden, slit the side with a paring knife to allow steam to escape, so they hold their shape and don’t sink down.
- Add herbs and cheese for elevated flavor.
How to make Popovers Ahead
If making Popover batter ahead, store it in a sealed jar in the fridge for up to 48 hours. *Bring the batter to room temperature before baking- you can place the jar of batter in a bowl of warm water to hasten this. Mix well.
How to Reheat Popovers
Popovers are best right out of the oven, but yes, they can be baked ahead, reheated in the oven, and will even get crispy again! Bake directly on the oven rack (or toaster oven) for 12-15 minutes at 375°F or until crispy.
Popover Variations (see notes)
- Cheddar Jalapeno – add a couple of tablespoons of grated cheddar to each popover. Stir in finely chopped jalapeno and chopped scallions into the batter.
- Rosemary Garlic – Blend 1-2 teaspoons granulated garlic powder into the batter, sub rosemary for thyme and add parmesan or pecorino
- Gorgonzola and Sage– Add 1-2 tablespoons crumbled gorgonzola to the middle of each popover and 1 tablespoon finely chopped sage into the batter.
- Curry Spiced– add 1 1/2 teaspoons of yellow curry powder to the batter. Use parmesan, gruyere. Sprinkle the tops with whole cumin and fennel seeds.
FAQS & TroubleShooting
If the popovers aren't baked long enough or hot enough, the exteriors won’t crisp enough to support the airy interiors. Bake until they're deeply golden brown and crisp - usually 5-10 minutes longer than you think. Every oven is different, so trust the color! If your oven runs cool, this could also be the culprit.
Even perfectly baked popovers can collapse slightly as trapped steam condenses inside. Fix: When they come out of the oven, use a small knife to pierce the side or bottom of each one to release steam. You can even pop them back in the oven for 1-2 minutes to dry out the interior.
They share the same basic batter, but Yorkshire pudding is traditionally baked in beef drippings and served with roast beef and gravy, while popovers are made with butter and can swing sweet or savory. Think of popovers as a more neutral, versatile version - perfect for breakfast with jam or alongside dinner.
Usually, this happens if the oven or popover pan isn't hot enough. Preheat both before adding the batter. Cold ingredients can also slow the steam-powered rise, so bring eggs and milk to room temperature before adding them. And resist the urge to open the oven door while baking - escaping steam will deflate them.
Yes. Use your favorite 1:1 gluten-free flour blend and a neutral oil or plant-based butter. The texture will be slightly different, but still light and hollow. (Try to avoid coconut oil - its low smoke point can cause uneven browning.)
What to Serve with Popovers
Popovers are delcious on the holiday table! I love them better than rolls because they are lighter (less filling) and easier to make.
- Enjoy with butter, honey, or whipped honey butter (my favorite). Enjoy with Pumpkin Butter, or Wild Rose Petal Jam for breakfast with a cup of coffee!
- Serve them on your Thanksgiving table alongside our Vegetarian Thanksgiving Recipes, Thanksgiving Sides, and Roasted Turkey!
- Enjoy them throughout the week as dinner rolls-they're perfect for dipping into soups and stews, like Beef Stew, Vegetable Stew, Tomato Soup, Lentil Turkey Sausage Soup, or any of our cozy vegetarian soups
More Recipes You May Enjoy
- Cherry Clafoutis
- Dutch Baby with Blueberries
- Baked Apple Pancake (Pannekoeken)
- Sourdough Biscuits
- Butternut Squash Dinner Rolls
Best Popovers (Never Fail Recipe!)
- Prep Time: 15
- Cook Time: 30
- Total Time: 45 minutes
- Yield: 6 1x
- Category: Baked, breads, dinner rolls
- Method: Baked
- Cuisine: American
- Diet: Vegetarian
Description
Whip up these golden, airy popovers in just 15 minutes with only 5 ingredients! Perfect for holiday feasts or to elevate a simple weeknight dinner, the batter can be made ahead and is gluten-free adaptable. Includes a step-by-step video! Makes 6 extra-large popovers.
Ingredients
- 3 large eggs
- 1 3/4 cups milk (or sub 3/4 cups half & half and 1 cup water)
- 1 1/4 cup AP flour spooned and leveled (or sub gf flour blend)
- 1 teaspoon salt
- 4 tablespoons melted butter, divided.
- Optional addition: 2 tablespoons fresh thyme, 1/3 cup grated parmesan (or sub pecorino, cheddar, gruyere)
Instructions
- Preheat oven to 450°F (or 425°F with convection on) with popover pan inside, on the middle rack with ample room for expansion. (Please see note for electric ovens).
- Make Batter. Place eggs, milk, flour, salt, and 2 tablespoons melted butter in a blender. Blend until smooth, scraping down sides to incorporate all of the flour. Stir in 1 tablespoon fresh thyme if using. Place the batter in a warm spot (like on the stove) so it comes to room temperature. (You could also place the blender in a bowl of warm water) while the oven gets hot, or store the batter in the fridge until ready to use, then let it come to room temperature.)
- Assemble. Pull out the hot popover pan, and place 1 teaspoon of remaining butter into each tin, brushing it up the sides to coat well. Moving quickly, stir the batter once more, then pour batter into each tin, filling each cup 2/3rds of the way up. Sprinkle with cheese if using.
- Bake. Bake for 20-25 minutes or until fully puffed and golden. Turn the heat down to 325°F (or 300°F with convection) and continue baking for 10-12 minutes. Cut a small 1/2-inch slit into the top (poke a paring knife straight in) to allow steam to escape.
- Serve. You can let them cool in the pan or serve them immediately.
Notes
All ovens are different– I find this timing works perfectly in my gas oven, producing a deeply golden, crispy popover that holds its shape after cooling. It may take one practice try to get the timing perfect for your oven.
***If you have an electric oven, when you place the popovers in the oven, lower heat to 425 F, bake 20 minutes or until fully puffed and golden, lower heat to 350F for last 10 minutes.
Make ahead. These can be made up to 48 hours ahead and stored in the fridge. Bring to room temperature before baking.
Muffin tins: You can bake these in non-stick muffin tins. Butter the sides!
Nutrition
- Serving Size:
- Calories: 233
- Sugar: 1.4 g
- Sodium: 402.5 mg
- Fat: 12.5 g
- Saturated Fat: 7.1 g
- Carbohydrates: 21.8 g
- Fiber: 0.8 g
- Protein: 8.1 g
- Cholesterol: 121.3 mg


Easy and tasty
Great to hear JJ!
Was making popovers tonight for the first time in a while, and used the recipe I’ve been using for years. Then, I remembered seeing that you had a recipe for them (your site is my most trusted, go-to, first-stop for recipes). So, I had already mixed up the other recipe, but decided to use your method/temp/timing. Holy Wow! What a difference! They were enormous, super crispy, light, flakey, and absolutely did not deflate at all! Perfect! I’m just so pleased with how they came out. Next time I will be sure to use your recipe in addition to your method. Thank you so much!!
Great to hear it worked out for you Andrea!
How many popovers does this make?
Hi Kim, it makes 6 popovers.
Hi Sylvia, thanks for this – and all your other recipes! Love the clarity of detail in your descriptions, your choice of foods and your eye for beauty. Will make the popovers!
Great Dessy! Love to hear what you think of them.
I am from the UK and was wondering if these are these a bit like a Yorkshire pudding in texture?
Thanks
Yes I think they are similar.
I’m also in UK and was wondering the same 😄
Hi Sylvia …. Love your recipes! I have made several. Making popovers again after not having made them since I was in home ec. in junior high (a few years ago!) is appealing. However I need to make a vegan version. Would using an egg substitute work?
Hi Sandy, We have not attempted a vegan popover. You’ll have to do some experimenting and let us know how they turn out.😊
I’ve been making these for years. For those who have smaller kitchens/less space, my tip is ramekins. I just use ramekins instead of owning a separate thing, and place them on a cookie sheet. Crowd pleasing, always!
What a great tip Stephanie- thanks and glad you are enjoying!