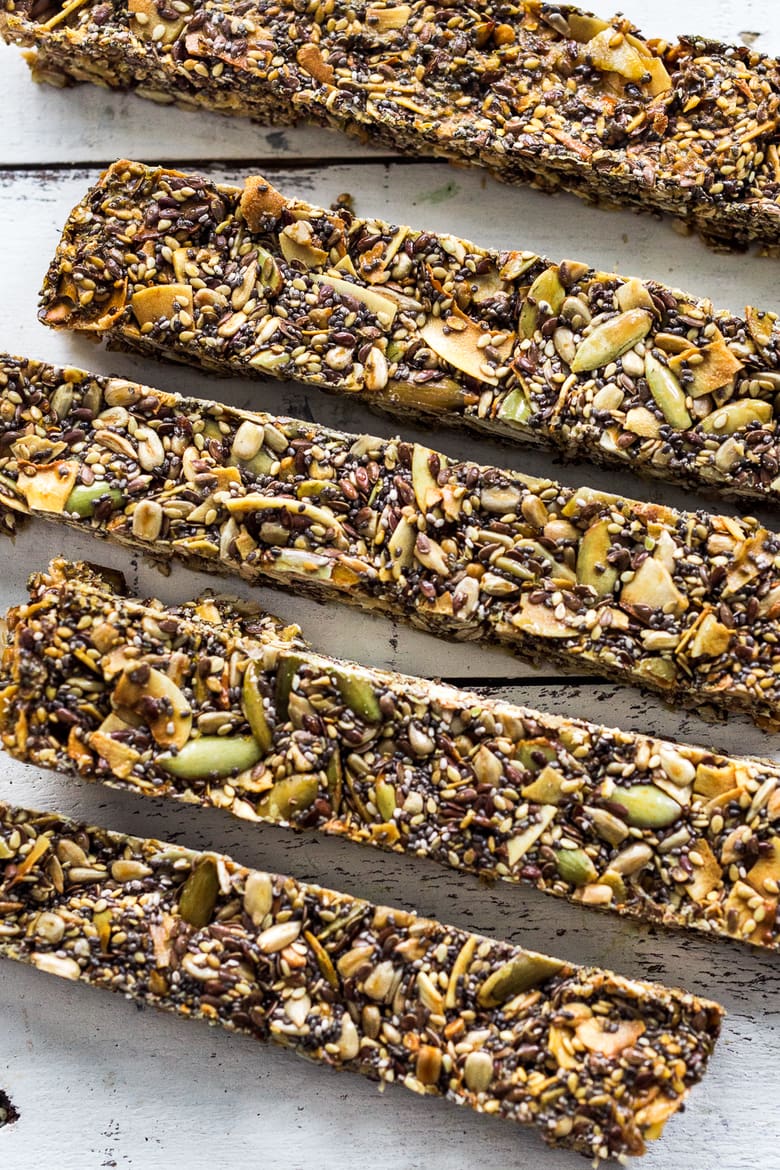
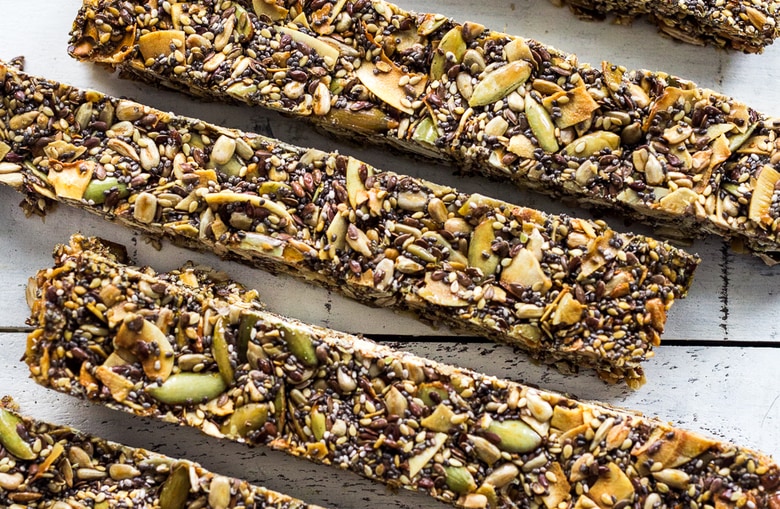
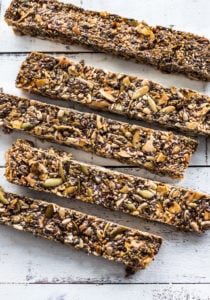
These gluten-free granola bars, aka Seed Bars, are easy and delicious! They are nut-free, oil- free and grain-free made with seeds and coconut- super crunchy, energizing, and satisfying.
These gluten-free granola bars require only 5-10 minutes of hands-on time before baking in the oven. High in protein and fiber, these nutritious bars make for a simple breakfast on the go or an energy-boosting midday snack!
Because they are full of little scrubbing seeds they do a great job of keeping your digestive system healthy!
What I personally love about them is how convenient they are as a “grab and go” snack- keeping me feeling energized and fueled whether I’m running errands, hiking or cross-country skiing. Easily transportable, I keep a little zip-lock bag tucked away in the glove compartment of my car for hunger emergencies. Pretty handy.
Gluten-Free Granola Bars Video
Why You’ll Love This!
- Diet-friendly. Nut-free, oil-free, paleo, dairy-free, gluten-free, and vegan adaptable!
- Super energizing. Perfect for on-the-go when you need a boost!
- Quick and easy. Only 5 minutes of hands-on time.
- So nutritious. Full of so many healthy ingredients that support a strong digestive system.
- High in protein. Perfect for a mid-day crash or post-workout.
Gluten-Free Granola Bar Ingredients
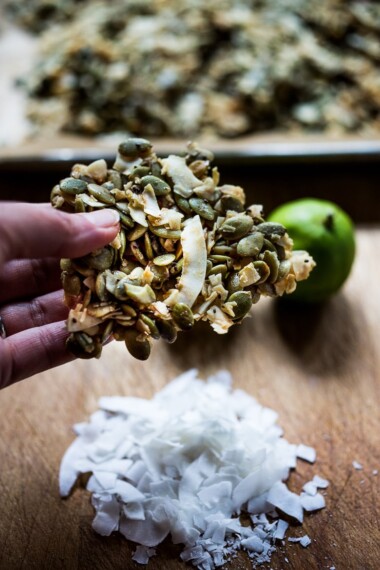
- Super seeds: raw pumpkin seeds, sunflower seeds, chia seeds, sesame seeds, flax seeds (or hemp seeds)
- Large flaked coconut: unsweetened
- Salt
- Vanilla extract
- Honey: Or brown rice syrup or maple syrup. If you can have honey, it is ideal for flavor and binding!
How to Make Grain-Free Granola Bars
- Preheat oven to 300 degrees F.
- Mix the seeds, coconut flakes, and salt together in a medium or large bowl. Stir in vanilla and warm honey.
- Place a piece of parchment in an 8 x 8 baking dish. Spray lightly with oil.
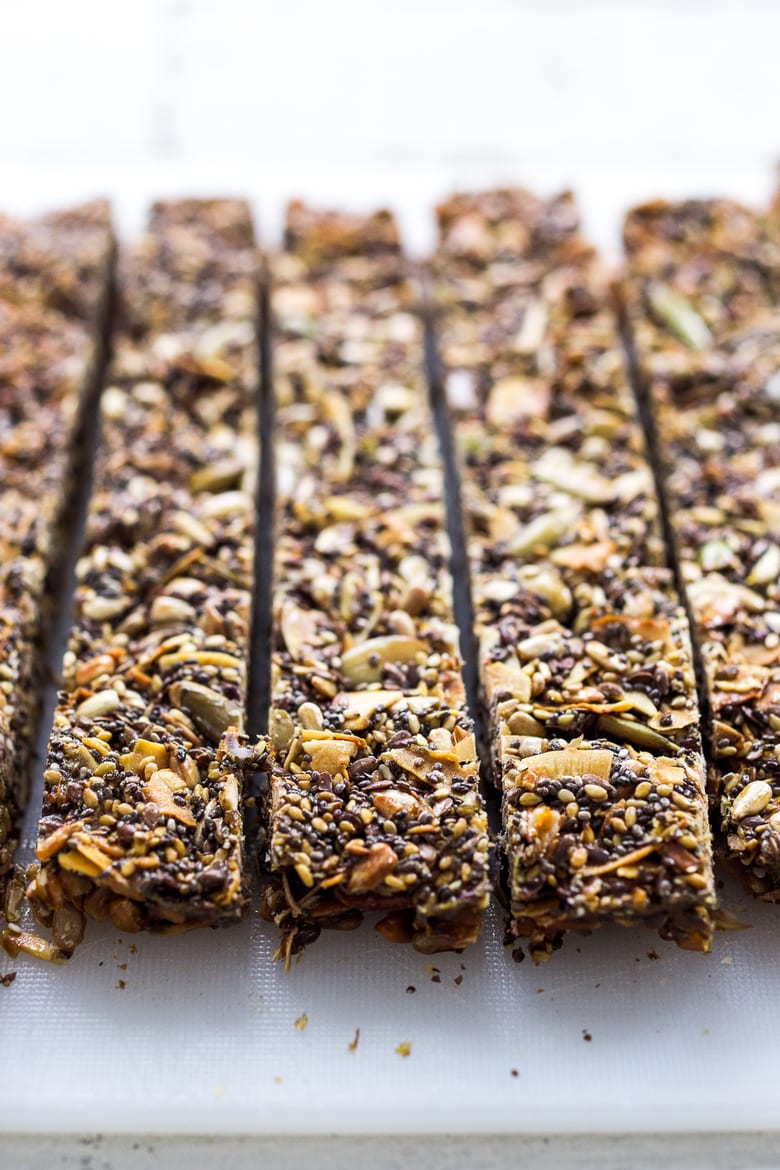
- Pour seed mix into a lightly greased, parchment-lined pan, and using a wet metal spatula, spread it out, into corners and edges and press down firmly until you have a compacted, smooth surface.
- Place on the middle rack in the oven, check at 25 mins, rotate if need be, and continue baking. For a chewy consistency, take them out at 40-45 minutes, for a crispy crunchy consistency, let it cook the full 50 -55 minutes. Remember, all ovens are different! Start watching at 35 min and remove when golden.
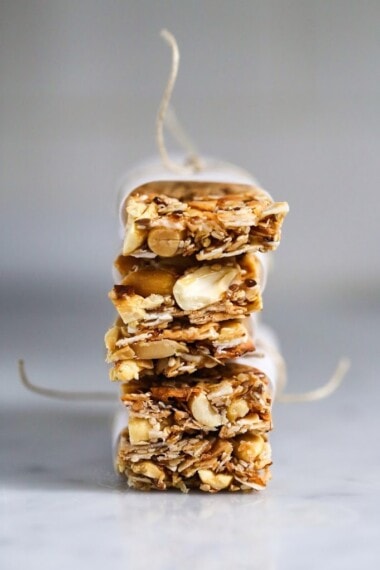
- Remove from oven, and cool completely. You could place it in the fridge to cool faster. When it’s completely cooled, take the parchment out of the pan, turn it over, and remove the parchment. Flip back over and cut into desired shapes or bars. Store at room temp.
FAQs
Wrap lightly in parchment and leave on the counter. Wrapping too tightly or placing in the fridge can cause them to soften.
Made with superfood seeds, these bars are high in protein and fiber and packed with health-boosting nutrients, vitamins and minerals! Many of the seeds are a great source of healthy fats too.
Use brown rice syrup or maple syrup with a tablespoon of ground flax. They may turn out slightly more crumbly. But still delicious!
Place the jar of honey in a bowl or small saucepan of hot water.
These bars are made up entirely of nutritious seeds (and coconut flakes), whereas granola bars are usually made with oats (and nuts or chocolate chips).
STORAGE
Leave your Seed Bars out on the counter wrapped in parchment, and they should stay crisp. The energy bars keep for up to 10 days!
We are on our third batch this month. I just make the Seed Bars and leave them out on the counter in the kitchen for easy snacking. They magically disappear!
Also, leaving them out, uncovered also keeps them nice and crisp.
Tell me what you think … I hope you love these Seed Bars as much as we do.
xoxo
More recipes you may like!

Gluten Free Granola Bars (Seed Bars)
- Prep Time: 5
- Cook Time: 55
- Total Time: 1 hour
- Yield: 10 1x
- Category: snack, breakfast
- Method: baked
- Cuisine: American
- Diet: Vegan
Description
These gluten-free granola bars, aka Seed Bars, are easy and delicious! They are nut-free, oil-free, and grain-free, made with seeds and coconut. They are super crunchy, energizing, and satisfying.
Ingredients
- 1/2 cup pumpkin seeds ( raw)
- 1/2 cup sunflower seeds ( raw)
- 1 heaping cup large flaked coconut (unsweetened)
- 1/4 cup sesame seeds
- 1/4 cup chia seeds
- 1/4 cup flax seeds ( or sub hemp seeds )
- generous pinch salt
- 1 teaspoon vanilla
- 1/2 cup honey ( warmed for easier mixing- heat jar in a hot water bath) or brown rice syrup or maple syrup– see notes
Instructions
- Preheat oven to 300F
- Mix the seeds, coconut flakes, and salt together in a medium bowl. Stir in vanilla and warm honey, until uniformly combined.
- Place a piece of parchment in an 8 x 8 baking pan ( all the way up the sides too). Spray lightly with oil.
- Pour seed mix into a lightly greased, parchment-lined pan, and using a wet metal spatula, spread it out, into corners and edges and press down firmly until you have a compacted, smooth surface at a uniform depth.
- Place on the middle rack in the oven, check at 25 mins, rotate if need be, and continue baking. For a chewy consistency, take them out at 40-45 minutes, for a crispy crunchy consistency, let it cook the full 50 -55 minutes. Keep in mind, all ovens are different, so heat may vary. The key is….You want to take them out when they are perfectly golden, before they get too dark. So watch them like a hawk after 35-40 minutes. If you take them out too early (before they are golden) they can too sticky. Pay attention to the color. For example, I’ve cooked these in two different ovens. In the gas oven, 50-55 minutes delivered perfectly golden bars. In the electric oven, 40 minutes were enough for perfectly golden. 55 minutes would have totally burnt them.
- Remove from oven, and cool completely. You could place it in the fridge to cool faster. When it’s completely cooled, take the parchment out of the pan, turn it over, and remove the parchment. Flip back over and cut into desired shapes or bars. Store at room temp.
Notes
To keep them crisp, wrap very lightly in parchment. Sealing them too tightly may cause them to get soft. I usually just leave them on a plate uncovered on the counter. Keeps up to 10 days.
You can easily make this vegan by substituting brown rice syrup, or maple syrup and 1 tablespoon ground flax. They may be slightly more crumbly, but not too bad!
Do NOT use sugar-free syrup- it will NOT work here. Honey or, brown rice syrup or real maple syrup!
If you don’t have an 8×8 pan, you could make a “crackle” on a sheet pan. Basically place the mixture on a parchment-lined sheet pan, pressing down hard with a spatula, into an 8-10-inch round. It will spread out and become thin in the oven. Check at 35-40 minutes and pull it out when it is deeply golden. Let it cool completely. Break apart into sections.
Nutrition
- Serving Size: 1/10th of the recipe
- Calories: 222
- Sugar: 14.5 g
- Sodium: 34.4 mg
- Fat: 14.9 g
- Saturated Fat: 5 g
- Carbohydrates: 20.8 g
- Fiber: 4.5 g
- Protein: 5.3 g
- Cholesterol: 0 mg
I resisted, and resisted and finally gave in to making these last night.
I had a mixture of toasted sesame seeds and pumpkin seeds that I use in my bread making, chia and flaxseed, and I’m so glad that I found some coconut flakes. Hadn’t any sunflower seeds, or honey, but hey used agave syrup instead. You’ll never know if you don’t give it a go!
They tasted so good – ate a couple last night and will try my best to have just the one for breakfast this morning.
How on earth do you know that they’ll last up to ten days out on the counter? There’s only me will be eating them and if there’s a single one left by tomorrow I will be utterly amazed!!
Thanks for the recipe XX
Ahaha! Happy you are enjoying and glad these worked with agave!
Great recipe!
Have been making it on a regular basis.
I noticed that the bottom side is usually pretty sticky so once it is completely cooled, I melt some dark chocolate with a tiny bit of coconut oil and drape it over the sticky side, let it cool down until the chocolate is hard again or I put it in the fridge if I don’t have time. I cut it once it is all set.
It’s so perfect!
Love this Peggy!
Love these. Great and healthy
Hello! This recipe looks amazing, but I am wanting to add some puffed rice in, without taking away from any of the other ingredients. Could you suggest an amount of puffed rice as well as a suggestion for how much more honey/maple syrup would be needed?
Hi Gencie, I think that should work, although the puffed rice may not stay crispy. It tends to soften up.I would just add enough honey that is all just lightly coated.
The bars are delicious, but I’m having the same problem with a sticky bottom as many of the others stated. I baked them for 45 min. at 300 degrees in an electric oven, then noticed the video says 325 degrees for 50 minutes. I’m concerned if I do 325 degrees at 50 minutes, they will burn because they were golden on the bottom and the top when I baked them at a lesser temperature and time. I followed the directions exactly including the ingredients. I love the taste and would like to make them work. Any more suggestions?
I would just let them bake at 300F a little longer.( Or try 325. for shorter time). They do get really really deeply golden- but have the best texture overall that way. Maybe lightly tent with foil?
These are fantastic!
Tastes like candy.
I made with equal parts honey and maple syrup.
Will make another batch and bake at less time to compare chewy vs crunchy.
Thank you for a great recipe!
Thanks Roberta- gald you liked them!
So great to hear this Roberta! Let us know your findings. 🙂
Would the recipe still work without using coconut? Or perhaps a good substitute?
Yes, just add more of everything else!
Hi, I like your recipe and would like to try it to make health nut-free snacks.
As good quality honey is expensive in the long run, I would like to use normal cane sugar; is that possible? How much sugar would I need?
Also, could I substitute chia seeds for buckwheat?
Many thanks
I’m not sure Colette- I have only made this with honey. You may have to do a few smaller test runs using a thick simple syrup? I am also not sure about the buckwheat- but the recipe is meant to be played with – so try it!
Sorry about that, the coconut goes in with the seeds. The recipe is adjusted now.
I don’t have an 8×8 pan, would Pyrex work?
Yes, should work fine!
Have you made these with 1/4 cup honey and 1/4 cup unsulphered molasses, combined to make the 1/2 cup binder? Just curious if it might work.
Hey Tela- I have not. I feel like the Molasses may overpower; personally, I’d use less, but of course, do what you like!
If I use roasted sunflower and pumpkin seeds instead of raw will it taste burnt? That’s what I have on hand.
You know Trish, good question! I haven’t tried. It might, but if that is all you have, I would probably give it a go? Just be careful not to overbake.
Baked till golden brown, raw underneath once it cooled. Put back in oven upsidedown, still raw in the middle. Waste of time and ingredients.
Sorry about that, Kerry, shat sweetener did you use?
This didn’t work for me. It was so sticky and I couldn’t get the parchment paper off of it I ended up having to throw half of it away
Oh shoot Kristin- sorry.Is it possible you used waxed paper instead of parchment? just curious…
This slice is DELICIOUS and Nutritious. I don’t feel bad when I have a piece with my coffee.
Great recipe….Thanks
Great to hear Cobie!
Awesome – just what I was looking for! Thank you.
Great!:)
Hello Sylvia!
What a lovely snack recipe. I’m allergic to sesame seeds (so sad), which seed would you increase to replace the sesame seeds in this recipe?
Thank you!
I would use more chia and flax!
Could you drizzle dark chocolate on this? If so, how and at what stage would you do this? Thank you!
Hi Jen, yes absolutely. Melt dark chocolate, thin and whisk with a little half and half, drizzle with a fork over cooled Bars.
just made the Seed Bars…..deeeelicious. I didn’t have any sesame seeds so I doubled the hemp and I used honey. so good.
So glad you enjoyed it!
Love these seed bars! Thank you for such a great recipe!
Glad you enjoyed Ginny!
Yummy! Followed recipe using hemp seeds and they are just delicious. Love the tip for leaving out on the counter as I think they just get better, though they are not lasting very long! Thank you for another amazing and simple recipe.
Thanks Joan. So happy you enjoyed!
Hi Sylvia,
These sound delish!
Is there a substitute for the sweetener that would be more Keto friendly? It need not be sweet. Thanks very much, pj
Sorry PJ, I don’t know of one- this is what holds the bar together.
I have added a couple of eggs to bars before — that would help hold them together!